
With many productions now favoring IEMs for the benefits of lower stage volume and a CD-like stereo monitoring experience for the performers, it’s still important to understand the fundamentals of microphones and old fashioned floor monitors. In this article, we’ll learn about monitor wedge coverage angles, microphone polar patterns, and how you should take these into consideration for microphone and monitor positioning. With this, we’ll learn how the equipment you have on the gig may require small tweaks and modifications to your stage plot in order to maximize your results. Understanding the coverage angles within your monitor setup and your microphone’s polar patterns is imperative to ensuring a high-gain-before-feedback experience for the performers on stage, can help drastically reduce excessive stage volume, and help prevent an environment susceptible to microphone feedback.
What is a wedge? Many pro audio manufacturers make specialized wedge-shaped speaker boxes that are designed to aim the microphone source back at the performer, and are often referred to as “monitors”, “wedges”, or “foldback speakers”. They come in all different varieties of sizes, coverage patterns, self powered and conventionally powered – If possible, you’ll want to choose a wedge that works well for the space you are working with and also the types of performers you are most likely to encounter.
Monitor coverage angles are typically published in the user manual and/or tech sheet, and will give you an idea of the “sweet spot” you can expect while standing near the monitor. Every model is going to have different specs, with some favoring a tighter coverage pattern, and others with a more broad, wider throw. Depending on the situation and the number of performers who are sharing the monitor, you may have to optimize your stage plot for the most consistent and manageable coverage for the performers. In an ideal world, each performer has their own wedge with a tight, well targeted dispersion, but that is not always the case– especially in situations with larger ensembles like worship bands.
Meyer’s MJF series of stage monitors are an excellent example of a highly focused, high volume wedge-shaped speaker box designed to give an accurate monitor mix to the performer. The MJF-210s have been a choice monitoring solution for high profile artists like Metallica for the better part of the last decade, and for good reason! Their little brother, the MJF-208, comes with a slightly wider coverage in a smaller package. Both of these are excellent low-profile monitoring options for most live productions. We have many MJF series monitors to choose from in our rental pool here at TC Furlong Inc. (including the recently discontinued big brother, the MJF-212A)
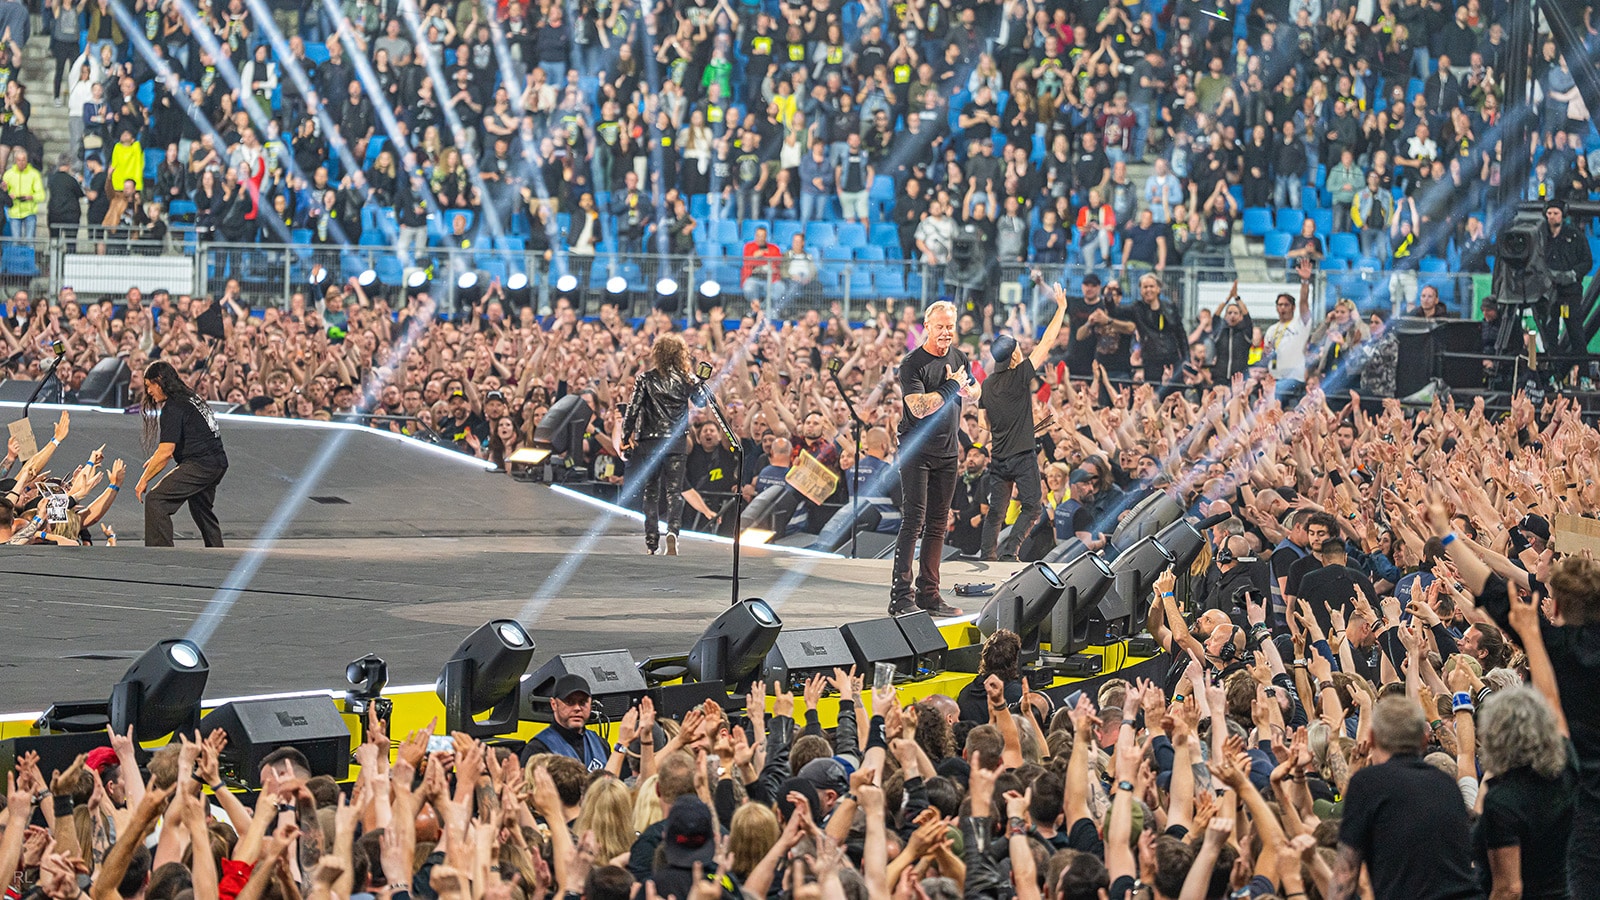
Photo credit: Ralph Larmann, via meyersound.com
While it’s not uncommon to have to manually “ring out” a wedge mix by using a hefty amount of subtractive EQ, feedback prevention starts with a good stage setup and understanding a little bit about how the equipment you are using may interact with one another in a loud environment, like a small stage with a rock band. This brings us to the next half of the equation: understanding microphone polar patterns and how they will interact with your monitor coverage angles.
For most live performance sound reinforcement productions, the most common directional microphone polar patterns you will find in use are cardioid, supercardioid, and hypercardioid. All part of the same family of directional microphones, cardioids are built to capture sound coming from the front of the microphone only, and thus rejecting sounds coming from the rear of the microphone. This makes them an excellent choice for reinforcement applications where the source will need to be routed back on stage for the performers to hear through a dedicated monitor speaker. In some cases, other polar patterns may be desired, but for today’s article we will focus on cardioid directional microphones as opposed to other common polar pattern options like omnidirectional or figure 8.
Generally speaking, cardioid microphones, like the time-favored classic Shure SM58, will have the best gain before feedback ratio when being placed with the rear of the microphone (the pointy end) aimed at the monitor speaker. This, along with its uncanny robustness, is one of the many reasons why the Shure SM58 is cherished amongst live audio professionals all around the world, and is considered by many to be a must-have piece of audio gear.
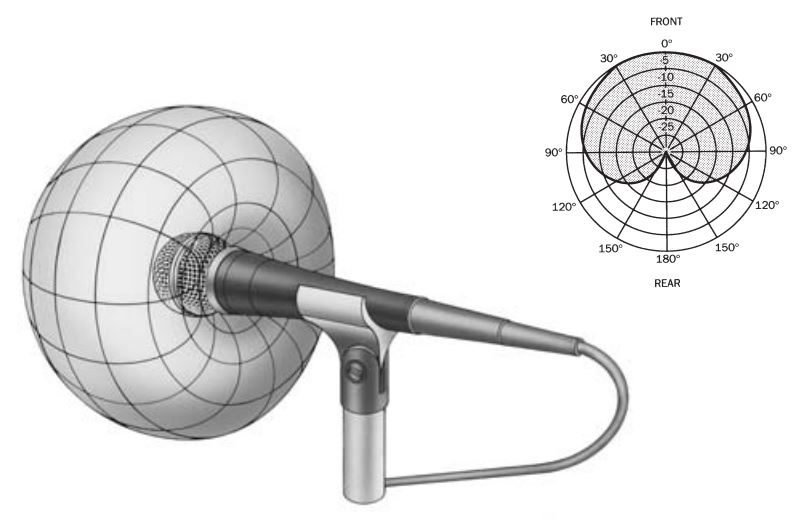
With the SM58’s directional cardioid polar pattern, it works very well when staged properly in front of a monitor speaker, and is often an engineer’s first choice for most live vocal applications. When placing your speakers, it’s also important to note that your main PA speakers (aimed towards the audience) should be well ahead of the front plane of your stage/performance area, in order to further reduce the chances of feedback, as seen in the left side of the diagram below.
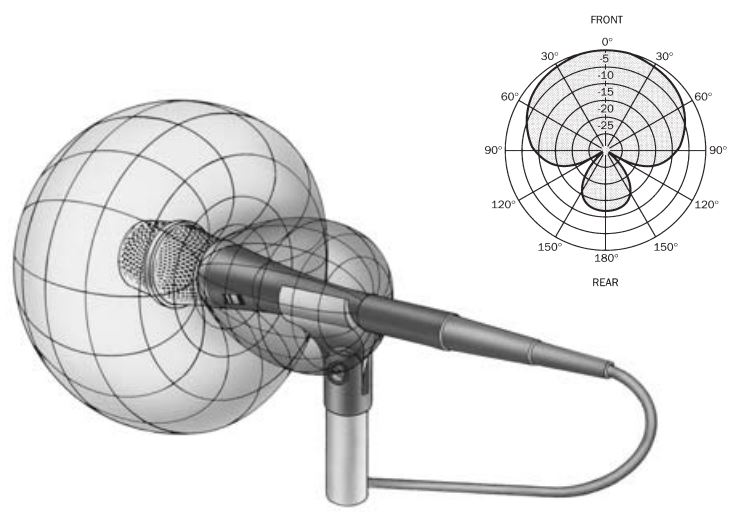
Hypercardioid and supercardioid microphones, like the Shure Beta87A, have a similar-looking front pickup pattern when compared to their more-tame standard cardioid counterpart, but both hyper and supercardioid microphones have an 180° off-axis lobe directly behind the capsule. These types of microphones will have the best results with a slightly off-set monitor angle coming from one or both of the sides (approx. 120° off-axis), rather than directly from the rear like a standard cardioid. They also are more focused in their on-axis pickup pattern than a standard cardioid, further rejecting unwanted sound coming from the sides of the capsule. Supercardioids are a good choice when you have many sources on stage that may be bleeding into the microphone, but they require the artist to have consistent mic technique to maximize those benefits, due to the narrower pickup pattern.
Stage volume is often a big reason why many worship bands and rock ensembles choose to switch to IEMs. In the worship world, it’s also common to see the deployment of bleed-reducing tools like drum shields, guitar amplifier isolation cabinets, or stand mounted trumpet shields to help reduce excessive stage bleed, even with a full band already on IEMs. An often overlooked solution to excessive stage bleed is to ensure your stage plot and monitor coverage is ideal for the performance area– If the performers keep asking for “more me”, giving them more of their microphone in the monitor mix can only go so far before you run into trouble.
Firstly, you’ll want to ensure the performers are within the throw of the monitor, usually at least 4-6 feet away from the wedge, with the horn of the speaker pointed upwards, relatively at head height. Secondly, you’ll want to be sure to only include the channels that are absolutely necessary for the performer to do their job effectively. This will vary due to each individual’s personal preferences, but as a general rule you should not be sending every channel on your board to an artist’s monitor mix. Some performers may ask for quite a few things in their wedge, and in those cases it’s a good idea to ask what the three priority instruments are, and go from there. You can always sprinkle in a little bit of everything else requested, but the goal is to keep the monitor sends as clear as possible, with little crowding or masking of instruments within the same frequency range. Instruments with a lot of low end information will also take up a lot of headroom, so you will want to add in these types of elements sparingly. It’s common to see a ground-stacked subwoofer and top next to the drums for this exact reason, as drummers typically like to feel the kick and bass strongly while performing.
With this knowledge and guidance, we hope to help you achieve many feedback-free shows in your professional audio career. This is, of course, all just a general guideline, since it’s likely you’ll have many artists who will handle the mic by taking it off the stand during the show. In such cases, if you believe your artist may be traversing the stage excessively during their performance, it would be best to include a quick walkaround with the live microphone during soundcheck. Optional hardware like the Rupert Neve Designs 5045 Primary Source Enhancer can give you up to 20db gain-before-feedback without major coloration to your source, and the 5045 is used quite often here at TC Furlong Inc. for one of our large-scale collegiate sporting events, where historically feedback from the microphones on the playing field was a major issue for our client.
Choosing the right monitor and microphone combinations for your stage and production is key to delivering a top notch experience for not only the audience, but the performers as well. Interested in purchasing for yourself? Check out our line card of over professional audio 100 manufacturers. Our sales team is ready to help and can be reached at sales@tcfurlong.com or by phone 847-367-9588. Contact us today for a quote!
Not ready to purchase? Want to take some mics and wedges for a spin? Send a message to our rental team at rentals@tcfurlong.com or call our office at 847-367-9588 and our experienced team of audio technicians will help ensure your next event is a success!