MAPP 3D is latest evolution of Meyer Sound’s Multi Acoustic Prediction Program that launched over 20 years. The newest edition of the free loudspeaker system design and prediction tool adds 3D modeling and prediction to the already powerful legacy of design tools. We gave an introduction to the software in a previous blog, but we wanted to share some of our favorite tips and features to improve workflow.
Our project managers and sales engineers regularly use the proven and essential tools in MAPP 3D as part of our “Better Audio by Design” philosophy of creating custom tailored solutions for every project. Whether deciding the necessary height and down-angle for point-source speakers in small ballrooms, or complex outdoor multi-zone systems, the tools in MAPP 3D are scalable for any design.
One major advantage of the MAPP 3D workflow is the availability of all of the necessary design tools on a single screen. The Model View tab gives you quick access to several virtual camera angles, and the Object and Processor settings are just a click away to modify loudspeakers, microphones, and other objects in your design. Lastly, the Measurement View displays broadband response and maximum acoustic output, including transfer functions based on room and processing interactions.
Here are some of our tips to get the most out of your MAPP 3D user experience.
1) Import your drawings
While MAPP 3D includes a pallet of tools to create three dimensional drawings, it also has the ability to import existing 3D drawings into the software, allowing significant time and cost savings for building complex venues within the software. MAPP 3D supports the importing 2D and 3D AutoCAD (DXF) and 3D Sketchup (SKP) files. While importing SKP files is fairly straightforward, Meyer Sound does have some suggestions for preparing DXF files before importing (read more about them here).
Once in MAPP 3D, users can turn layers on and off from your imported venue. At this point, prediction planes will still need to be assigned, but tools like “snapping” allow for easy addition of prediction plane geometry directly to the imported files.
A bonus tip is to always verify the scale of the model after it has been imported by using the Distance Tape Measure tool. Accuracy of the venue model is essential when designing a sound system for a given space.
2) Download updated speaker data
Meyer Sound has worked to meticulously catalog their loudspeaker data, and each 3D loudspeaker performance is based on more than 65,000 three-dimensional measurement points taken in 1/48th octave resolution in Meyer’s own anechoic chamber in Berkeley, California. All of that data is available for download through the HELP > CHECK FOR UPDATES menu.

It is worth noting that the initial installation of the MAPP 3D software only includes a limited pool of loudspeakers to add to a design, and this is the menu where users will choose additional speakers to download to your computer. Meyer Sound has continued to update the available loudspeaker data, including support for legacy models and additional array configurations for select point source boxes.
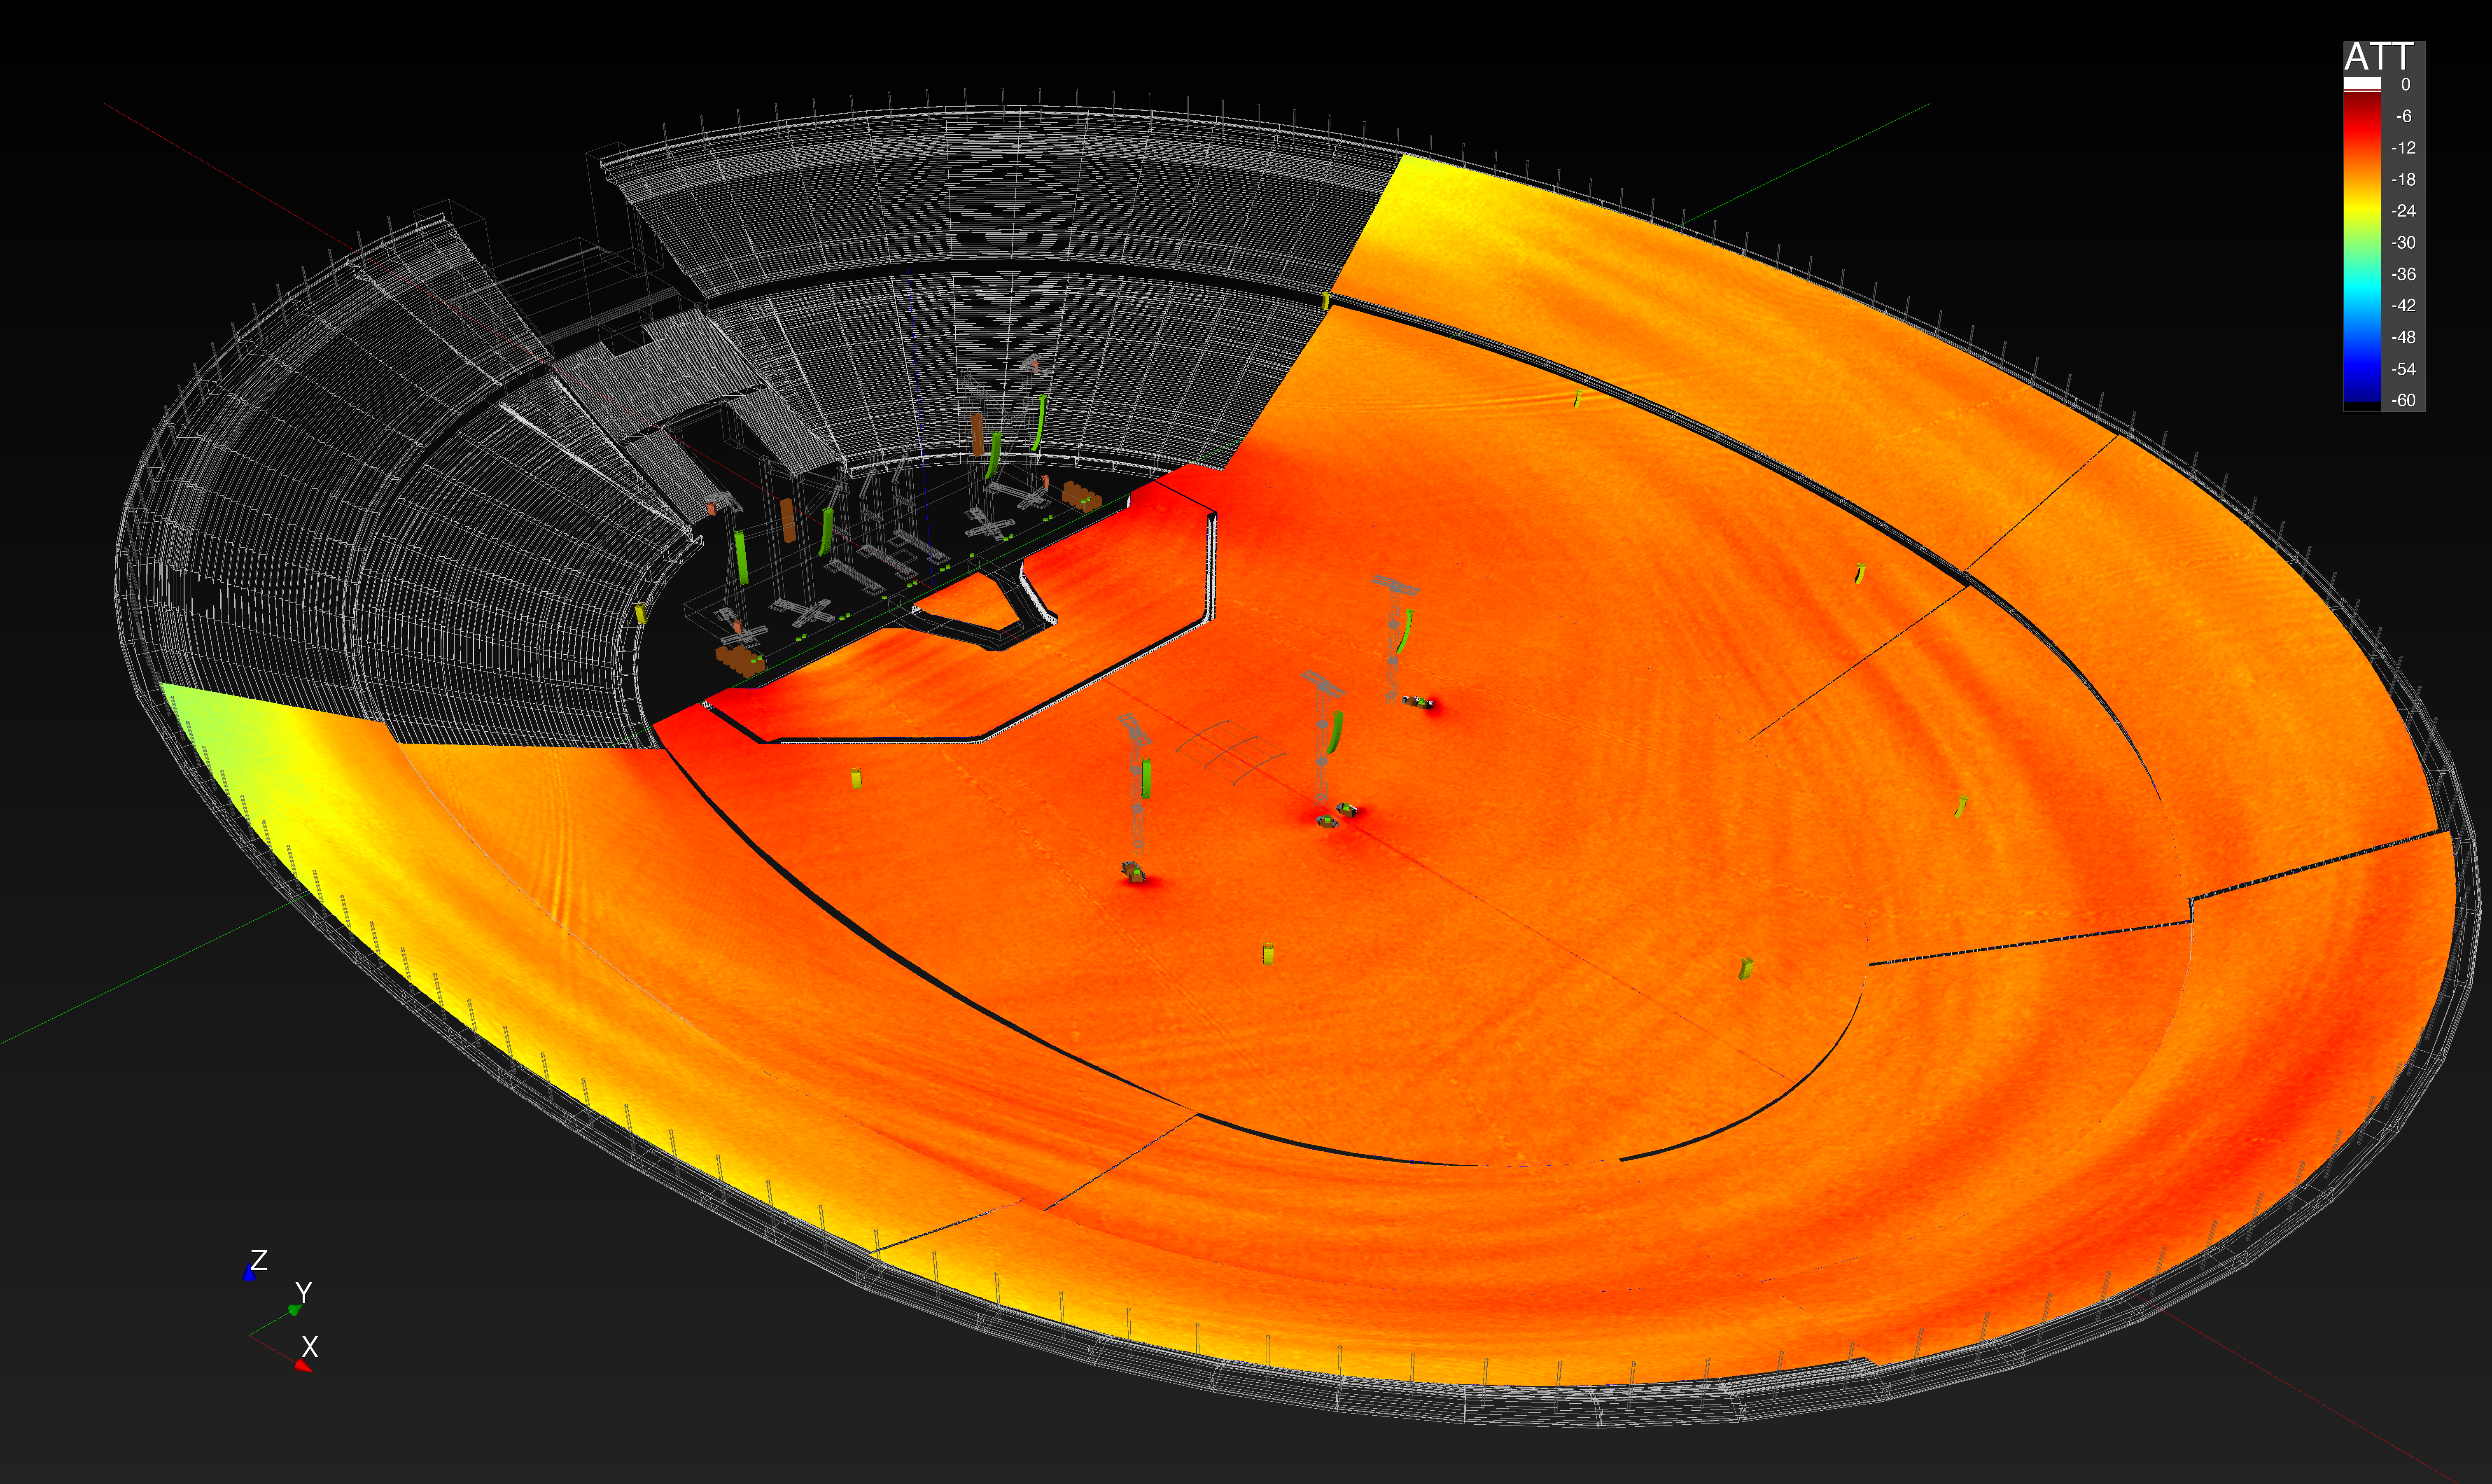
3) Take full advantage of the Measurement View
While viewing 3D pressure plots of prediction planes can give some general information of coverage, including hot and dark zones of a loudspeaker system design, MAPP 3D’s Measurement View lets users dive much deeper. After placing virtual “microphones” within the venue, users can evaluate broadband response and maximum acoustic output in this tab. Pioneered by Meyer Sound, SIM (Source Independent Measurement) is a technique for real-time acoustical analysis, and this virtual SIM system is built right into the MAPP 3D to help users optimize processor settings during the design phase.
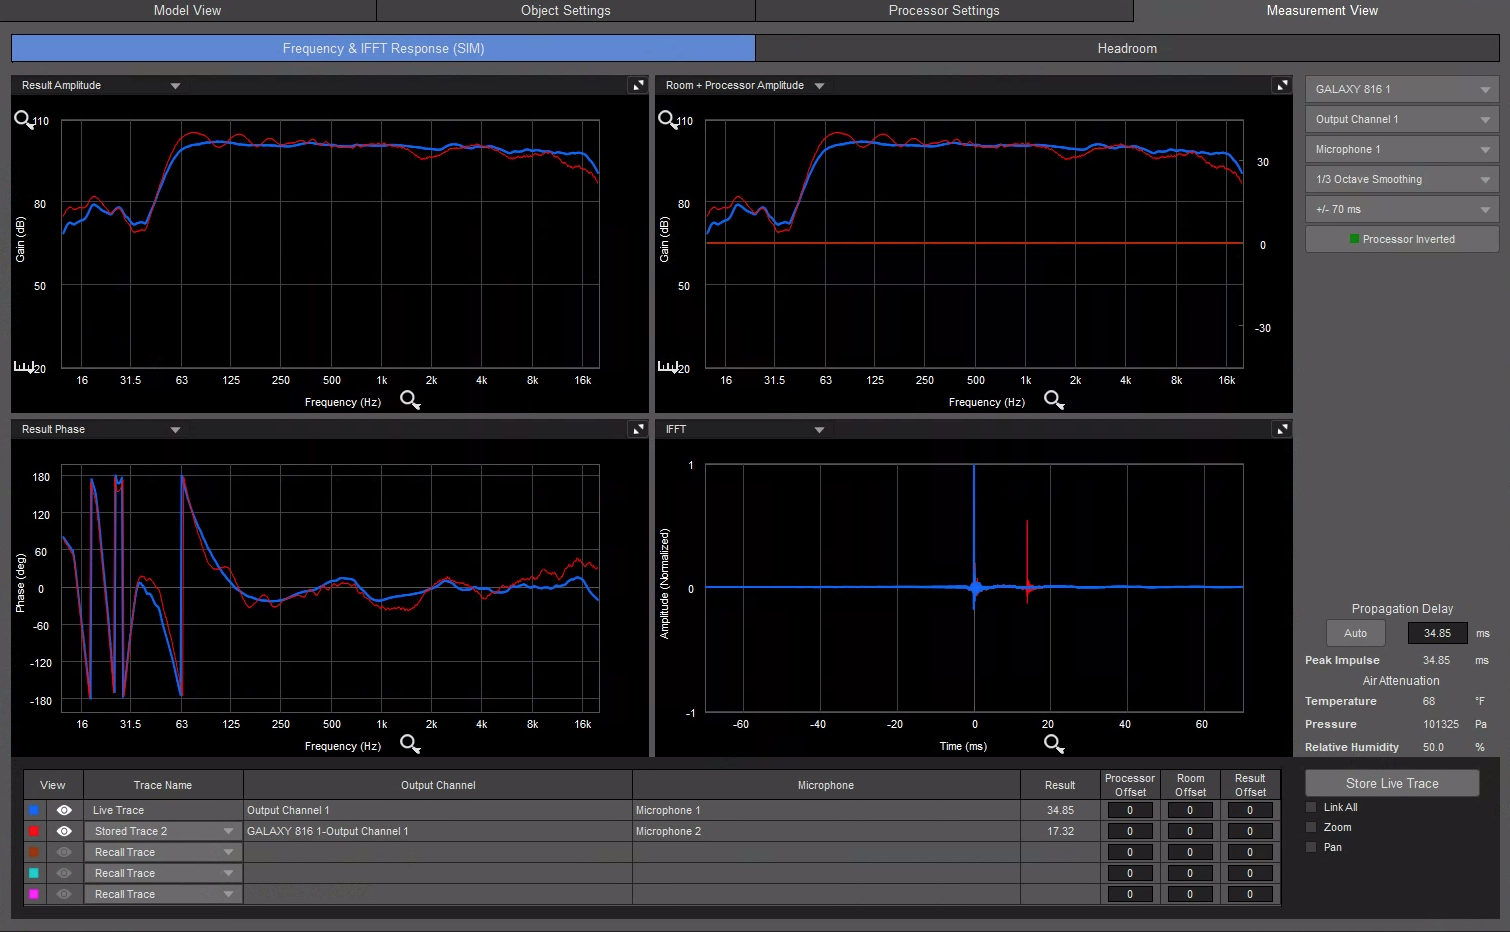
The default view displays four charts and includes transfer functions for four measurements: result amplitude (between processor input and microphone), result phase (between processor input and microphone), room and processor amplitude (between the processor input and microphone and between processor output and microphone displaced on the same plot), and the IFFT (signal generator and microphone difference).

Additionally, the Headroom tab gives a peek into SPL predictions at each microphone location and the available headroom predictions for individual loudspeakers. This helps designers avoid over-designing systems and can lead to greater cost efficiencies.
4) Sync your GALAXY device
Meyer Sound’s series of Galileo GALAXY networked audio processors provide precision control of loudspeaker management parameters including EQ, delay, and matrix mixing. MAPP 3D now offers full workflow integration with GALAXY system processors, enabling users to load resultant EQ and filter settings derived from predictions directly into multiple GALAXY processors.
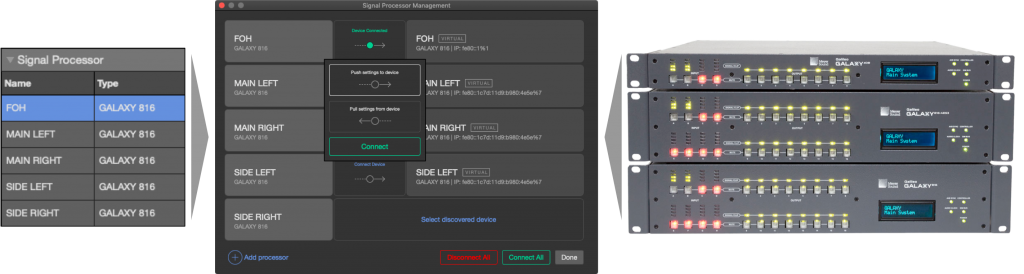
Once the software and processors are synced, settings can be pushed in either direction. This means users can tie predictions and system tuning together in the same workflow, simplifying the need for additional software. Paired with the ability to make virtual SIM predictions, much of the loudspeaker optimization can be handled offline.
Conclusion
MAPP 3D is a great tool for all levels of loudspeaker system design. If you would like to learn more, join us for our MAPP 3D Webinar on Tuesday, March 30th (sign-up here). Meyer Sound also has a great resource of help topics available at mapp-3d-help.meyersound.com/
Our loudspeaker system Design & Alignment team have decades of experience and can help design the perfect loudspeaker system for your next rental, live event, or permanent installation. Email align-design@tcfurlong.com today with questions.