Education

With many productions now favoring IEMs for the benefits of lower stage volume and a CD-like stereo monitoring experience for the performers, it’s still important to understand the fundamentals of microphones and old fashioned floor monitors. In this article, we’ll learn about monitor wedge coverage angles, microphone polar patterns, and how you should take these into consideration for microphone and monitor positioning. With this, we’ll learn how the equipment you have on the gig may require small tweaks and modifications to your stage plot in order to maximize your results. Understanding the coverage angles within your monitor setup and your microphone’s polar patterns is imperative to ensuring a high-gain-before-feedback experience for the performers on stage, can help drastically reduce excessive stage volume, and help prevent an environment susceptible to microphone feedback.

What is a wedge? Many pro audio manufacturers make specialized wedge-shaped speaker boxes that are designed to aim the microphone source back at the performer, and are often referred to as “monitors”, “wedges”, or “foldback speakers”. They come in all different varieties of sizes, coverage patterns, self powered and conventionally powered – If possible, you’ll want to choose a wedge that works well for the space you are working with and also the types of performers you are most likely to encounter.

Monitor coverage angles are typically published in the user manual and/or tech sheet, and will give you an idea of the “sweet spot” you can expect while standing near the monitor. Every model is going to have different specs, with some favoring a tighter coverage pattern, and others with a more broad, wider throw. Depending on the situation and the number of performers who are sharing the monitor, you may have to optimize your stage plot for the most consistent and manageable coverage for the performers. In an ideal world, each performer has their own wedge with a tight, well targeted dispersion, but that is not always the case– especially in situations with larger ensembles like worship bands.

Meyer’s MJF series of stage monitors are an excellent example of a highly focused, high volume wedge-shaped speaker box designed to give an accurate monitor mix to the performer. The MJF-210s have been a choice monitoring solution for high profile artists like Metallica for the better part of the last decade, and for good reason! Their little brother, the MJF-208, comes with a slightly wider coverage in a smaller package. Both of these are excellent low-profile monitoring options for most live productions. We have many MJF series monitors to choose from in our rental pool here at TC Furlong Inc. (including the recently discontinued big brother, the MJF-212A)
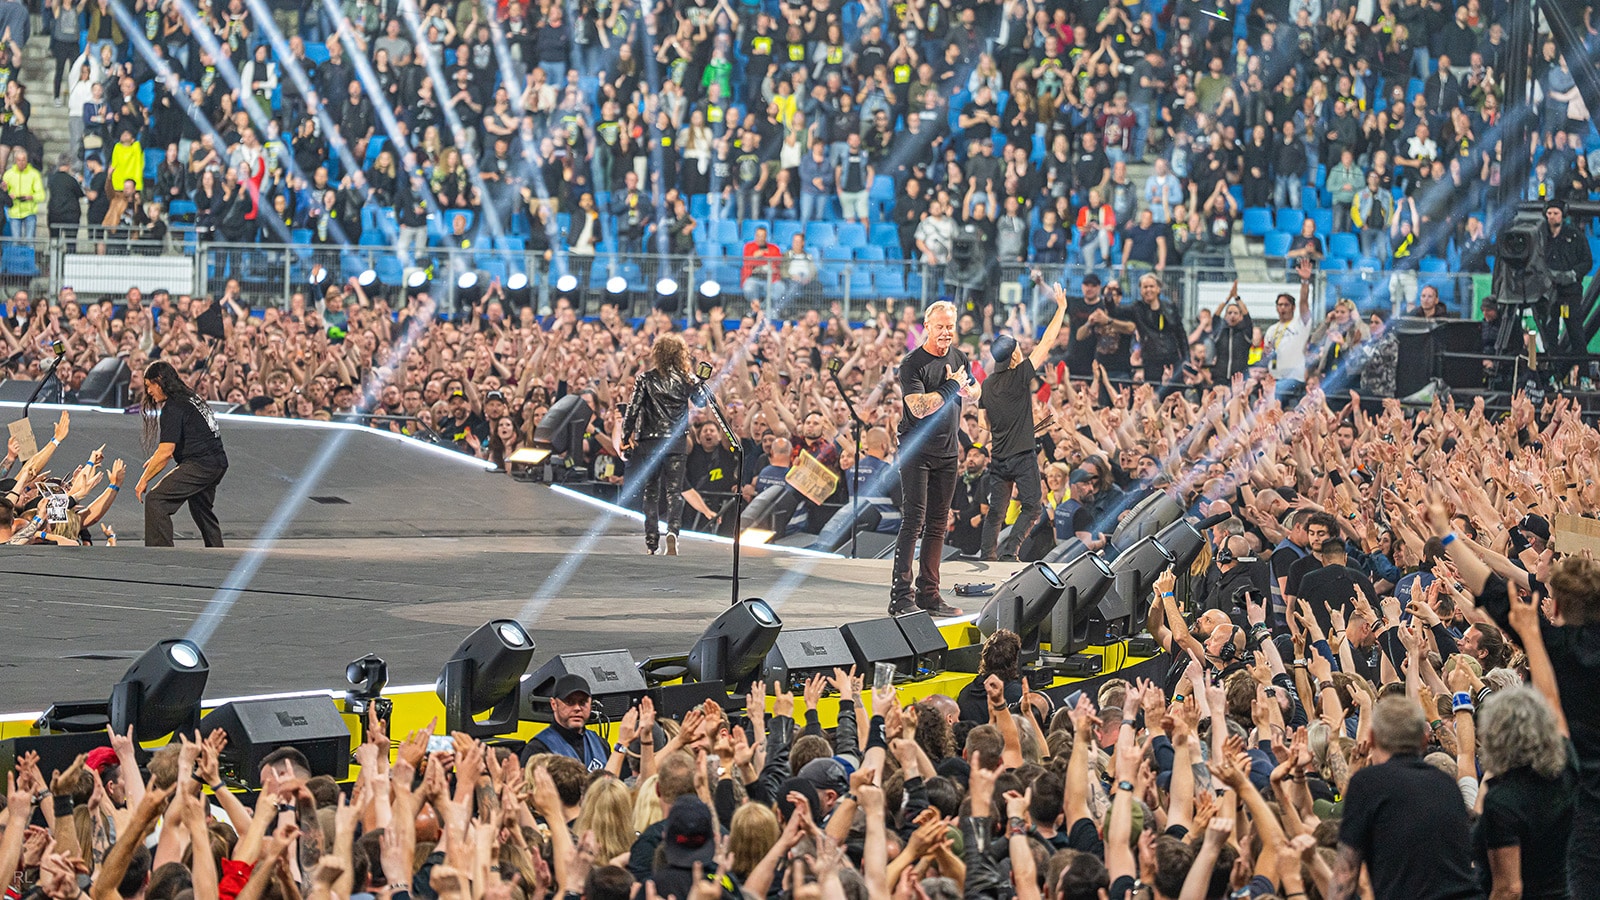
A herd of Meyer Sound MJF-210s in deployment on Metallica’s M72 World Tour in 2023
Photo credit: Ralph Larmann, via meyersound.com

While it’s not uncommon to have to manually “ring out” a wedge mix by using a hefty amount of subtractive EQ, feedback prevention starts with a good stage setup and understanding a little bit about how the equipment you are using may interact with one another in a loud environment, like a small stage with a rock band. This brings us to the next half of the equation: understanding microphone polar patterns and how they will interact with your monitor coverage angles.

For most live performance sound reinforcement productions, the most common directional microphone polar patterns you will find in use are cardioid, supercardioid, and hypercardioid. All part of the same family of directional microphones, cardioids are built to capture sound coming from the front of the microphone only, and thus rejecting sounds coming from the rear of the microphone. This makes them an excellent choice for reinforcement applications where the source will need to be routed back on stage for the performers to hear through a dedicated monitor speaker. In some cases, other polar patterns may be desired, but for today’s article we will focus on cardioid directional microphones as opposed to other common polar pattern options like omnidirectional or figure 8.


Generally speaking, cardioid microphones, like the time-favored classic Shure SM58, will have the best gain before feedback ratio when being placed with the rear of the microphone (the pointy end) aimed at the monitor speaker. This, along with its uncanny robustness, is one of the many reasons why the Shure SM58 is cherished amongst live audio professionals all around the world, and is considered by many to be a must-have piece of audio gear.
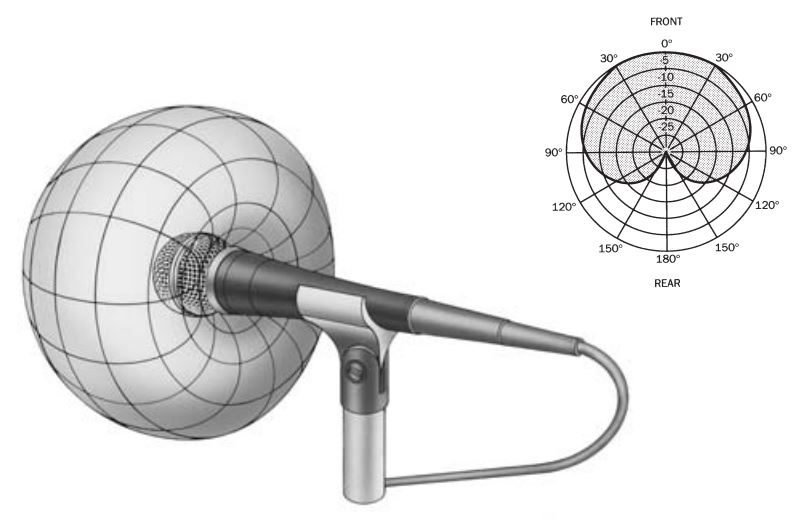
Cardioid pickup pattern of a Shure SM58 via service.shure.com

With the SM58’s directional cardioid polar pattern, it works very well when staged properly in front of a monitor speaker, and is often an engineer’s first choice for most live vocal applications. When placing your speakers, it’s also important to note that your main PA speakers (aimed towards the audience) should be well ahead of the front plane of your stage/performance area, in order to further reduce the chances of feedback, as seen in the left side of the diagram below.
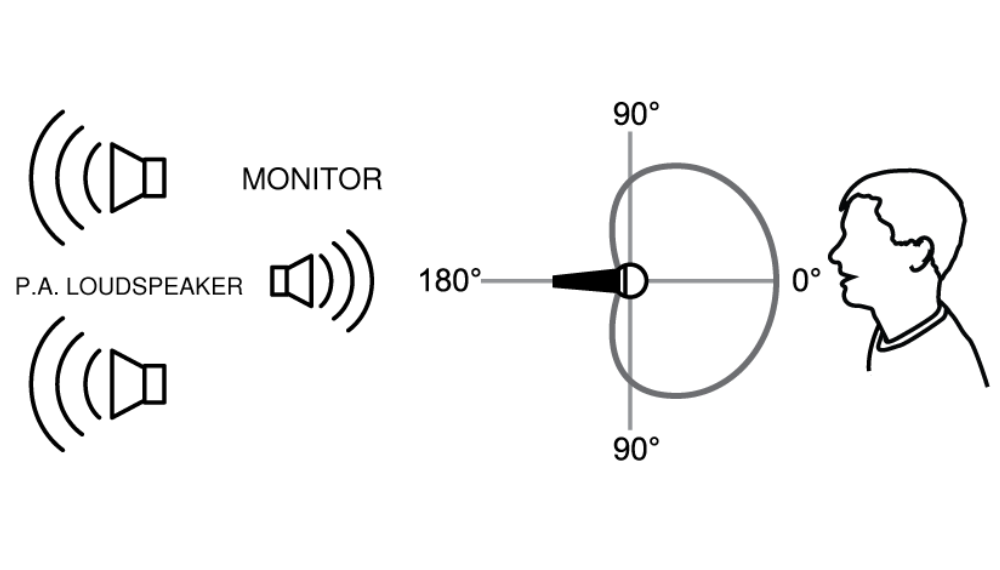
Recommended speaker and microphone locations from the Shure SM58 guide via service.shure.com

Hypercardioid and supercardioid microphones, like the Shure Beta87A, have a similar-looking front pickup pattern when compared to their more-tame standard cardioid counterpart, but both hyper and supercardioid microphones have an 180° off-axis lobe directly behind the capsule. These types of microphones will have the best results with a slightly off-set monitor angle coming from one or both of the sides (approx. 120° off-axis), rather than directly from the rear like a standard cardioid. They also are more focused in their on-axis pickup pattern than a standard cardioid, further rejecting unwanted sound coming from the sides of the capsule. Supercardioids are a good choice when you have many sources on stage that may be bleeding into the microphone, but they require the artist to have consistent mic technique to maximize those benefits, due to the narrower pickup pattern.
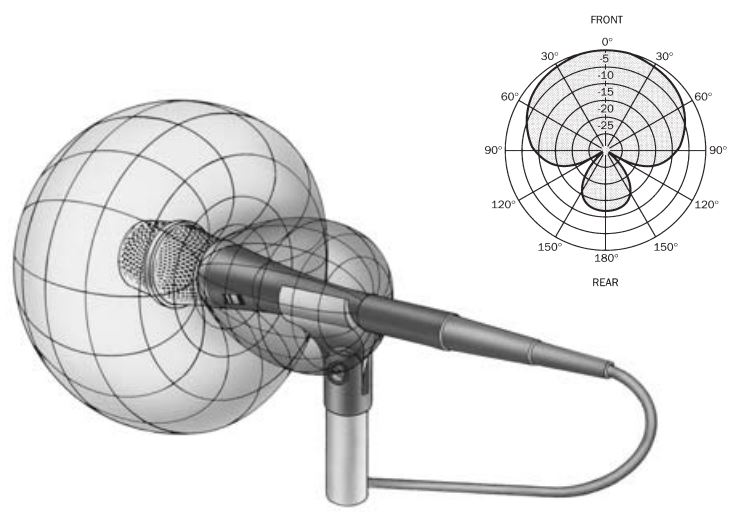
Supercardioid pickup pattern of a Shure Beta87A via service.shure.com

Stage volume is often a big reason why many worship bands and rock ensembles choose to switch to IEMs. In the worship world, it’s also common to see the deployment of bleed-reducing tools like drum shields, guitar amplifier isolation cabinets, or stand mounted trumpet shields to help reduce excessive stage bleed, even with a full band already on IEMs.  An often overlooked solution to excessive stage bleed is to ensure your stage plot and monitor coverage is ideal for the performance area– If the performers keep asking for “more me”, giving them more of their microphone in the monitor mix can only go so far before you run into trouble. 

Firstly, you’ll want to ensure the performers are within the throw of the monitor, usually at least 4-6 feet away from the wedge, with the horn of the speaker pointed upwards, relatively at head height. Secondly, you’ll want to be sure to only include the channels that are absolutely necessary for the performer to do their job effectively. This will vary due to each individual’s personal preferences, but as a general rule you should not be sending every channel on your board to an artist’s monitor mix. Some performers may ask for quite a few things in their wedge, and in those cases it’s a good idea to ask what the three priority instruments are, and go from there. You can always sprinkle in a little bit of everything else requested, but the goal is to keep the monitor sends as clear as possible, with little crowding or masking of instruments within the same frequency range. Instruments with a lot of low end information will also take up a lot of headroom, so you will want to add in these types of elements sparingly. It’s common to see a ground-stacked subwoofer and top next to the drums for this exact reason, as drummers typically like to feel the kick and bass strongly while performing.

With this knowledge and guidance, we hope to help you achieve many feedback-free shows in your professional audio career. This is, of course, all just a general guideline, since it’s likely you’ll have many artists who will handle the mic by taking it off the stand during the show. In such cases, if you believe your artist may be traversing the stage excessively during their performance, it would be best to include a quick walkaround with the live microphone during soundcheck. Optional hardware like the Rupert Neve Designs 5045 Primary Source Enhancer can give you up to 20db gain-before-feedback without major coloration to your source, and the 5045 is used quite often here at TC Furlong Inc. for one of our large-scale collegiate sporting events, where historically feedback from the microphones on the playing field was a major issue for our client.

Choosing the right monitor and microphone combinations for your stage and production is key to delivering a top notch experience for not only the audience, but the performers as well. Interested in purchasing for yourself? Check out our line card of over professional audio 100 manufacturers. Our sales team is ready to help and can be reached at sales@tcfurlong.com or by phone 847-367-9588. Contact us today for a quote!

Not ready to purchase? Want to take some mics and wedges for a spin? Send a message to our rental team at rentals@tcfurlong.com or call our office at 847-367-9588 and our experienced team of audio technicians will help ensure your next event is a success!

Are you having trouble getting your transmitters to sync with your new Axient Digital receiver? You are not alone, and TC Furlong Inc. is here to help! With many of our customers now receiving the remaining pieces on their backordered Axient orders, we’ve noticed this somewhat common issue when our customers start unboxing their highly anticipated top-tier Shure wireless systems.

The factory default setting for the Axient Digital receiver is set to the G53 band. If you are having an issue getting your existing Axient beltpacks or handhelds to pair with your new RX, likely your transmitters and receivers are not set to the same bands. Changing the band on the receiver to match the transmitters is quick and easy.

To switch the frequency band on your Axient receiver, follow the steps below:

  1. Press the red “Exit” button on the front panel to make sure you are on the home screen.
  2. While on the home screen, press the control knob in to access the settings main menu.
  3. On the main menu, choose the first option “Device Configuration”
  4. In the device configuration menu, choose the first option “Device RF”
  5. On the device RF screen, choose the first option “RF Band”
  6. On the RF band selection screen, press the control knob inwards again to choose the RF band parameter. The band selection box will highlight on the screen. Choose the correct frequency band, which will likely be G57 if you are in the US.
  7. To confirm the change, you need to press the (now blinking) “Enter” button next to the control knob. You will see an image on the screen that lets you know your settings have been saved.

And that’s it! Your receiver should now be able to connect to your transmitters in the desired band.

For more information, you can visit the Axient Digital page on our website to check out our rental brochures, spec sheets, and manuals for all the Axient products we carry.

Interested in renting Axient Digital from TC Furlong Inc.? Our vast inventory of Shure Wireless includes dozens of Axient receiver channels, corresponding body packs and handheld transmitters, as well as hundreds of other wireless microphone options and accessories. Send a message to rentals@tcfurlong.com or call our office at 847-367-9588 and our experienced team of audio technicians will help ensure your next event is a success!
Interested in purchasing Shure Wireless or anything else from our line card of over 100 manufacturers? Our sales team is ready to help and can be reached at sales@tcfurlong.com or by phone 847-367-9588. Contact us today for a quote!

by Andrew Dewar

It’s commonplace for the TC Furlong team to have a position for larger events known as a Wireless Mic Wrangler, whose role ends up being more complicated than it sounds. The Mic Wrangler is ultimately in charge of getting the right packs and microphones to the right people, at the right time and then when the act is done, returning the microphones and packs to their proper home. Below, we lay out some simple ways to effectively “wrangle” high channel count wireless to avoid a catastrophic “wrong mic on stage” type failure at a live event.

Being Prepared is Expected, Not Encouraged

Preparation for live events is 90% of achieving a great show with minimal production errors. Being a Mic Wrangler follows the same approach. The critical document for any seasoned Mic Wrangler is a show flow with the mics going out and the mics coming back for every scene or act depending on the type of event. This allows for two really important things: 1. Front of House, Monitors, and Broadcast all will know exactly which mics will be on stage as well as which mics will not be on stage and 2. It allows the Mic Wrangler to do quick checks such as “how many mics are going out” or “which belt packs should I have in bread pans (more to come on this) during this act”. Finally, a column for names of talent and any capsule or headset information on your show flow is critical and will allow the show to gain another level of sonic quality and consistency.

Microphone location, especially on lavaliers and head worn microphones, makes up a huge component of the sound you get off the capsule and because of this another show document that goes a long way in creating consistent sounding performances is a “Show Bible”. Most of the time we see these in long runs of musical theater performances as they travel across the globe performing in different venues, but we can extrapolate important information from them for one off shows. As the Mic Wrangler you would be most interested in creating pages for the document that give a good visual and written explanation of where mics are located on each person. Some might be very simple and say, “handheld mic” while others might be complex with information like, “black wig clip 2 inches above hair line”. In situations where the mic placement gets complex a picture truly is worth a thousand words and can be good for spot checking mic placement as the talent prepares to enter in the wings.

Organization Allows Preparedness to Thrive

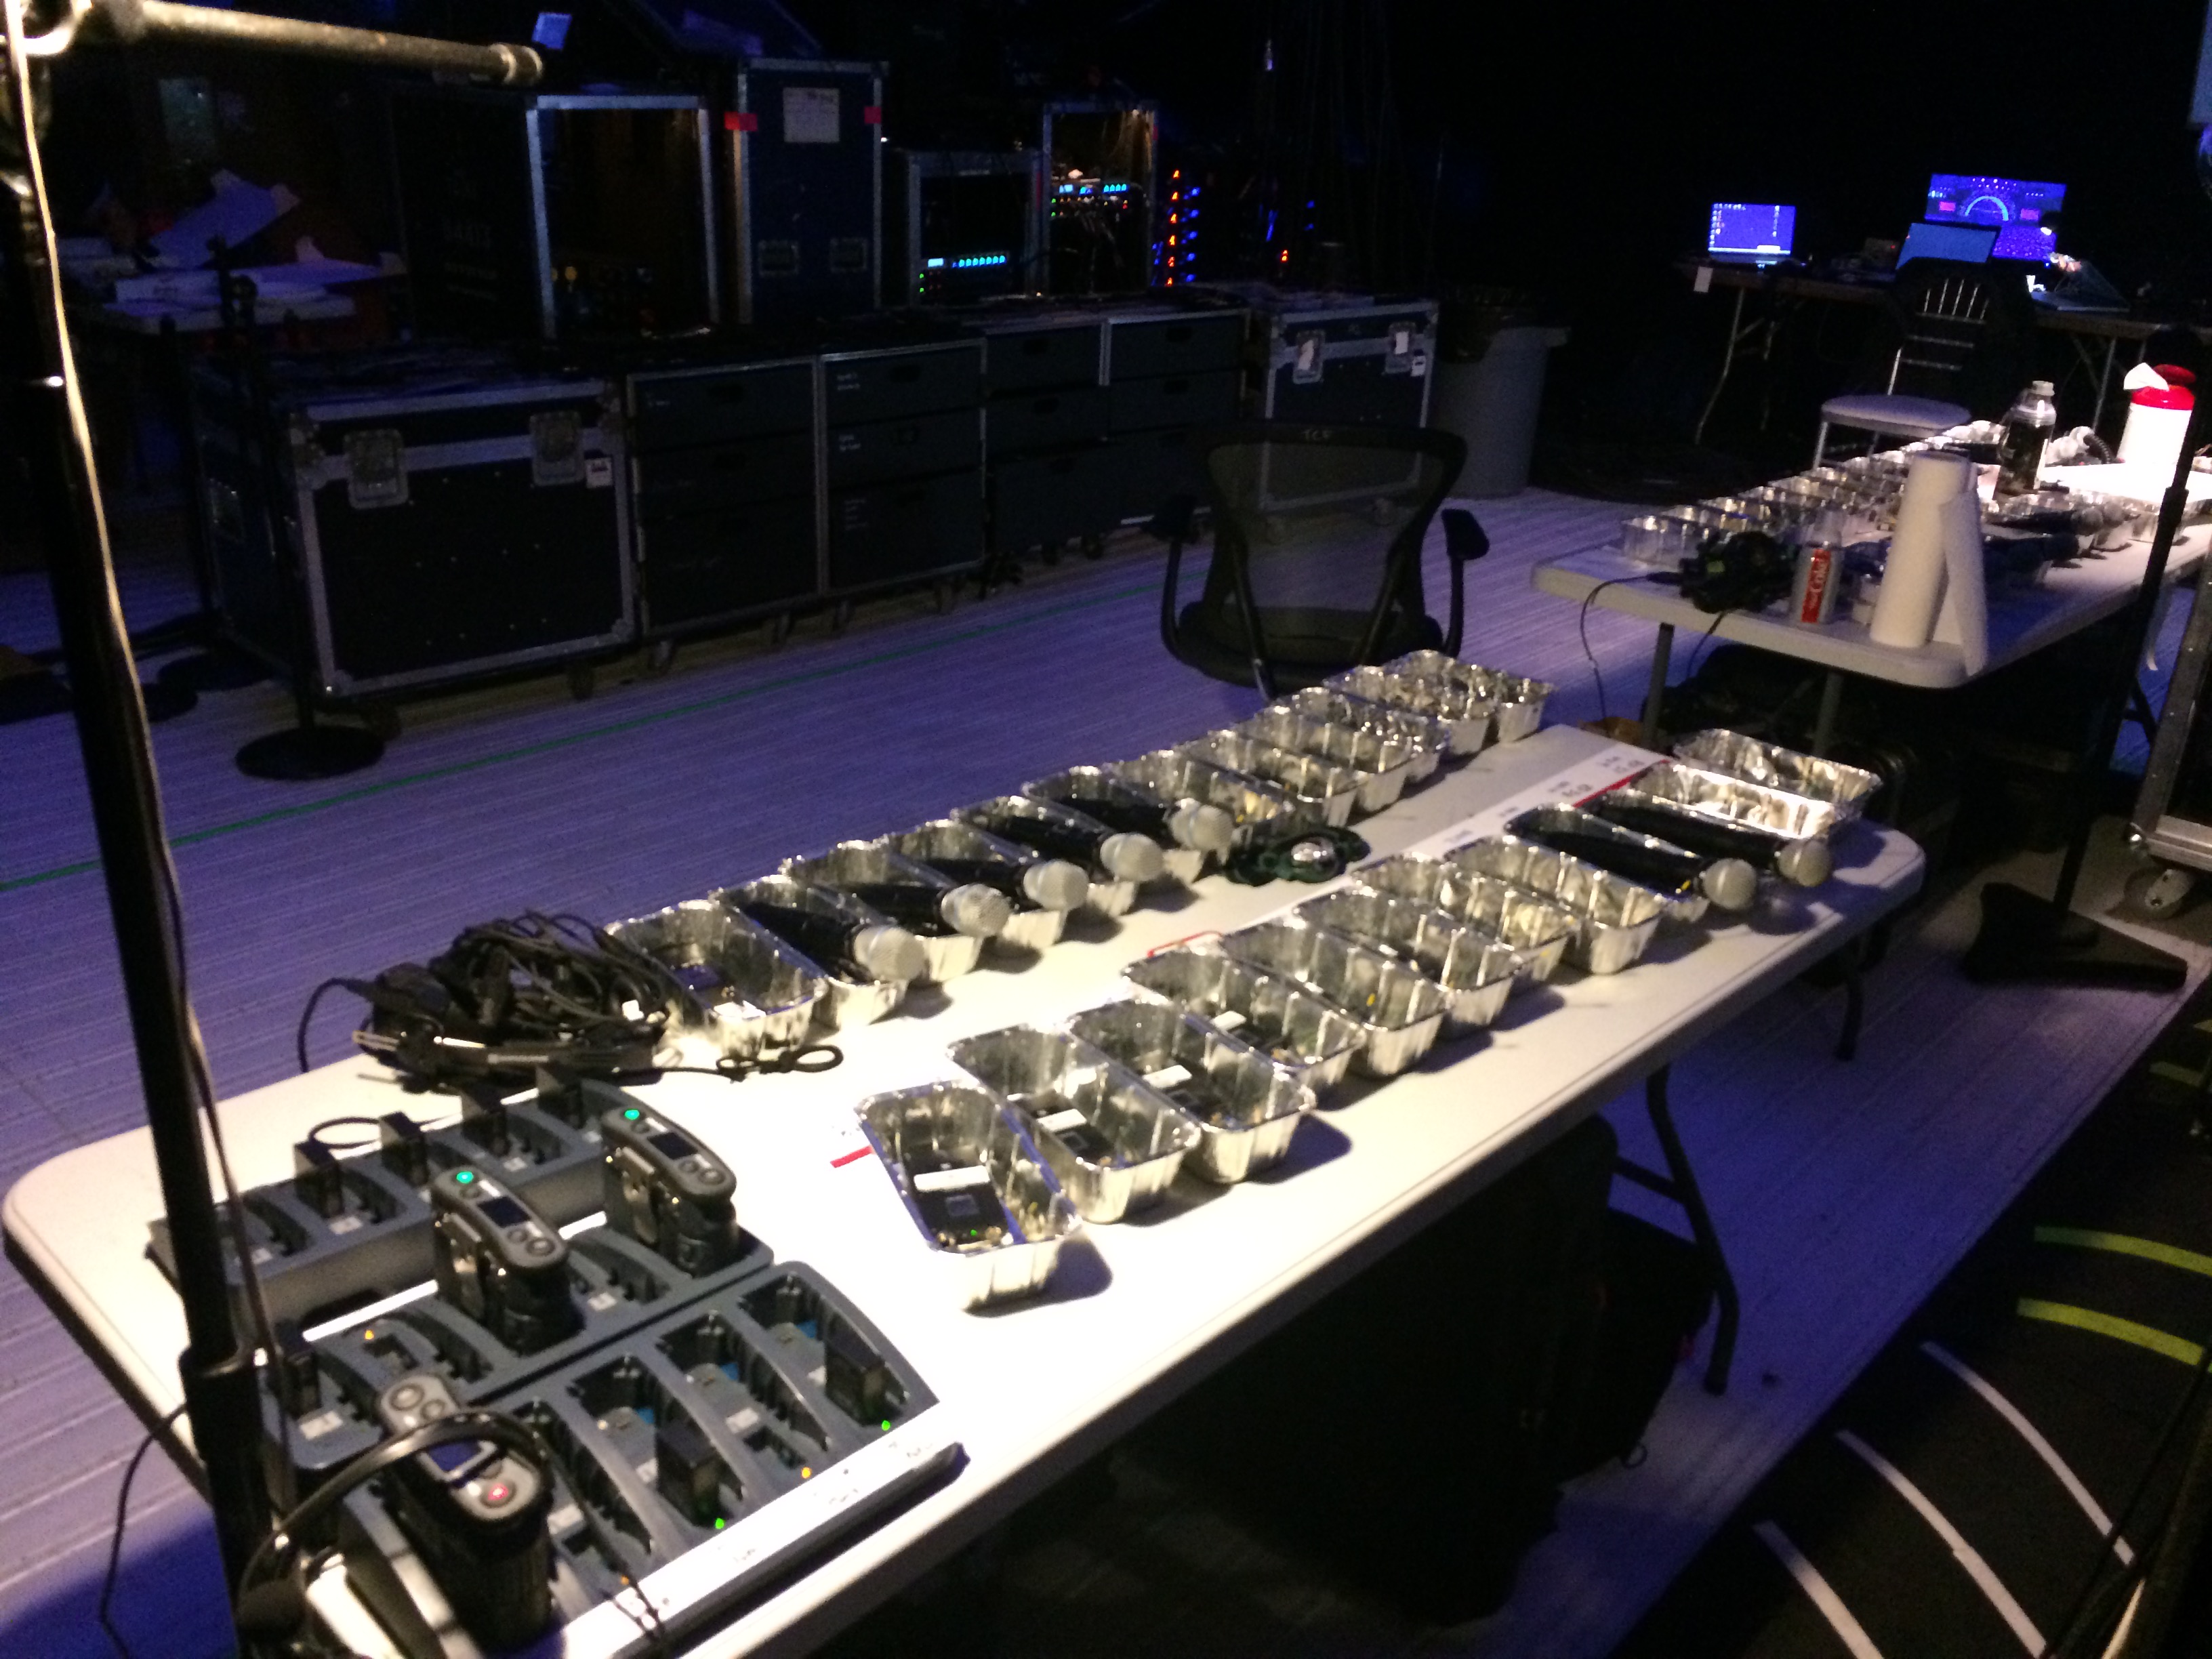
If you’ve got a well written and easy to follow show flow with wireless mic cues, one way to have the hard work not pay off is by allowing yourself to be disorganized during shows and rehearsals. One common industry trend is the use of bread pans or tin bins to not only have a clearly marked place for each transmitter but to also cut down the amount and intensity of intermodulation products created by dozens of transmitters in close proximity to one another. To learn more about intermod and how to avoid it, be sure to check out our recent Wireless Blog Series.

When we bring high channel count wireless onto a show site, we bring along enough tin bins with a few spares and make sure we have more than enough table space to allow each one to sit flat on the table. Once laid out make sure to clearly and consistently label each transmitter, tin bin, and even the table where the bin sits so you can do a cross check at any point in time to make sure everything is cohesive and agrees. Keeping mics and packs for each performer physically separated also decreases the risk of germs and pathogens spreading due to unintentional mixups and sharing of microphones.

Another important level of organization has nothing to do with the physical space we operate in but rather the nomenclature we use to describe each wireless channel. Whether it is “RF 1” or “Wireless 1” or “Allie’s Mic” doesn’t really matter but what does matter is that Front of House, Monitors, Broadcast, and the Mic Wrangler all have the same terms for each channel so communication on coms is quick and efficient. We’ve found that starting with an agreed naming system before rehearsals begin keeps everyone on the same literal page (because you’ve got a well prepped show flow!) and allows us to all “rehearse” using the right names for wireless channels.

Checks and Balances Before and During the Show

A catastrophic mistake that seems to be made far too often is that the first time a microphone goes onto the stage is by the talent as they make their initial entrance during the show. Even if Front of House and Monitors say they see signal coming in pre-show from the mics, an audio crew needs to set aside a few minutes to cycle through the mics and test them before the show on stage. By taking the time to get them on stage and test them we remove 2 possible critical failures from our performance.

First is the possibility that there are some stray wireless frequencies that are causing interference somewhere specifically on stage. Second, it allows us to confirm that the signal passing from the mic to the consoles is clean and won’t feed-back on stage. This is a critical step and can be expedited by having multiple people put on mics and test them on the stage one at a time.

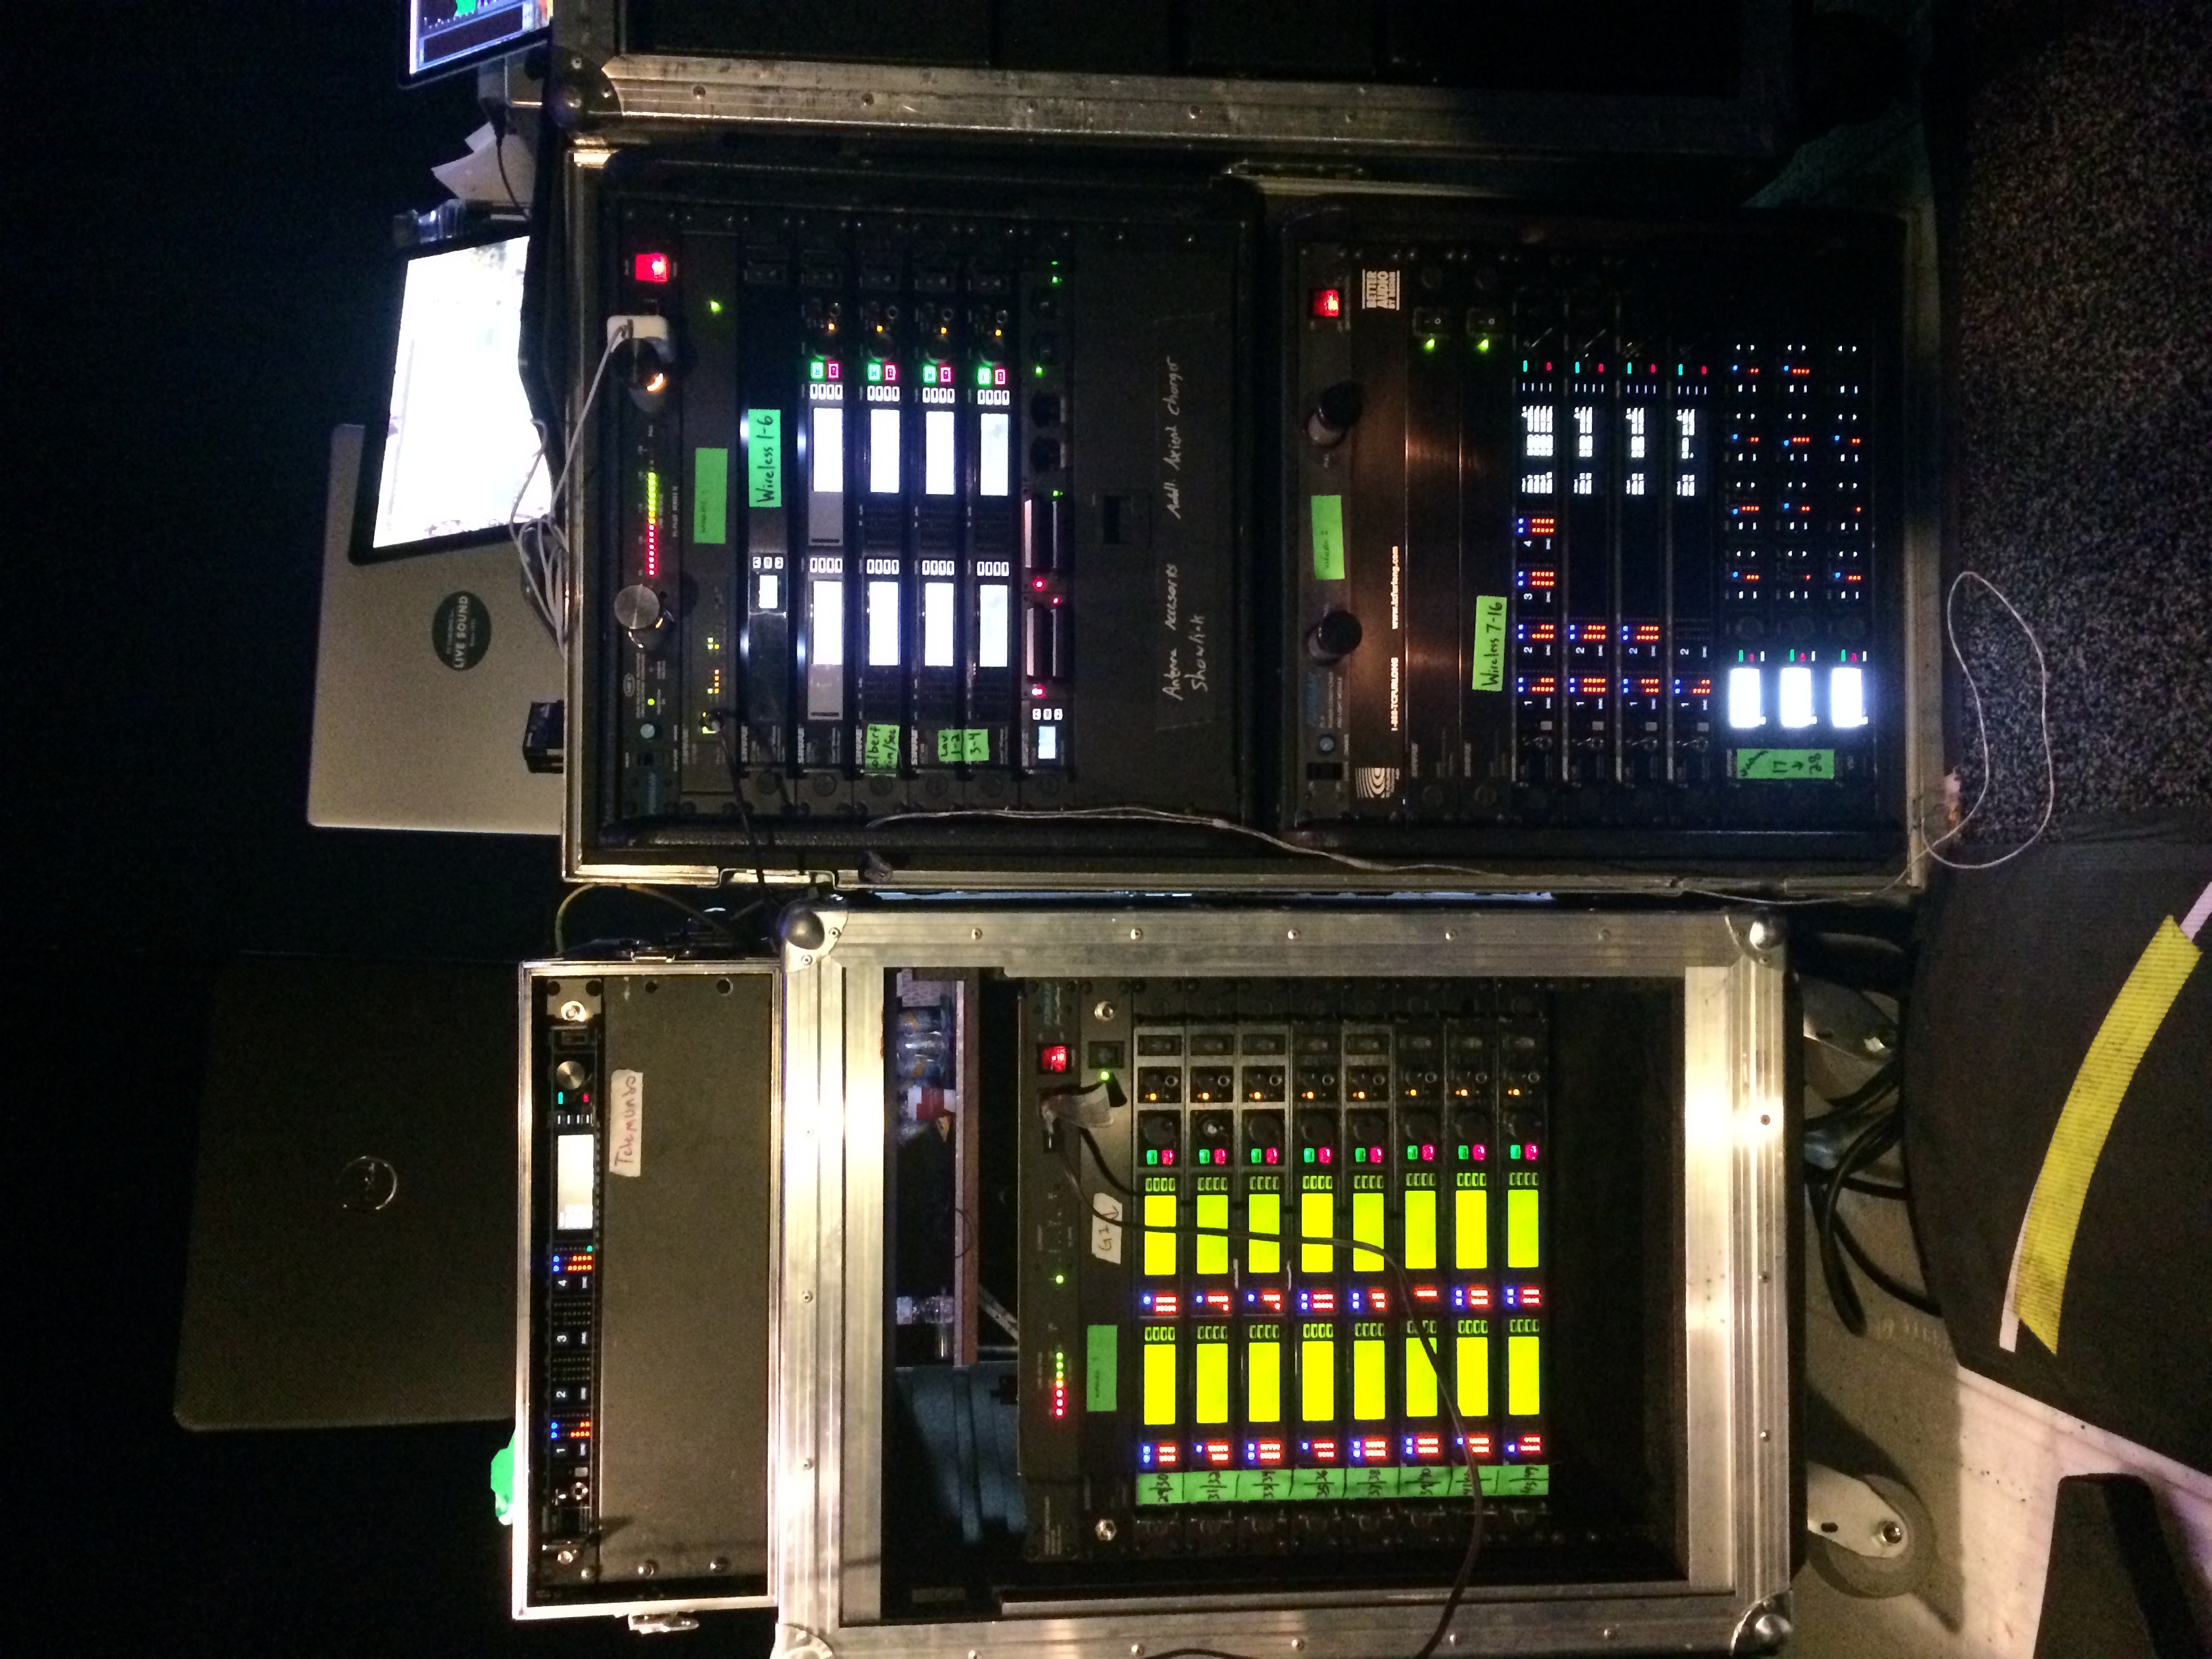
Despite all the planning, testing and organization we still need to have a few ways to navigate the show on the fly. First and foremost, make sure there’s an easy way to quickly see the status of all your transmitters. With networkable Shure systems we tend to put a laptop or a large display near the Mic Wrangler’s position so that during the show they can keep the monitor tab open on Wireless Workbench and see all the transmitters on the display. This can save an act by allowing the Mic Wrangler to spot low batteries, bad RF, and powered off transmitters while deploying the channels to the talent.

Most importantly for a Mic Wrangler, call the show live. The Mic Wrangler can be most effective when they get on coms right before an act and say, “We have RF 1, RF 2, RF 4, RF 6, and RF 9 going on stage for act 7”. The clear communication allows all the engineers to look at their consoles and make sure those channels are unmuted and seeing signal and gives everyone one last check before an incorrect mic is put live in the mix. Even if you’re doing scene to scene pre-programmed shows this technique allows everyone to be on the same page and also builds in the flexibility to make a last minute change if the wireless coordination isn’t holding up or a pack fails during show.

Our extensive rental inventory includes hundreds of channels of wireless mics, IEM, and intercom, along with all the accessories you’ll need to make your next event a success. Reach out to our Rental Team today at rentals@tcfurlong.com or call 847-367-9588.

We are also authorized sales dealers for all major manufacturers of live sound equipment. Reach out to our Sales Team for a quote at sales@tcfurlong.com or 847-367-9588.

by Scott Helmke

This blog post is the eighth and final entry in our blog series all about wireless systems – background info, best practices, and useful tips & tricks. Click here to get caught up on the previous articles.

This is the eighth blog article in our wireless series.  In the previous article I wrote about choosing better antennas, and in this article I’ll wrap up the series with some handy tips for deploying large wireless systems.

System Deployment Tips

Frequency coordination is something that you should always be doing.  At TC Furlong we don’t prep a rental, work a show, or even sell wireless gear without doing some kind of coordination. Whenever possible, the coordination includes any nearby gear we can find out about as well.

Receiver location should ideally be as close to the microphones as possible.  They should also be located where somebody can keep an eye on them during an event, which might mean out at the front of house console.  As long as appropriate antennas are used with good antenna distribution FOH is usually fine.

Large wireless systems need a dedicated person, usually referred to as an A2 (“audio second”), to handle the microphones. This person’s job is to issue mics to the talent, change batteries, and in general keep track of maintenance and repair.  Most importantly, the A2 can be on stage fixing a problem with a microphone instead of making the FOH mixer leave their console.  Even smaller productions can benefit from designating a person to be responsible for the microphones, while the largest productions will have a team.

Microphone storage is also important – simply keeping track of which microphone goes to which person requires some kind of organization, even if it is just having a table marked out with spots for each microphone. Some productions use a hanging shoe organizer, which has many pockets that can be used to store microphones and associated parts.  However, intermod problems can happen whenever microphones are physically close together.  A table or other organizer holding a whole bunch of microphones can cause RF problems, and the usual solution is to use metal baking pans to store each microphone separately.  The metal in the pan reduces the intermod enough to prevent any problems.  Another potential issue is having a large group of microphones right next to the receiving antennas, which could overwhelm the receivers with strong signals.  The baking pans help with that situation as well.

Batteries are critical to having a successful show. Having a microphone battery run out during an important scene is every tech’s nightmare.  At the very least, fresh batteries should be used for every show.  Half-used batteries can be saved and used for rehearsals.  Rechargeable batteries are a good option, as battery and charger technology is very solid these days.  However, any type of battery still requires that somebody be assigned to make sure batteries are always changed and/or recharged as needed.

Maintaining Transmitters & Microphones

Rock shows and musical theatre often has performers working hard enough to sweat, which can cause damage to wireless microphones.  A beltpack transmitter worn under a costume can get regularly soaked in sweat, which can cause a great deal of damage to the electronics. The usual tradition in musical theatre is to use unlubricated condoms as a waterproof cover that can be replaced for each show.  For school teachers who may have trouble explaining why their students need condoms, the same basic product is available from companies selling them as “sheaths”.  Thin rubber gloves can also be used.  And of course after each show the microphones should be left in a place where they can dry out before the next show.

Wireless microphone headsets and clip-on lavalier mics can also suffer from exposure to sweat, makeup, hairspray, and their thin wires can be easily damaged.  Almost all such microphones have tiny protective screen caps that fit over the microphone element itself, and it is important to make sure that those caps are used.  Not only do the caps help protect the microphone itself, they are often used to control the sound of the microphone.  Replacement caps are available from the microphone manufacturer, and spares should be kept in stock.  It’s a lot cheaper to replace a little cap if somebody accidentally hoses the mic down with hairspray.

Headset and lavalier microphones should really be considered something that will need to be replaced periodically. Big professional productions usually consider headset or lav mics to be “consumable”, and have a budget for regular replacement.  While a damaged connector can be replaced or wires spliced, I’ve had customers bring in lav mics where the wire itself was falling apart from corrosion caused by sweat.

Conclusion

This has been a long series of articles with many suggestions for the best way to deploy and use wireless microphones.  While you may not be able to implement all of these best practices, doing as many as you can will help you have successes instead of failures.  At TC Furlong we’ve worked with customers from big Broadway style theatres all the way down to worship leaders using a single microphone, and we’ve often been able to get good results without them having to spend a lot of money on new equipment. Whether you are an RF novice, or an expert in your own right, our technicians are available to provide advice and recommendations, based on our collective decades of experience with production wireless systems.

If you’d like to learn more about the deployment of wireless systems for large, complex, high-pressure shows, check out the webinar we hosted with special guest presenter James Stoffo, Strategies for Large Scale Wireless System Deployment:

Interested in purchasing a wireless system? Reach out to our Sales Team at 847-367-9588 or sales@tcfurlong.com for comprehensive help selecting the right wireless system for your needs, complete with antennas and all the other accessories you’ll need.

We also carry hundreds of channels of production wireless equipment in our rental inventory, and our experienced Project Managers can help design and implement a wireless system for your next show. Reach out to them today at 847-367-9588 or rentals@tcfurlong.com to get started.

by Scott Helmke

This blog post is the sixth entry in an ongoing series all about wireless systems – background info, best practices, and useful tips & tricks. Click here to get caught up on the previous articles.

This is the seventh blog article in our wireless series.  In the previous article I wrote about using antenna distribution to clean up both your RF performance and also your wireless rack.  In this article I’ll be writing about some better choices in antennas.

Omnidirectional Antennas

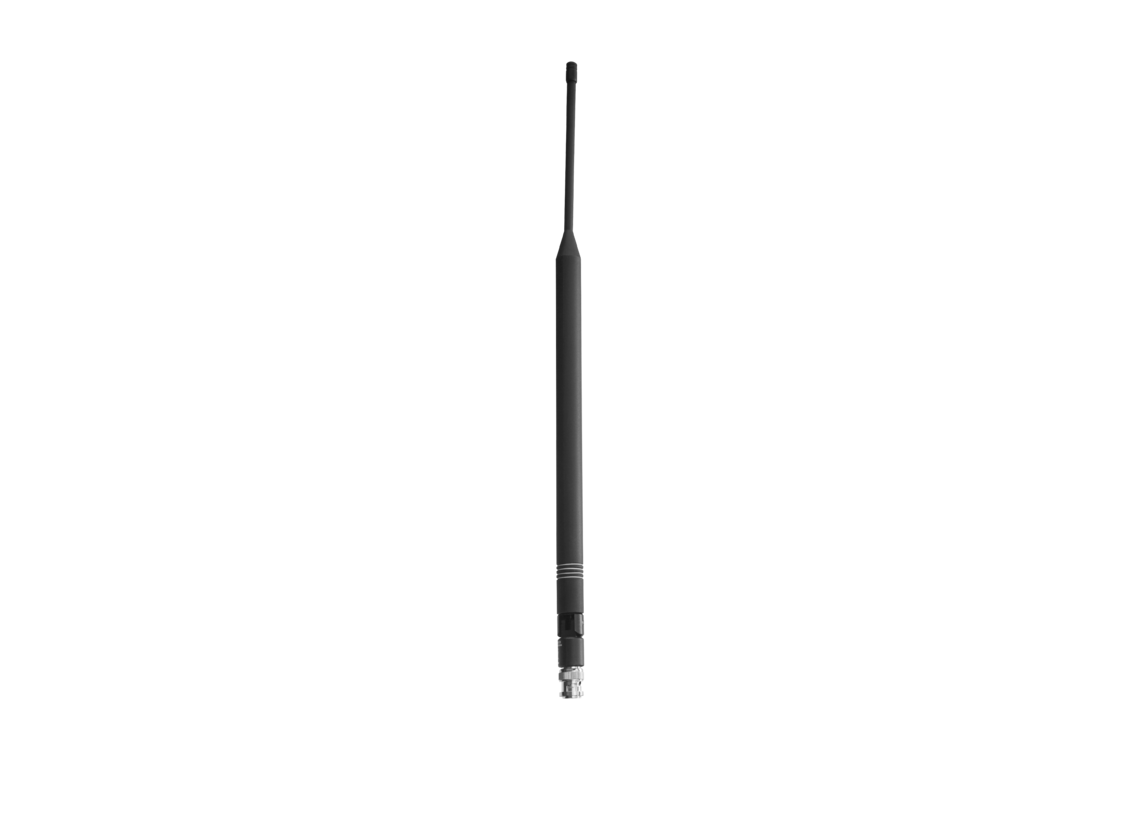
The antennas that most people use are, no surprise, the ones that came bundled with the system.  Often referred to as “whips”, these antennas might be rather primitive bits of wire and plastic, but the nicer ones might actually be pretty good.  The antennas Shure bundles with their better quality systems such as QLXD and beyond fit the generic “whip” name but are technically “center fed ½ wave dipole” antennas.  If you were to cut one open you’d find more than just a length of wire.  The “half wave” part of that name is important, as antennas work best when they are the same length as one of the RF waves coming from the microphone.  That ends up being a little on the large side, so often a good compromise is to go with a half or a quarter of the wavelength.  The cheapest antennas are usually just a quarter wave long.  But the important thing to take from this is that the antenna needs to be designed for the frequency band that your microphone uses.  While an antenna of the wrong length will still work in many cases, having the right length works best.  More advanced antennas will be designed to work well over wider frequency ranges, but it is always something you should keep in mind especially when considering antennas to feed several different frequency bands through antenna distribution systems.

The most important specification about antennas, after the frequency range, is the directional pickup pattern. The whip-style antennas that come bundled with wireless systems are usually referred to as “omnidirectional”, meaning that they pick up equally well from all directions.  This isn’t entirely true, as the directional pattern is more like a torus or donut shape.  These antennas pick up best from the side rather than the end of the antenna.  Don’t point the tips of your antennas at the stage, in other words.

Directional Antennas

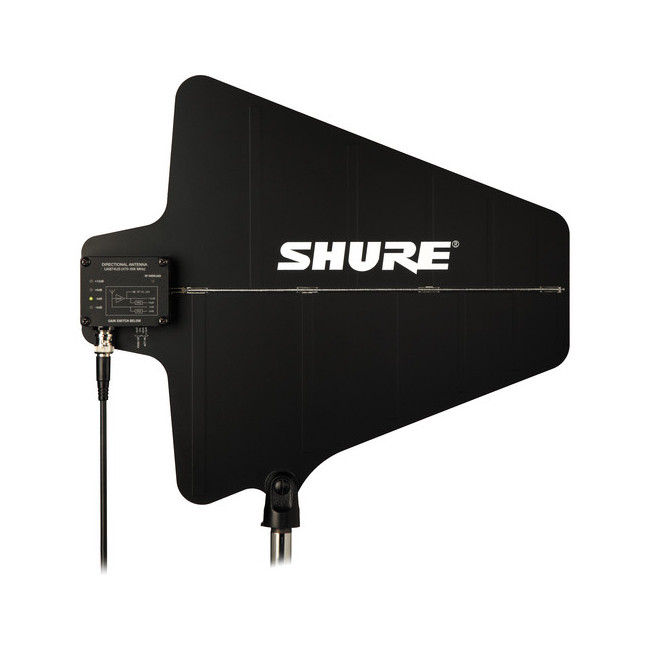
The antenna you will see being used in most professional systems is the log-periodic directional antenna, most often referred to as a “paddle” or “shark fin” antenna.  These antennas pick up best from one direction, and less from the other directions.  By concentrating the pick up pattern in one direction these antennas can usually pick up microphone signals from longer distances than omnidirectional antennas.  This also means that the antennas need to be in a location where they can be aimed at where the microphones are being used, such as from the side of a stage or from the front of house location.

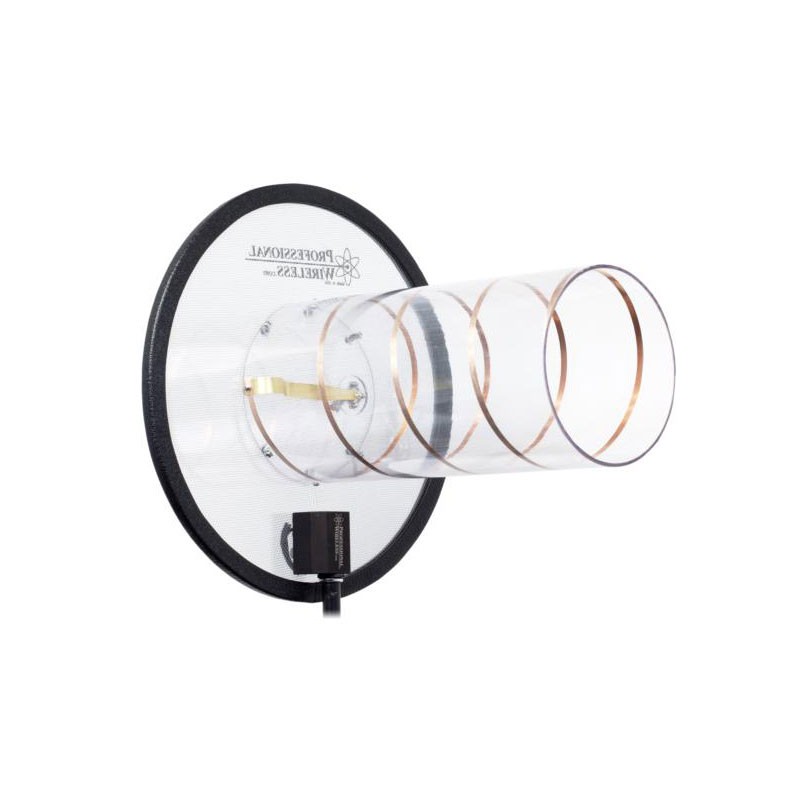
The most advanced antennas found in regular use are the “helical” antennas, or more properly “helically polarized” or “circularly polarized” antennas. Like the log-periodic paddle antennas these have a directional pickup pattern, but they also feature a different antenna polarization.  Most antennas, including whip and paddle antennas, have “linear” polarization.  Put very briefly, RF waves have a particular polarization direction, and the system works best if the transmitting antenna (on the microphone) is oriented in the same direction as the receiving antenna.  A microphone held vertically will work best with a receiver antenna mounted vertically, but a microphone held horizontally will not be picked up very well by a vertical receiving antenna.  If you are using a receiver with two “diversity” antennas, you can put the antennas at different angles to cover any possible angle that the transmitter might be held at.  A helically polarized antenna does not have a polarization angle at all, meaning that it will pick up equally well no matter what angle the microphone is held at.  These antennas are most often used with in-ear monitoring (IEM) systems because the receiving beltpacks rarely have diversity antennas – with only one receiving antenna you want the best transmitting antenna possible.

Antenna Amplifiers

Some antennas have built-in amplifiers to boost the signal strength.  This feature is not meant for picking up distant or weak microphone signals, though.  It’s really only meant to compensate for long antenna cable runs back to the receiver.  An antenna amplifier can overload on strong signals, as well as adding its own noise to the signal.  My usual rule of thumb is to avoid antenna amplifiers unless I’m running at least 50 or 100 feet of antenna cable.

Choosing The Right Antennas

Which antenna should you use?  It really depends on your situation.  Directional antennas are great if you have all the action happening in a place where you can point the antennas at it.  On the other hand if the receiver is located in the middle of all the action (such as on a guitar pedalboard) then an omnidirectional antenna would be best.  Ideally your antennas are mounted high up, so that they can “see” over the heads of the crowd or other obstacles and get a clear “view” of the stage.  Even the best antenna will give disappointing results if it is blocked by people (who absorb RF) or metal (which blocks and reflects RF).  High quality coaxial antenna cables should be used if the antennas are mounted away from the receivers, and with as short a cable length as possible.  

In some situations a long (but high quality, low loss) cable can be used to put antennas close to the microphones, giving better results than an antenna far away from the microphones.  For a hip-hop act on a large festival stage, I will attach a Shure half-wave whip antenna to a short microphone stand and place it right in among all the monitors and lights along the front edge of the stage.  I might have to run 100 feet of cable, but the whip antenna will be much closer to the performers than a directional antenna mounted at the side of the stage.  My other antenna could be a Shure paddle antenna pointing across the stage.  

Conclusion

Finally, because this question comes up a lot, it’s almost always fine to use antennas from one manufacturer for wireless systems from another.  As long as the antennas and antenna distribution cover the frequency range of the wireless systems it will work fine.  Some antennas need 12 volt DC power on the antenna line to power internal electronics, but every major manufacturer provides that power in the same way.

Stay tuned for the final entry in this series. Next week, we’ll wrap things up with some final thoughts and a number of handy tips. In the meantime, if you’d like to take an even deeper dive into antennas, check out the recording of our Antenna Theory webinar with RF expert James Stoffo:

Interested in purchasing a wireless system? Reach out to our Sales Team at 847-367-9588 or sales@tcfurlong.com for comprehensive help selecting the right wireless system for your needs, complete with antennas and all the other accessories you’ll need.

We also carry hundreds of channels of production wireless equipment in our rental inventory, and our experienced Project Managers can help design and implement a wireless system for your next show. Reach out to them today at 847-367-9588 or rentals@tcfurlong.com to get started.