Wireless Blog Series

by Scott Helmke

This blog post is the eighth and final entry in our blog series all about wireless systems – background info, best practices, and useful tips & tricks. Click here to get caught up on the previous articles.

This is the eighth blog article in our wireless series.  In the previous article I wrote about choosing better antennas, and in this article I’ll wrap up the series with some handy tips for deploying large wireless systems.

System Deployment Tips

Frequency coordination is something that you should always be doing.  At TC Furlong we don’t prep a rental, work a show, or even sell wireless gear without doing some kind of coordination. Whenever possible, the coordination includes any nearby gear we can find out about as well.

Receiver location should ideally be as close to the microphones as possible.  They should also be located where somebody can keep an eye on them during an event, which might mean out at the front of house console.  As long as appropriate antennas are used with good antenna distribution FOH is usually fine.

Large wireless systems need a dedicated person, usually referred to as an A2 (“audio second”), to handle the microphones. This person’s job is to issue mics to the talent, change batteries, and in general keep track of maintenance and repair.  Most importantly, the A2 can be on stage fixing a problem with a microphone instead of making the FOH mixer leave their console.  Even smaller productions can benefit from designating a person to be responsible for the microphones, while the largest productions will have a team.

Microphone storage is also important – simply keeping track of which microphone goes to which person requires some kind of organization, even if it is just having a table marked out with spots for each microphone. Some productions use a hanging shoe organizer, which has many pockets that can be used to store microphones and associated parts.  However, intermod problems can happen whenever microphones are physically close together.  A table or other organizer holding a whole bunch of microphones can cause RF problems, and the usual solution is to use metal baking pans to store each microphone separately.  The metal in the pan reduces the intermod enough to prevent any problems.  Another potential issue is having a large group of microphones right next to the receiving antennas, which could overwhelm the receivers with strong signals.  The baking pans help with that situation as well.

Batteries are critical to having a successful show. Having a microphone battery run out during an important scene is every tech’s nightmare.  At the very least, fresh batteries should be used for every show.  Half-used batteries can be saved and used for rehearsals.  Rechargeable batteries are a good option, as battery and charger technology is very solid these days.  However, any type of battery still requires that somebody be assigned to make sure batteries are always changed and/or recharged as needed.

Maintaining Transmitters & Microphones

Rock shows and musical theatre often has performers working hard enough to sweat, which can cause damage to wireless microphones.  A beltpack transmitter worn under a costume can get regularly soaked in sweat, which can cause a great deal of damage to the electronics. The usual tradition in musical theatre is to use unlubricated condoms as a waterproof cover that can be replaced for each show.  For school teachers who may have trouble explaining why their students need condoms, the same basic product is available from companies selling them as “sheaths”.  Thin rubber gloves can also be used.  And of course after each show the microphones should be left in a place where they can dry out before the next show.

Wireless microphone headsets and clip-on lavalier mics can also suffer from exposure to sweat, makeup, hairspray, and their thin wires can be easily damaged.  Almost all such microphones have tiny protective screen caps that fit over the microphone element itself, and it is important to make sure that those caps are used.  Not only do the caps help protect the microphone itself, they are often used to control the sound of the microphone.  Replacement caps are available from the microphone manufacturer, and spares should be kept in stock.  It’s a lot cheaper to replace a little cap if somebody accidentally hoses the mic down with hairspray.

Headset and lavalier microphones should really be considered something that will need to be replaced periodically. Big professional productions usually consider headset or lav mics to be “consumable”, and have a budget for regular replacement.  While a damaged connector can be replaced or wires spliced, I’ve had customers bring in lav mics where the wire itself was falling apart from corrosion caused by sweat.

Conclusion

This has been a long series of articles with many suggestions for the best way to deploy and use wireless microphones.  While you may not be able to implement all of these best practices, doing as many as you can will help you have successes instead of failures.  At TC Furlong we’ve worked with customers from big Broadway style theatres all the way down to worship leaders using a single microphone, and we’ve often been able to get good results without them having to spend a lot of money on new equipment. Whether you are an RF novice, or an expert in your own right, our technicians are available to provide advice and recommendations, based on our collective decades of experience with production wireless systems.

If you’d like to learn more about the deployment of wireless systems for large, complex, high-pressure shows, check out the webinar we hosted with special guest presenter James Stoffo, Strategies for Large Scale Wireless System Deployment:

Interested in purchasing a wireless system? Reach out to our Sales Team at 847-367-9588 or sales@tcfurlong.com for comprehensive help selecting the right wireless system for your needs, complete with antennas and all the other accessories you’ll need.

We also carry hundreds of channels of production wireless equipment in our rental inventory, and our experienced Project Managers can help design and implement a wireless system for your next show. Reach out to them today at 847-367-9588 or rentals@tcfurlong.com to get started.

by Scott Helmke

This blog post is the sixth entry in an ongoing series all about wireless systems – background info, best practices, and useful tips & tricks. Click here to get caught up on the previous articles.

This is the seventh blog article in our wireless series.  In the previous article I wrote about using antenna distribution to clean up both your RF performance and also your wireless rack.  In this article I’ll be writing about some better choices in antennas.

Omnidirectional Antennas

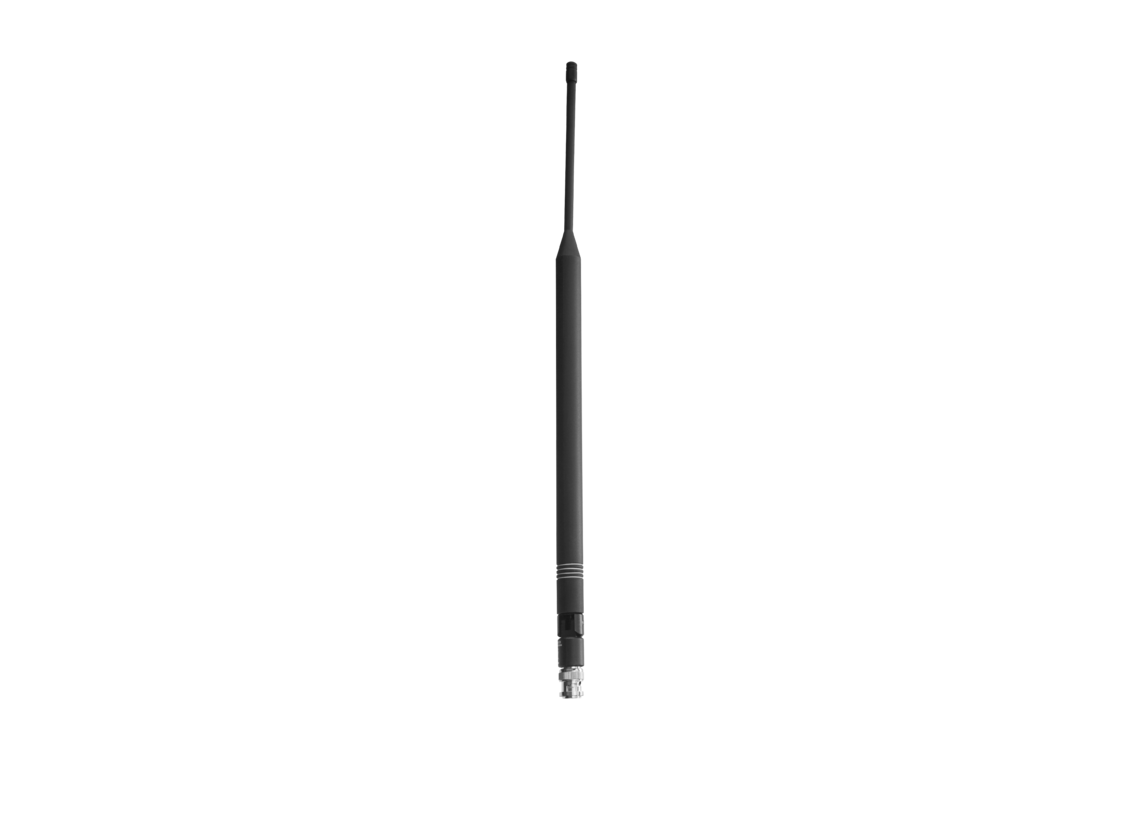
The antennas that most people use are, no surprise, the ones that came bundled with the system.  Often referred to as “whips”, these antennas might be rather primitive bits of wire and plastic, but the nicer ones might actually be pretty good.  The antennas Shure bundles with their better quality systems such as QLXD and beyond fit the generic “whip” name but are technically “center fed ½ wave dipole” antennas.  If you were to cut one open you’d find more than just a length of wire.  The “half wave” part of that name is important, as antennas work best when they are the same length as one of the RF waves coming from the microphone.  That ends up being a little on the large side, so often a good compromise is to go with a half or a quarter of the wavelength.  The cheapest antennas are usually just a quarter wave long.  But the important thing to take from this is that the antenna needs to be designed for the frequency band that your microphone uses.  While an antenna of the wrong length will still work in many cases, having the right length works best.  More advanced antennas will be designed to work well over wider frequency ranges, but it is always something you should keep in mind especially when considering antennas to feed several different frequency bands through antenna distribution systems.

The most important specification about antennas, after the frequency range, is the directional pickup pattern. The whip-style antennas that come bundled with wireless systems are usually referred to as “omnidirectional”, meaning that they pick up equally well from all directions.  This isn’t entirely true, as the directional pattern is more like a torus or donut shape.  These antennas pick up best from the side rather than the end of the antenna.  Don’t point the tips of your antennas at the stage, in other words.

Directional Antennas

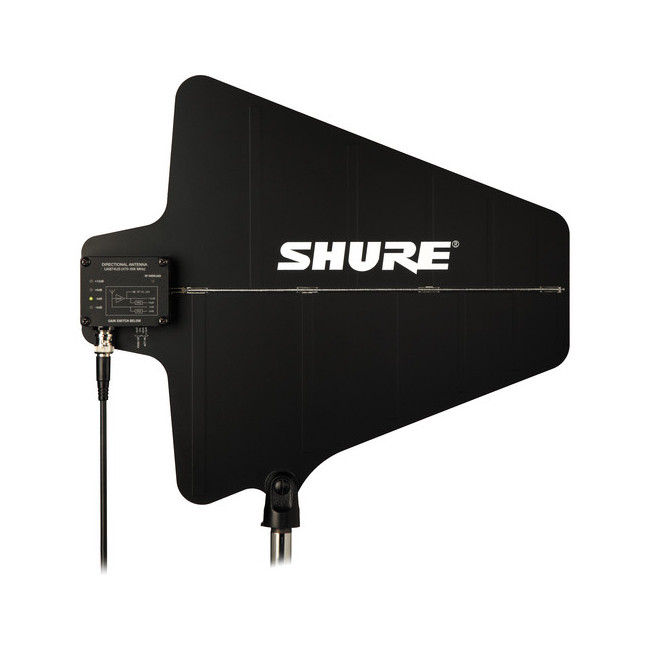
The antenna you will see being used in most professional systems is the log-periodic directional antenna, most often referred to as a “paddle” or “shark fin” antenna.  These antennas pick up best from one direction, and less from the other directions.  By concentrating the pick up pattern in one direction these antennas can usually pick up microphone signals from longer distances than omnidirectional antennas.  This also means that the antennas need to be in a location where they can be aimed at where the microphones are being used, such as from the side of a stage or from the front of house location.

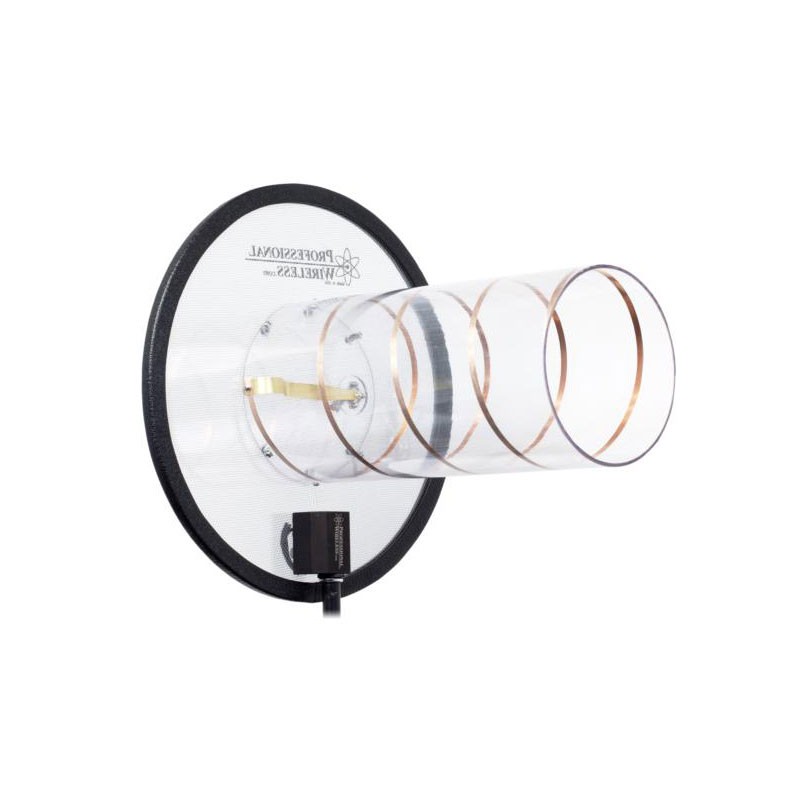
The most advanced antennas found in regular use are the “helical” antennas, or more properly “helically polarized” or “circularly polarized” antennas. Like the log-periodic paddle antennas these have a directional pickup pattern, but they also feature a different antenna polarization.  Most antennas, including whip and paddle antennas, have “linear” polarization.  Put very briefly, RF waves have a particular polarization direction, and the system works best if the transmitting antenna (on the microphone) is oriented in the same direction as the receiving antenna.  A microphone held vertically will work best with a receiver antenna mounted vertically, but a microphone held horizontally will not be picked up very well by a vertical receiving antenna.  If you are using a receiver with two “diversity” antennas, you can put the antennas at different angles to cover any possible angle that the transmitter might be held at.  A helically polarized antenna does not have a polarization angle at all, meaning that it will pick up equally well no matter what angle the microphone is held at.  These antennas are most often used with in-ear monitoring (IEM) systems because the receiving beltpacks rarely have diversity antennas – with only one receiving antenna you want the best transmitting antenna possible.

Antenna Amplifiers

Some antennas have built-in amplifiers to boost the signal strength.  This feature is not meant for picking up distant or weak microphone signals, though.  It’s really only meant to compensate for long antenna cable runs back to the receiver.  An antenna amplifier can overload on strong signals, as well as adding its own noise to the signal.  My usual rule of thumb is to avoid antenna amplifiers unless I’m running at least 50 or 100 feet of antenna cable.

Choosing The Right Antennas

Which antenna should you use?  It really depends on your situation.  Directional antennas are great if you have all the action happening in a place where you can point the antennas at it.  On the other hand if the receiver is located in the middle of all the action (such as on a guitar pedalboard) then an omnidirectional antenna would be best.  Ideally your antennas are mounted high up, so that they can “see” over the heads of the crowd or other obstacles and get a clear “view” of the stage.  Even the best antenna will give disappointing results if it is blocked by people (who absorb RF) or metal (which blocks and reflects RF).  High quality coaxial antenna cables should be used if the antennas are mounted away from the receivers, and with as short a cable length as possible.  

In some situations a long (but high quality, low loss) cable can be used to put antennas close to the microphones, giving better results than an antenna far away from the microphones.  For a hip-hop act on a large festival stage, I will attach a Shure half-wave whip antenna to a short microphone stand and place it right in among all the monitors and lights along the front edge of the stage.  I might have to run 100 feet of cable, but the whip antenna will be much closer to the performers than a directional antenna mounted at the side of the stage.  My other antenna could be a Shure paddle antenna pointing across the stage.  

Conclusion

Finally, because this question comes up a lot, it’s almost always fine to use antennas from one manufacturer for wireless systems from another.  As long as the antennas and antenna distribution cover the frequency range of the wireless systems it will work fine.  Some antennas need 12 volt DC power on the antenna line to power internal electronics, but every major manufacturer provides that power in the same way.

Stay tuned for the final entry in this series. Next week, we’ll wrap things up with some final thoughts and a number of handy tips. In the meantime, if you’d like to take an even deeper dive into antennas, check out the recording of our Antenna Theory webinar with RF expert James Stoffo:

Interested in purchasing a wireless system? Reach out to our Sales Team at 847-367-9588 or sales@tcfurlong.com for comprehensive help selecting the right wireless system for your needs, complete with antennas and all the other accessories you’ll need.

We also carry hundreds of channels of production wireless equipment in our rental inventory, and our experienced Project Managers can help design and implement a wireless system for your next show. Reach out to them today at 847-367-9588 or rentals@tcfurlong.com to get started.

by Scott Helmke

In 2021, we featured a round of special webinar presentations from industry veteran and RF expert James Stoffo. Both sessions are available to view on our YouTube channel.

This blog post is the sixth entry in an ongoing series all about wireless systems – background info, best practices, and useful tips & tricks. Click here to get caught up on the previous articles.

This is the sixth blog article in our wireless series.  In the previous article I wrote about using frequency coordination software to help decide what frequency bands to use when buying wireless gear.  In this article I’ll be writing about deploying antennas, and why you need “antenna distribution” instead of the usual tangle of individual antennas on your rack.

Antenna Deployment Guidelines

Assuming you’ve just got one channel of wireless (i.e. one transmitter and one receiver), you probably have two receiver antennas.  The reason is because things don’t tend to work all the time with just one antenna. Wireless signals tend to be a bit finicky, which makes sense when you understand that they’re moving at nearly light speed and constantly bouncing off anything made of metal. What can happen (in fact, often does happen) is that two or even more reflections of the same signal will arrive at the antenna, but at slightly different times.  Because of the time difference what the antenna picks up might be a massively degraded signal, and what you end up hearing is the audio dropping out for a moment.  The solution for this is “antenna diversity”, which is a fancy way of saying “two antennas”.  Simply put, the odds of weird stuff happening at one antenna are pretty high, but much lower with two antennas.  So you get two antennas, the receiver has two places to plug in antennas, and the most important thing to do is locate the antennas away from each other.  Most receivers that have the antennas attached only give you a few inches of separation, but a couple feet is much better.  Also it can help to put the antennas at different heights, with different angles, etc.  Remember that word “diversity”.

Beyond just having antenna diversity, it’s important to place the antennas where they can “see” the wireless microphone.  Wireless works best on “line of sight”, where there is open space between the transmitter and the receiver antennas.  If the receiver is mounted in a metal rack away from where the microphone will be used, then the antennas need to be mounted somewhere out in the open, not buried inside the rack where the metal walls will block any RF signals (yes, I’ve found installations where this had been done).  Antenna mounting kits and extension cables are available for this purpose.

Antenna Distribution

What if you have more than one microphone and receiver?  What if you have a dozen microphones and receivers?  Having all those antennas tangled together around the receivers is not only inconvenient and looks silly, but it can also cause reception problems.  That’s because as the RF signal is moving all over the place and bouncing off everything made of metal, they’re bouncing off the antennas as well.  Having two antennas close together means that neither one will work as well, and a whole bunch of antennas is even worse.  The solution is antenna distribution systems.

Antenna distribution is actually pretty simple. It’s exactly the same concept as running a splitter off your cable TV service to connect more than one television.  You’d have one antenna connected to a splitter, which has several outputs to feed several receivers.  In the wireless microphone world everything is doubled because of antenna diversity, but it’s the same concept.  Everything looks cleaner, and because you only need one pair of antennas you can buy better antennas and share the benefit over all your receivers. And manufacturers make it easy by selling antenna distribution units matched to their products – often the antenna distributor will include power outputs so you can get away from using all those wall wart power supplies for the receivers.

Conclusion

What if you absolutely can’t afford antenna distribution?  Maybe you’re even using wireless so cheap that the antennas are permanently attached to the receivers?  Well, you can still use some of the above guidelines to improve your reception.  First thing is to make sure your receivers have a clear view of the action!  Put the receivers up where there is line of sight to the microphones.  And spread the receivers out so that the antennas have some space.  Don’t just stack everything in a pile, spread them out as much as possible.

Now that we’ve established some guidelines for antenna deployment, your next question might be: “What kind of antennas should I actually use?”. While your first thought might be to use the “whip” antennas that come bundled in with the purchase of a wireless system, there are many other options available that can greatly improve the performance of your wireless systems. Please join me in our next blog article “Fancy-pants antennas and why should you even care?”.

Interested in purchasing a wireless system? Reach out to our Sales Team at 847-367-9588 or sales@tcfurlong.com for comprehensive help selecting the right wireless system for your needs, complete with antennas and all the other accessories you’ll need.

We also carry hundreds of channels of production wireless equipment in our rental inventory, and our experienced Project Managers can help design and implement a wireless system for your next show. Reach out to them today at 847-367-9588 or rentals@tcfurlong.com to get started.

by Scott Helmke

In the months of May and June 2021, we featured special webinar presentations from industry veteran and RF expert James Stoffo. The first webinar, Antenna Theory for Wireless Systems, was held on May 25th 2021, and a full recording is now available on our YouTube channel. Our second webinar featuring a presentation from James, Strategies for Large Scale Wireless System Deployment, is available as well.

This blog post is the fifth entry in an ongoing series all about wireless systems – background info, best practices, and useful tips & tricks. Click here to get caught up on the previous articles.

This is the fifth blog article in our wireless series.  In the previous article I wrote about standalone frequency coordination software, and I recommended you actually download Shure’s Wireless Workbench (WWB) and spend some time learning it.  At our office we use WWB quite a bit, and sometimes long before we’ve even got wireless systems to coordinate.

This article is about actually choosing what wireless gear to buy or perhaps rent.   On the surface it seems simple, you have $X and you need quantity (Y) microphones, right?  Well it starts that way.  You figure out you can buy four (4) microphones, you call up a dealer (timely reminder that TC Furlong Inc. is an authorized reseller for all major manufacturers of production wireless equipment, and that we carry hundreds of channels of wireless mic, IEM, and intercom systems in our rental inventory), and the second question they might ask is “which frequency band do you want?”.  Right about there is where the plan starts going off the rails.  You have to choose a frequency band?  How do you do that?  You just want some microphones!  While we are always more than happy to make recommendations on the best frequency band for your purchase or rental, understanding the subject will help you quite a lot too.

What are Frequency Bands?

The story with “frequency bands” is that a wireless microphone system can only tune to a limited range of frequencies.  The cheapest stuff is built with one frequency – that’s it.  If there’s a TV station on that frequency, you’re out of luck.  The most expensive wireless has a wide tuning range, such as Shure’s Axient Digital which can tune over the whole legal UHF TV band.  Your budget will likely fall somewhere between the two, meaning that the manufacturer might have two or three different frequency bands to cover the UHF TV band for the wireless series you are buying.  There might also be a couple bands available in a different part of the spectrum, such as Shure ULXD in VHF.  

So what you need to be able to do is figure out what frequency band would work best for you, in your specific location.  This is where frequency coordination software is invaluable.  Not only will it help you avoid buying into a frequency band that has very little space available for microphones, but it can also help you avoid buying gear that will interfere with wireless you might already own.  We do this a lot in our sales and rental offices, using WWB to play “what if” games based on a customer’s location and existing wireless gear.

How to Choose a Frequency Band

Without getting into trying to teach everybody how to use WWB (Shure has some great videos available on the subject), the process is just to start up WWB, put in the local postal code, and enter in all the wireless gear that might already be onsite.  It’s even possible to put in the specific frequencies that are being used.  After saving that as a “show” file in WWB so that it’s easy to start over, just put in the microphones or other wireless systems you are thinking of buying.  Maybe put in extra channels, just to see how many frequencies WWB can find for that specific make, model, and frequency band.  It’s pretty easy to see whether there’s space available or whether you need to try a different frequency band. Below is an example of WWB displaying available bands of Shure QLXD wireless. The vertical red bars represent TV stations to avoid.

There are some strategies to consider while doing this, beyond just finding what might fit.  If you already have a Shure wireless microphone receiver that can connect to WWB, you can usually use it as a “scanner” in WWB to see what’s actually in your local spectrum (though only for the frequency band of that receiver).  You may also be able to rent a compatible receiver or scanner that will cover the whole spectrum that you’re interested in.  

Also, it’s good practice to put microphones and in ear monitor (IEM) or intercom systems into different frequency bands when possible.  Keeping the powerful IEM transmitters out of your microphones’ frequency band will help reduce interference and intermod problems.

Conclusion

A final consideration for choosing specific gear is just the practical.  Buy the best you can afford, and if somebody generously offers to buy a bunch of cheap wireless be prepared to politely explain how those systems wouldn’t work in your situation.  Good wireless isn’t cheap, but the good news is that even the less expensive systems from reputable manufacturers are still pretty good quality.  Please don’t buy “too good to be true” systems from eBay; often these are cheap clones of the real thing and might not even be legal to use.

So, is that all there is to it? Actually, we’ve now covered the most important steps to having a successful wireless deployment.  But there’s more – in our next blog article I’ll be writing about antennas, how to use them, and the importance of proper antenna distribution systems.

Need help with a frequency coordination for your next show? Frequency coordination is just one of the many services we offer.

Interested in purchasing a wireless system? Reach out to our Sales Team at 847-367-9588 or sales@tcfurlong.com for comprehensive help selecting the right system – in the right frequency band – for your needs.

We also carry hundreds of channels of production wireless equipment in our rental inventory, and our experienced Project Managers can help design and implement a wireless system for your next show. Reach out to them today at 847-367-9588 or rentals@tcfurlong.com to get started.
by Scott Helmke

This blog post is the fourth entry in an ongoing series all about wireless systems – background info, best practices, and useful tips & tricks. Click here to get caught up on the previous articles.

This is the fourth blog article in our wireless series. In the previous article I wrote about actually finding (or more often, predicting) good frequencies for wireless microphones and other wireless audio devices using simple built-in features. This article will be about using standalone frequency coordination software.

There’s a saying that goes something like “Marconi invented interference when he built his second transmitter”. We can’t really confirm that, but there’s a lot of truth to the saying. And I would imagine that like every other successful inventor he had to come up with a solution, possibly one that Tesla had already found, but that’s a different topic altogether.

What Do Frequency Coordination Softwares Do?

Wireless systems manufacturers have been providing some type of system for dealing with multiple channels for many years now. While it’s straightforward to calculate intermod frequencies and generate lists of safe frequencies, it’s only been in recent years that the average audio tech has had access to enough computing power to actually do it themselves for large systems. And today we have several choices in standalone software to help coordinate large groups of wireless systems.

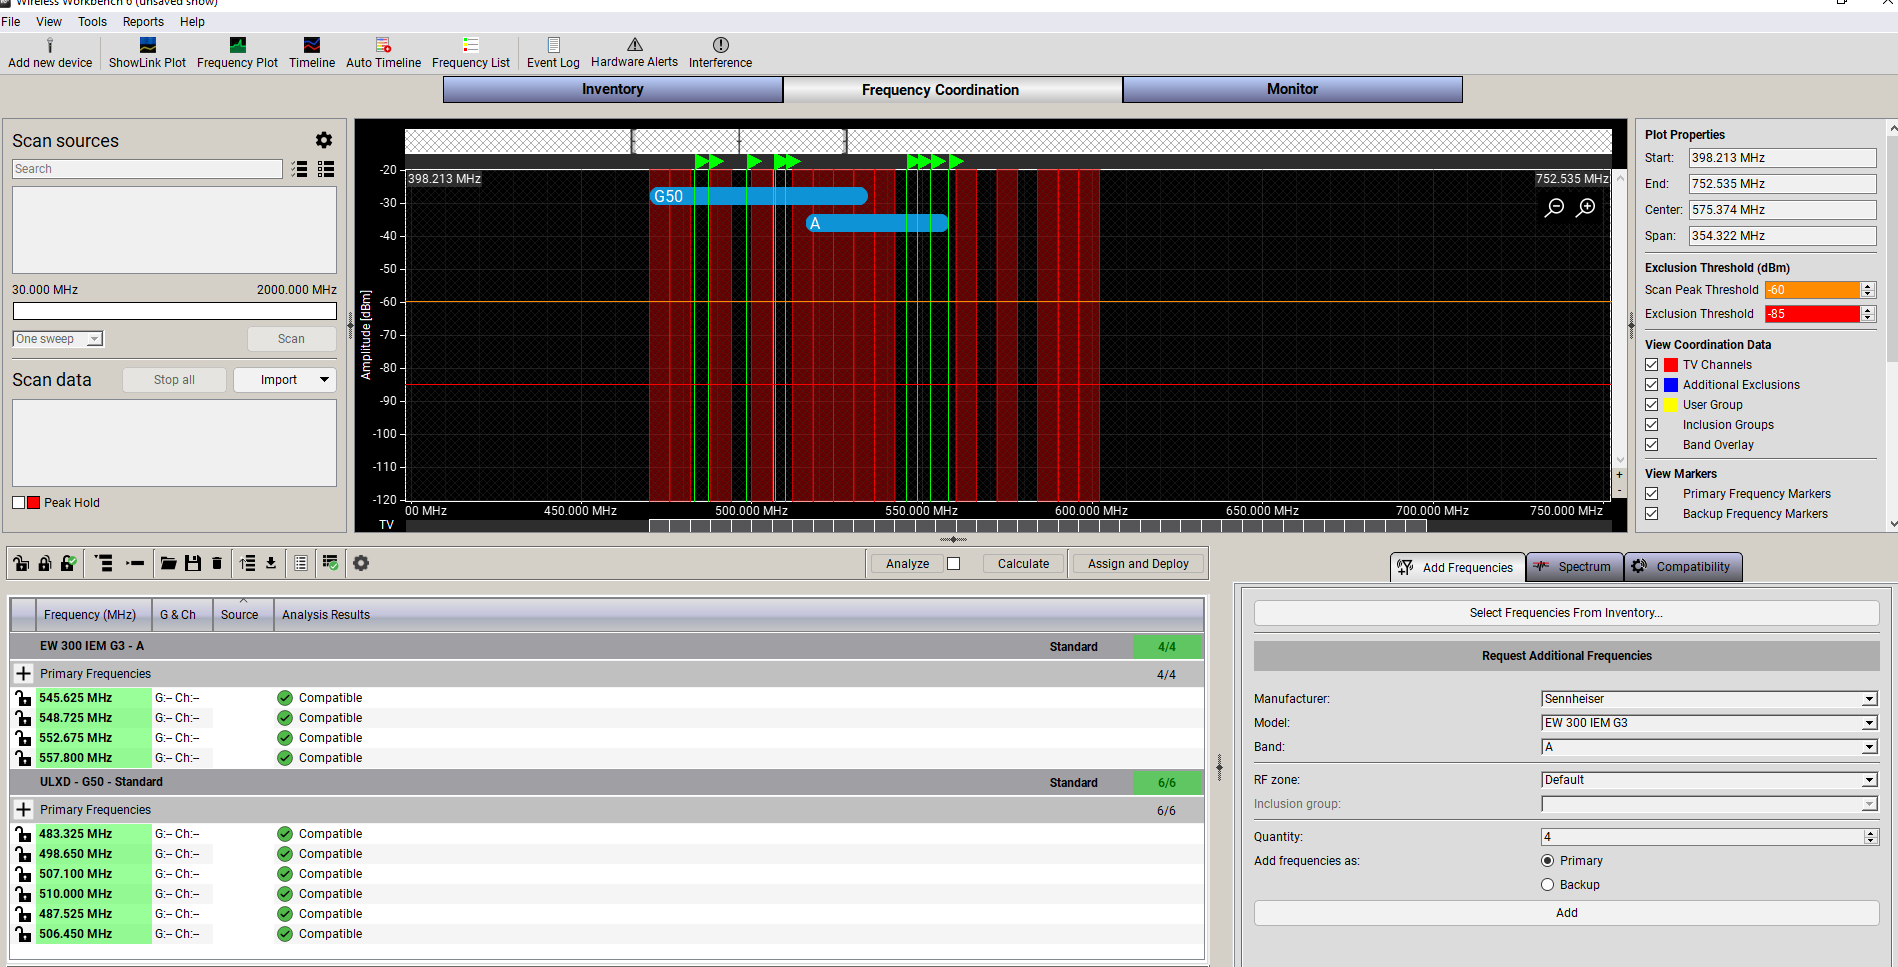
These software applications do roughly the same thing. You enter your location (usually just a postal code), and you enter information about the wireless systems you want to use. For instance, you might have six channels of Shure ULXD in the G50 band, along with four channels of Sennheiser Evolution IEM in the A band. The software uses your location to figure out which TV channels to avoid, based on FCC databases of TV broadcasters. The software then calculates frequencies for all the gear that you have entered. There may also be remote control of attached wireless gear, including the ability to use attached receivers to scan the local RF spectrum instead of relying on downloaded information.

Which Frequency Coordination Software Should I Use?

The first really modern software application dedicated to coordinating large event wireless is Intermod Analysis System (IAS) from Professional Wireless. This software downloads FCC data on TV stations and includes a large database of wireless products from different manufacturers. It’s not cheap, being about $550 for the professional version. But for years it was the only solution available for coordinating large wireless systems, and it has been a mainstay in the professional event world.

The main competition to IAS is Shure’s Wireless Workbench (WWB). This software started as a tool for coordinating and controlling only Shure wireless products, originally the UHF product line which had an early system for networking receivers together. As Shure has developed more and more products with modern networking they’ve continued to update the software, and within the past few years Shure added other manufacturers’ products to the coordination database. With the most recent versions of WWB it is possible to coordinate large events spread over multiple stages, even if you are not using Shure gear. Below is a recording of a webinar we hosted with Shure in 2020, where we discussed the features of the latest WWB update, and analyzed a coordination done in WWB for a large multi-stage music festival:

Other manufacturers do have software for coordination, but limited to compatibility with their own products and with limited coordination tools. Sennheiser’s Wireless Systems Manager (WSM) does allow users to create profiles for non-Sennheiser gear, whereas Shure already has many profiles included in WWB.

Which software should you use? Shure’s WWB is an easy choice, since it is completely free to download and use. Professional Wireless’s IAS is more of a professional tool, allowing you to trade certain risks in return for more frequencies. If you have a large amount of Shure systems which can be controlled by WWB, then being able to deploy your coordination to the equipment with just a few mouse clicks is a huge time saver compared to manually tuning everything. If you have a large Sennheiser system then you might find it worthwhile to use WSM even with its limited coordination features.

Conclusion

The uncomfortable truth about coordinating large wireless systems is that a lot of people are doing it, and a lot of those people are not professional wireless technicians. Quite often it’s the school theatre teacher who has been “gifted” with a motley assemblage of different wireless systems from different manufacturers, and who has to figure out how to make them all work together. For almost anybody who works in live audio and might be using wireless microphones, I strongly recommend downloading Shure’s WWB and watching a few videos to learn to use it. It’s not especially difficult to learn, and can make a huge difference in the success of your events.

Stay tuned for the next article in the series. Next up, we’ll give you some guidance to help you choose the right wireless gear for your next rental or purchase.

Need help with a frequency coordination for your next show? Frequency coordination is just one of the many services we offer.

Interested in purchasing a wireless system? Reach out to our Sales Team at 847-367-9588 or sales@tcfurlong.com for comprehensive help selecting the right system – in the right frequency band – for your needs.

We also carry hundreds of channels of production wireless equipment in our rental inventory, and our experienced Project Managers can help design and implement a wireless system for your next show. Reach out to them today at 847-367-9588 or rentals@tcfurlong.com to get started.