Rentals

The live events landscape has shifted dramatically this year. Social distancing measures and travel restrictions have brought virtual events and livestreams to the forefront in ways they never have been before. The TC Furlong Inc. live events team has leveraged our collective decades of experience, vast inventory of professional equipment, and relationships with trusted partners throughout the AV production industry to support all manner of live events.

Recently, we’ve provided production support for several “hybrid” events. These are events that have a limited, socially distanced in-person audience, as well as a remote audience watching via livestream. An upside of the hybrid event model is that the audience is not limited by geography or venue size; several of our customers have found that their hybrid event’s virtual audience dwarfed what they would normally expect for a strictly in-person event. Special considerations for hybrid events often include distributed loudspeakers and video displays throughout the venue, allowing for proper social distancing, and a consistent experience for all attendees. 

While virtual and hybrid event productions share many of the same principles of typical live events, additional care must be taken in order to create a safe environment for all crew members and presenters. Whether you’re hosting a traditional event with an in-person audience, a livestream, or a hybrid event combining both, we can take the stress off your shoulders and provide the high quality on-site AV production your event needs.

Here are some highlights of hybrid events we’ve supported in recent months:

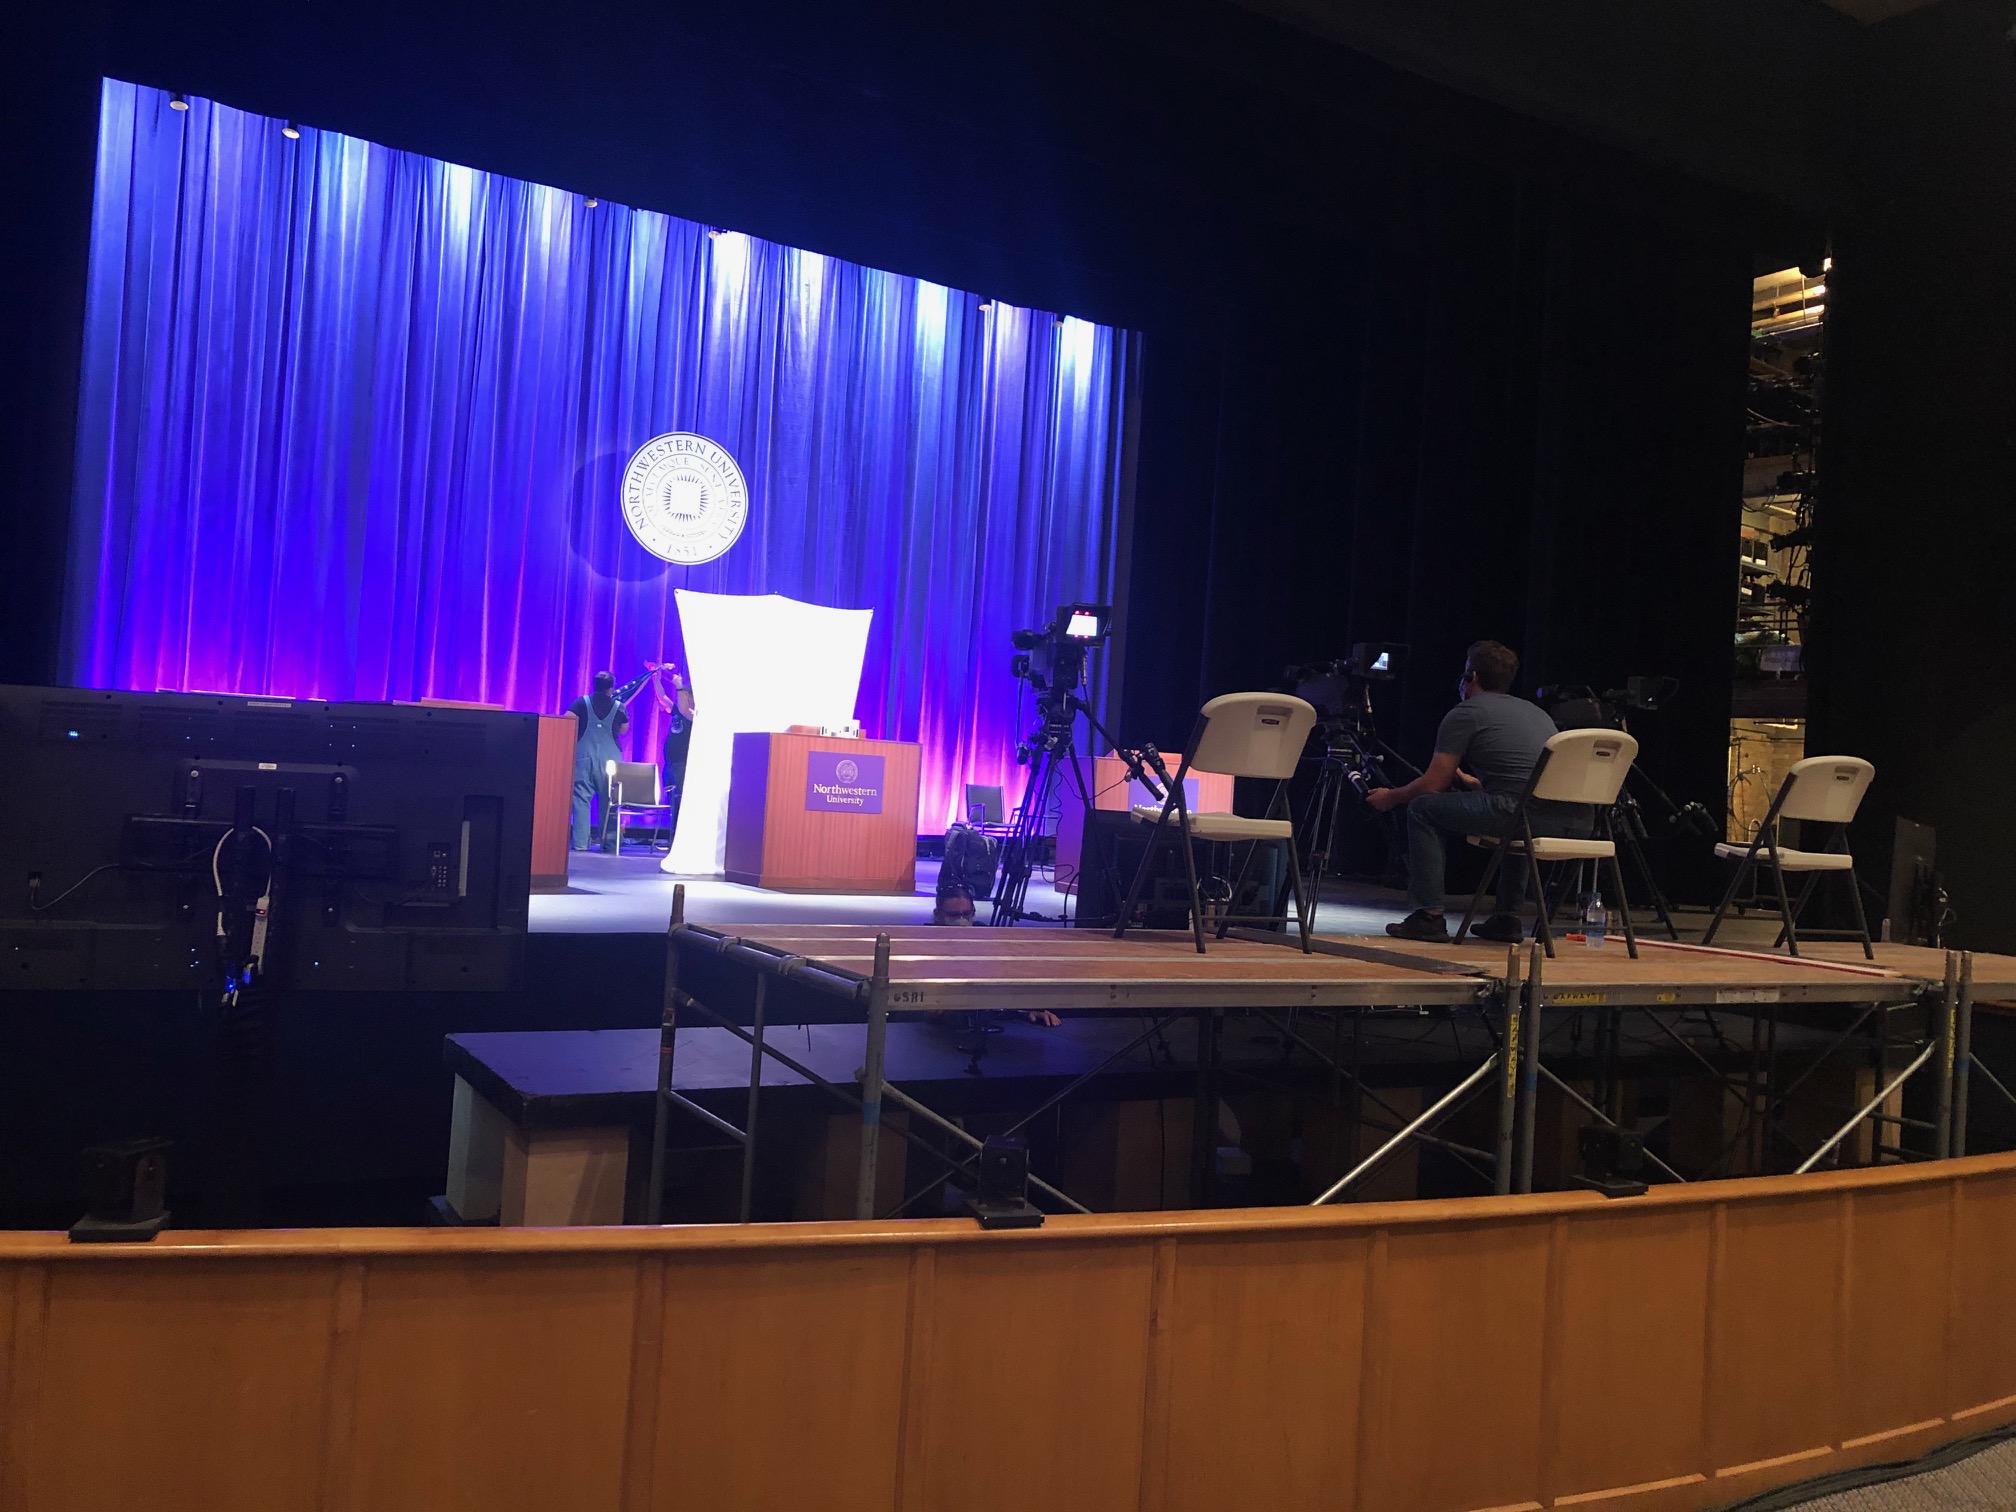
University Commencement

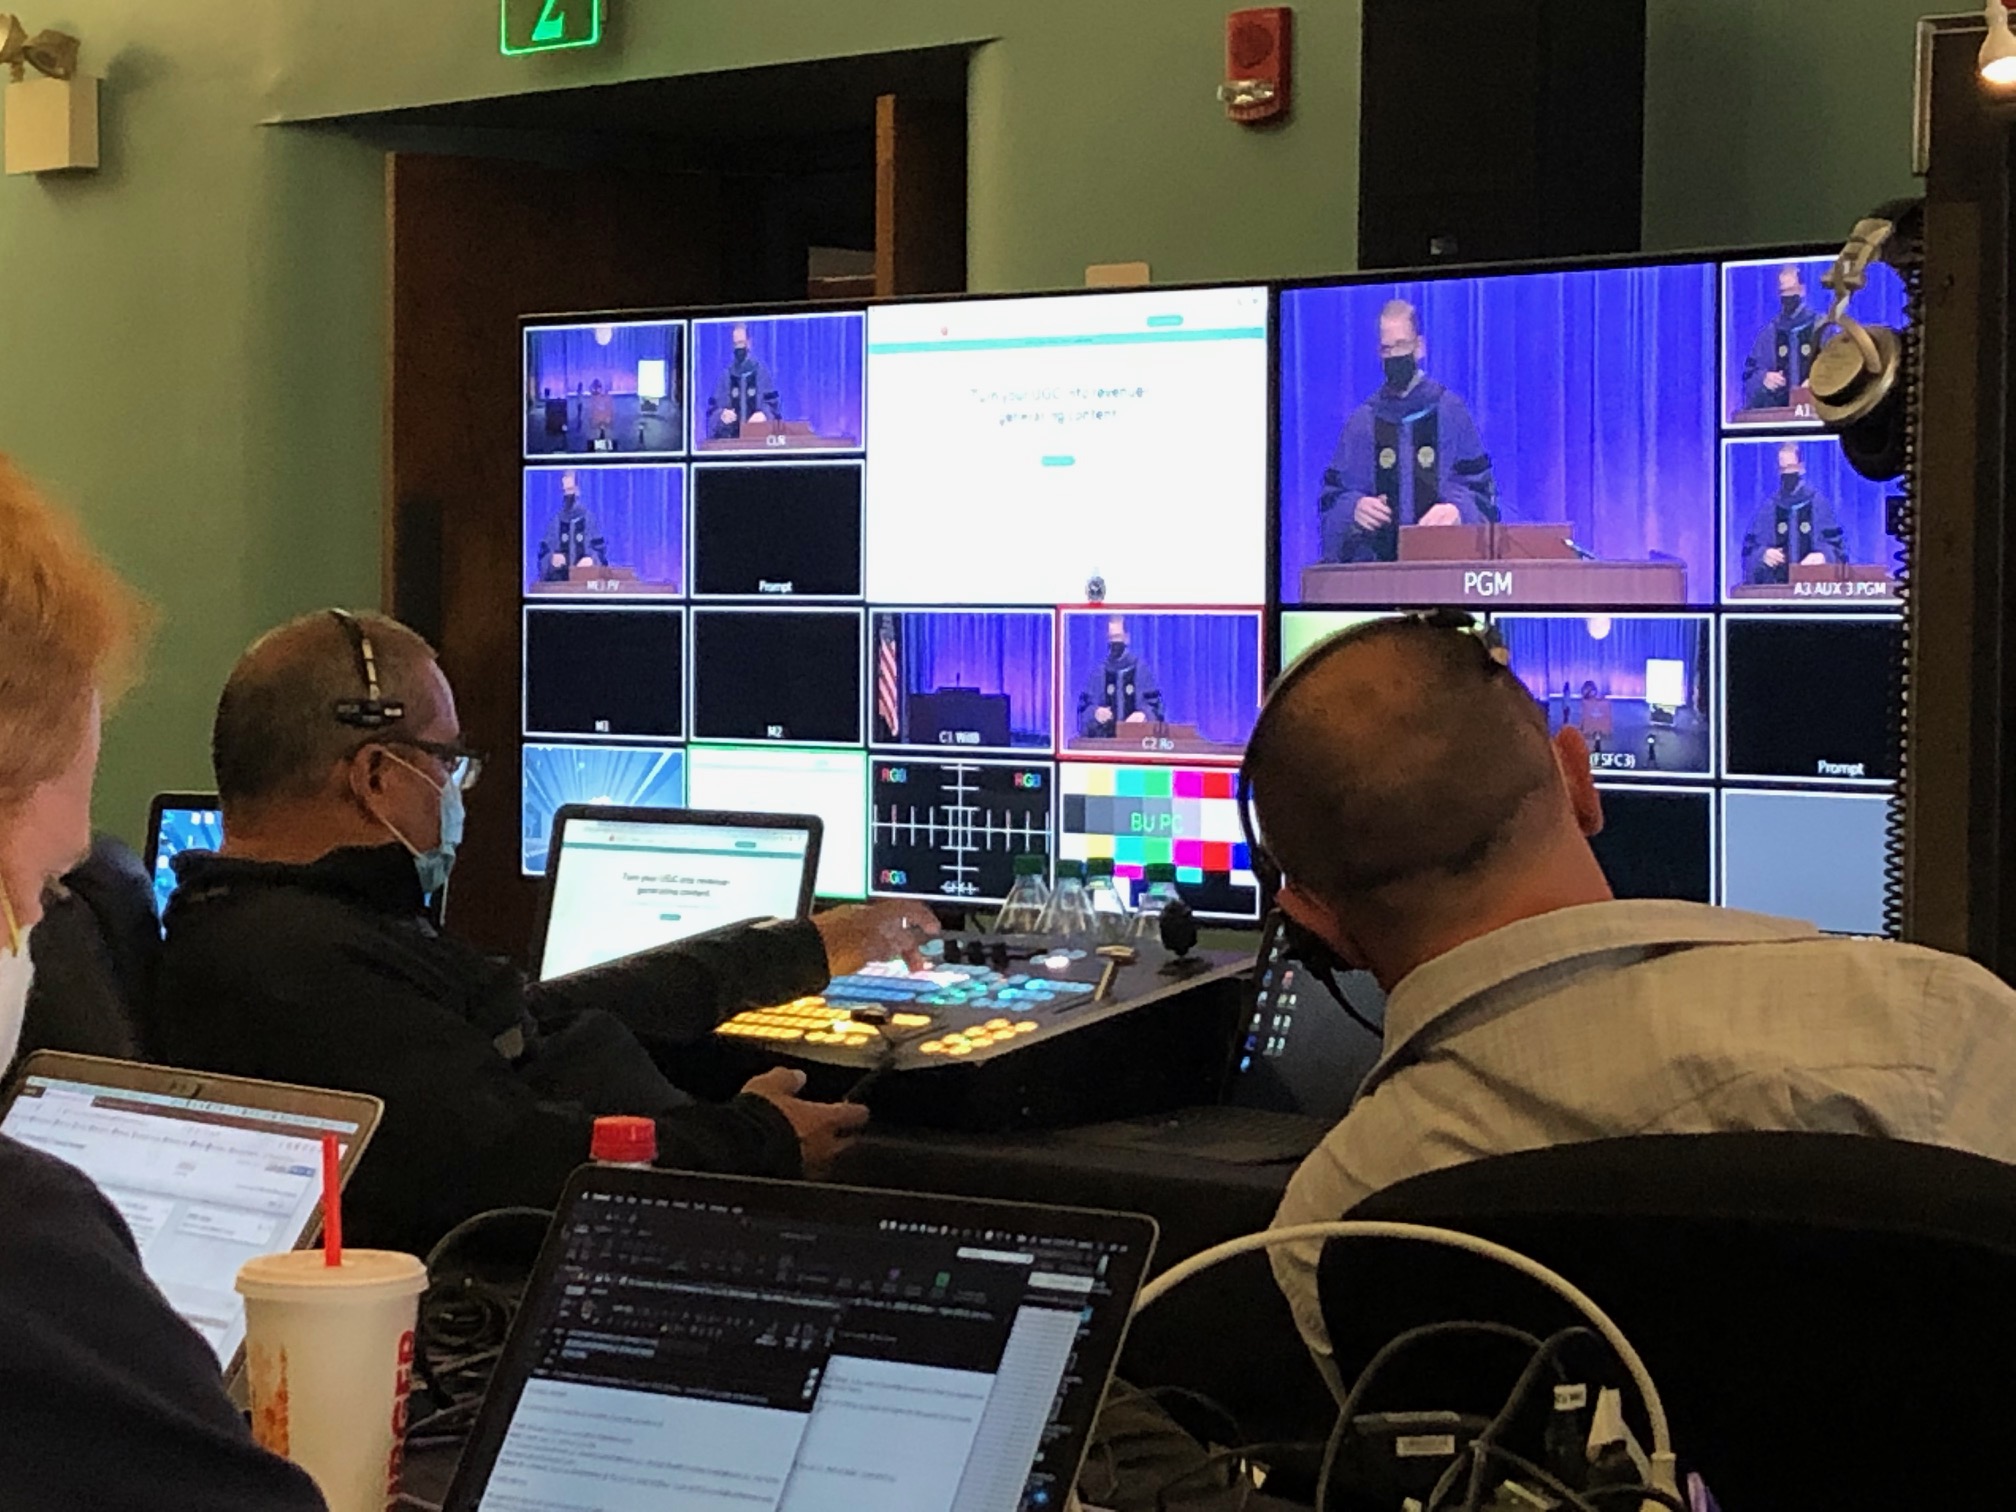
Our production of the commencement ceremony for a major university involved a highly choreographed mix of live and pre-recorded segments. Originally designed as a hybrid event, the live audience had to be struck due to the increased risk of the pandemic. The event was still held in an auditorium to provide the feeling of a live event, and our team was able to create a matrix of audio and video confidence monitors to make interactions between presenters in different physical locations feel more natural and realistic. Through multi-camera video switching, we were able to create a comfortable and safe atmosphere for all presenters. The full scope of the production included a broadcast audio mix for the stream, a full TV control room with a video editor, closed captioning, a sophisticated intercom system, as well as a presidential-style teleprompter and operator.


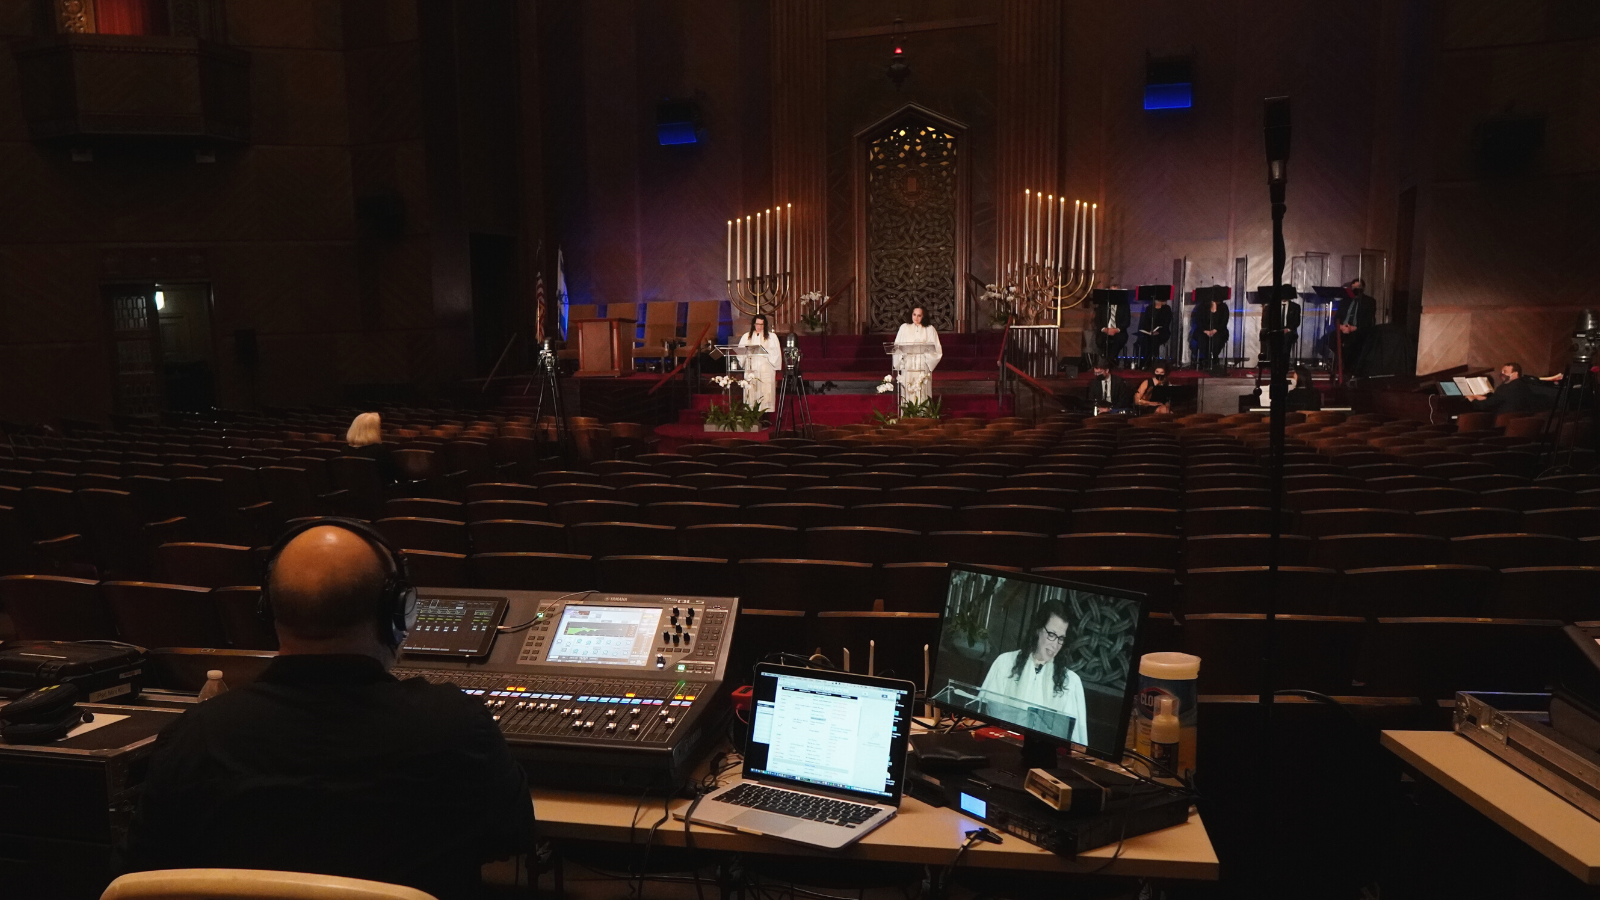
Special Worship Services

Our team provided technical direction for High Holidays services with over 900 virtual attendees for several Chicago synagogues. The live broadcast included a mix of worship leaders (speaking and singing), a small orchestral group, and a choir. Multi-camera video switching and the usage of ambient room microphones in the livestream broadcast mix created an immersive environment for viewers. The broadcast team also integrated the audio stream with the in-house phone system to allow congregation members without internet access to call-in and listen.

Private Event

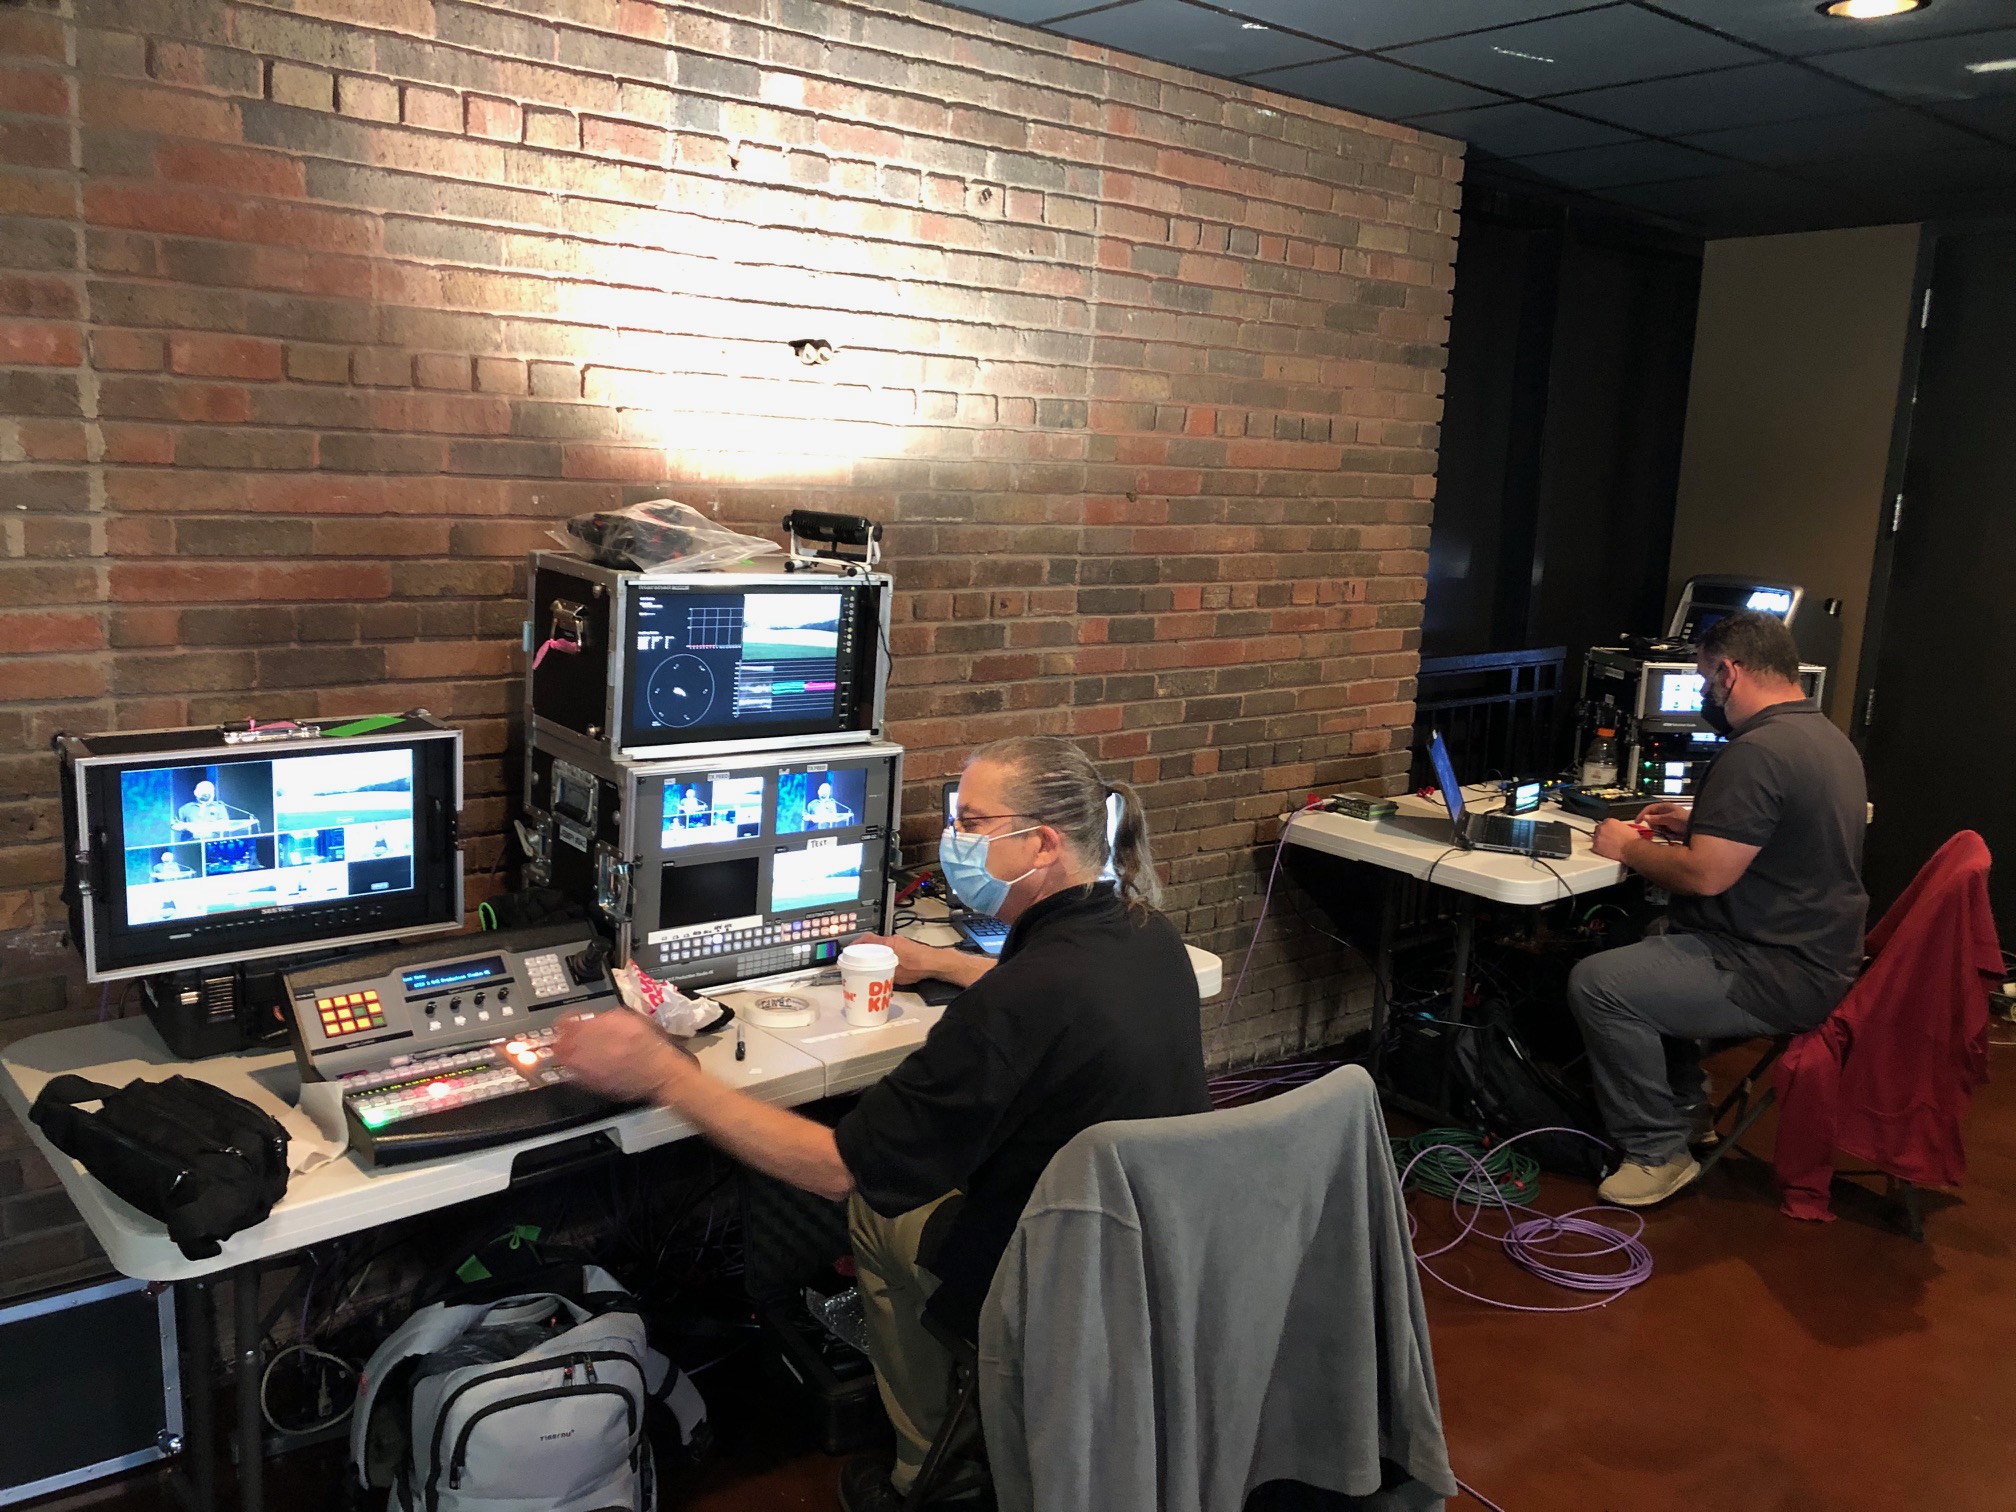
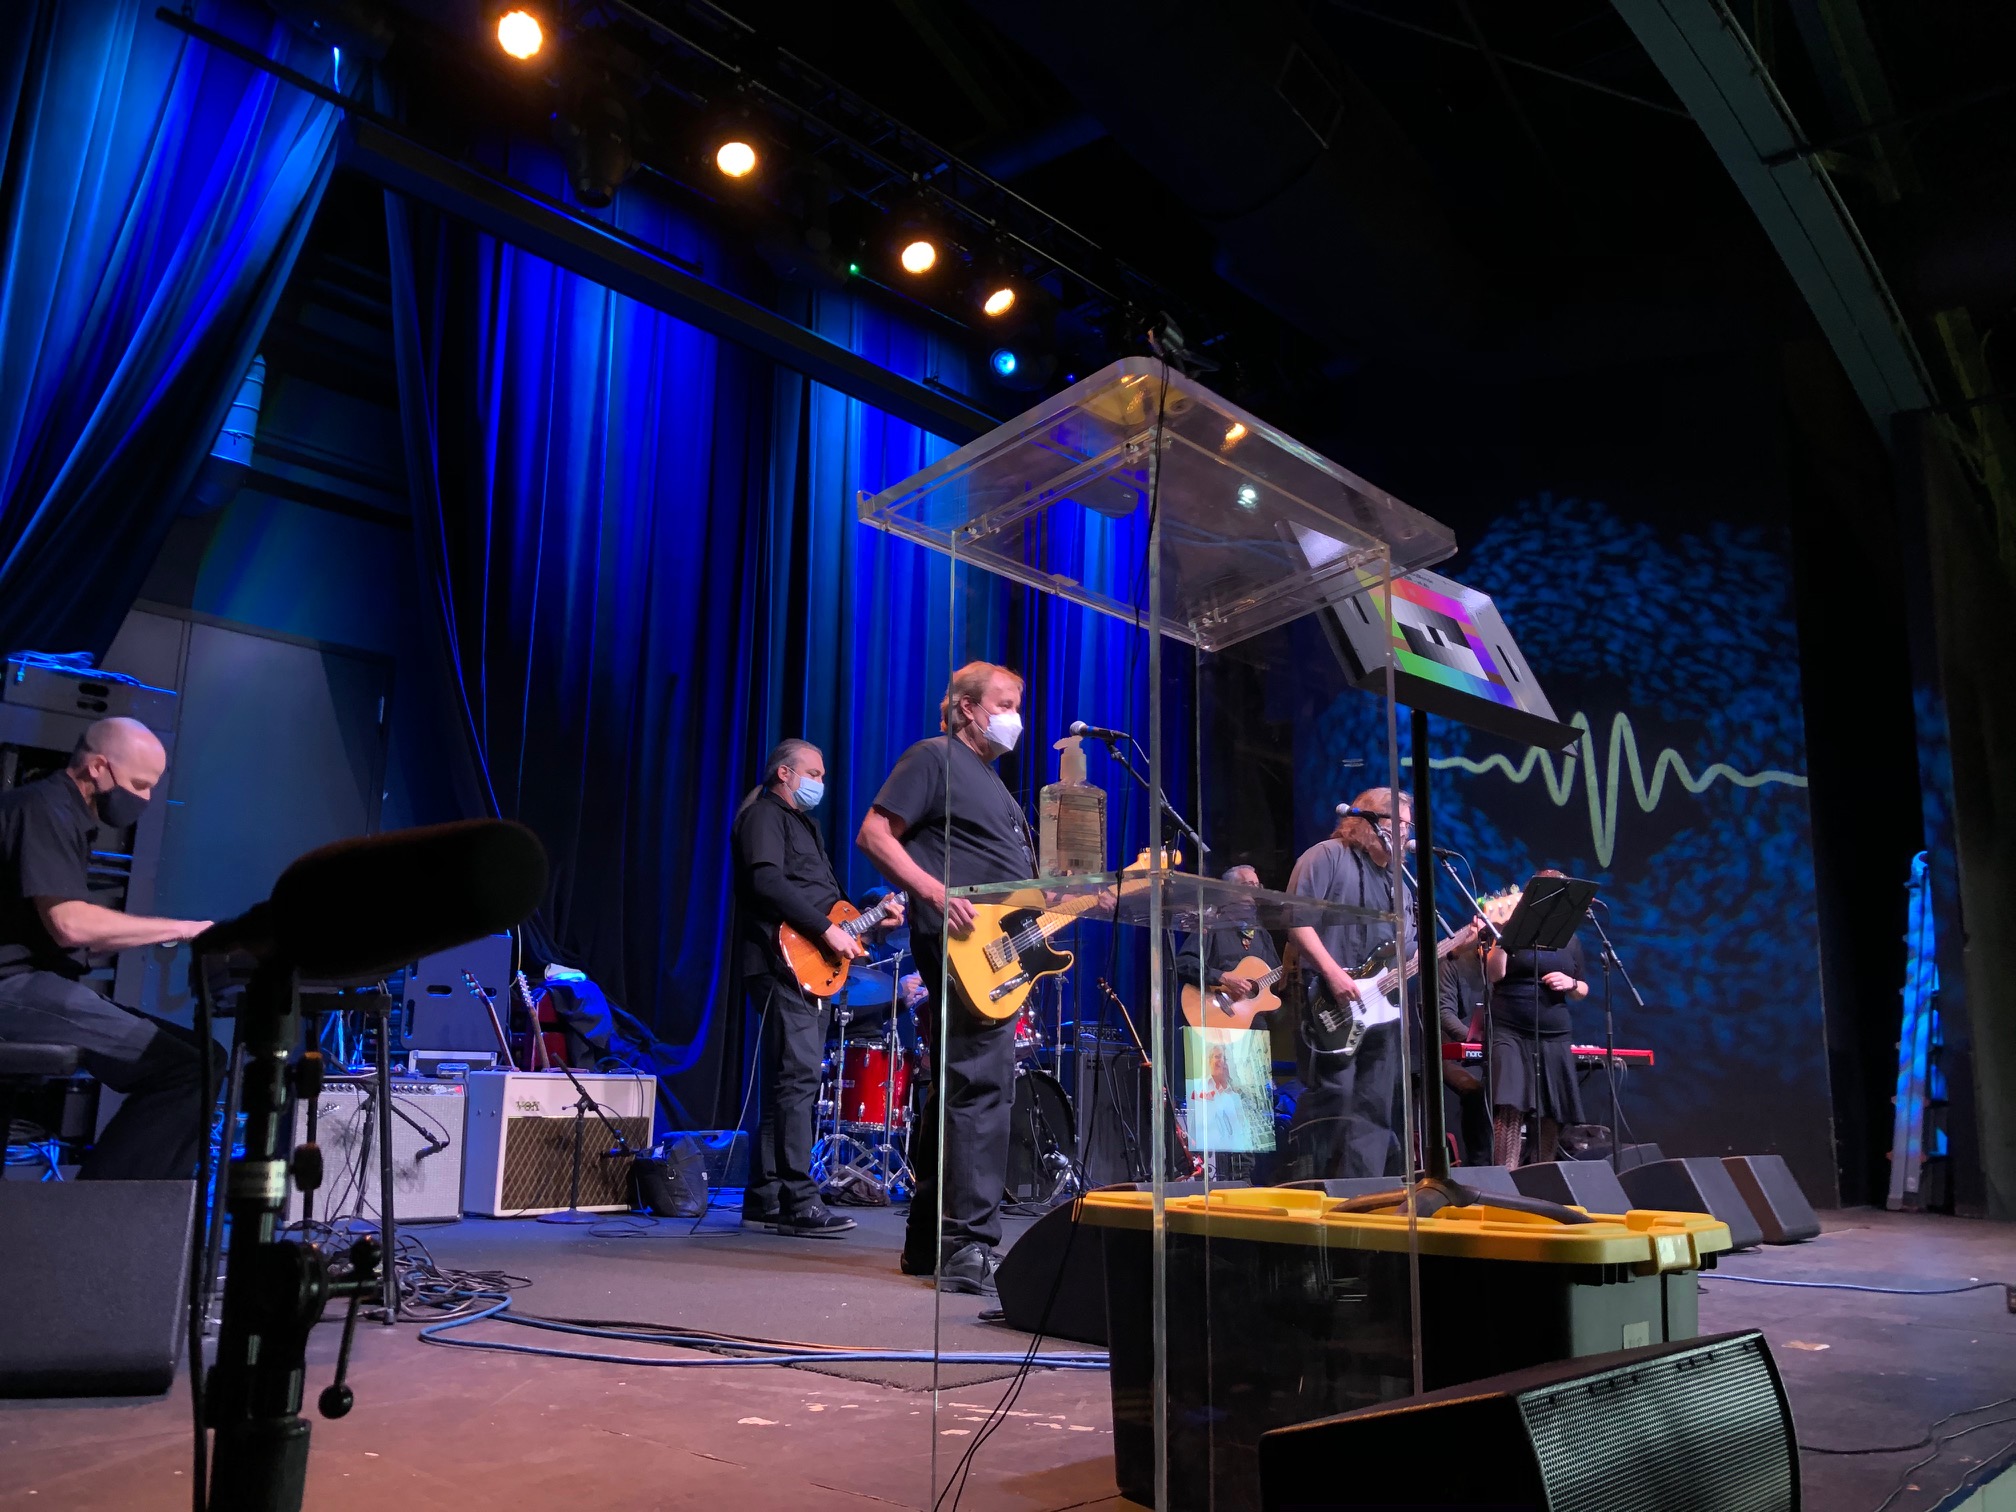
The production crew for this event consisted of over 16 technicians and engineers across multiple disciplines, including audio, video, and lighting, plus stage management and overall production management. The team integrated with the house sound and lighting systems, providing an audio split for separate in-house and broadcast mixes. We reinforced a 7-piece band with floor wedges. Again, another multi-camera shoot with video switching, the video was sent to the livestream, as well as audio/video displays set up at 3 different event spaces throughout the venue for the socially-distanced audience.

Each of the cases listed here was the first foray into hybrid live events for each of our customers. Whether you’re planning a hybrid event for the first time, and need guidance from start to finish, or you’re an experienced event producer just looking for a bit of extra help, our team has the know-how to make your event a success.

TC Furlong Inc.’s live event team can provide a full AV production solution for your next event. Contact one of our Project Managers next time you need flexible, expert planning, and flawless execution for your in-person, virtual, or hybrid event. Give us a call at 847-367-9588, or email Jeff Cech at jc@tcfurlong.com.

What does a direct box (or “DI”) actually do? What are the differences between passive and active DI’s? Which one is the best for my source? It’s well understood that direct boxes are an essential part of any stage package. However, as technicians, we probably put less thought into them than any other part of our signal chain. For a lot of us, the DI might just be a “magic box” that we know we’re supposed to use, but aren’t quite sure why. In this article, we’ll explore the basics of direct boxes, and give you some simple guidelines for using them.

What Does a DI Do?

Put simply, a DI is a device that takes a signal from a source, and adjusts it to the parameters your mixer or stagebox’s preamp will be happy with; namely a balanced, mic level, low impedance signal. To illustrate, let’s look at one of the most common sources that we use a DI with: the electric bass guitar.

The signal output from an electric bass is high impedance and unbalanced. The high output impedance means the signal will degrade quickly over a long cable run. Likewise, unbalanced cables are extremely susceptible to RF interference. For this reason, unbalanced cable runs should be kept as short as possible. A direct box will take the incoming signal, and convert it to a low impedance, balanced signal. The result? You can run a long XLR cable to your stagebox or console, without worrying about signal degradation or interference.

For another example, let’s consider a line level source, maybe an electric keyboard, CD player or other playback device. While there are a couple different standards for line level, both operate at an exponentially higher voltage than mic level, which will overload your mic preamp. A direct box steps down the voltage from a line level source, and again, outputs a balanced signal, which your preamp will accept.

Most DI’s have an input pad to attenuate particularly hot incoming signals, a ground lift to deal with any pesky hums, and a throughput (typically labeled “THRU”) to feed an instrument’s unaltered signal to the musician’s amplifier. Your DI might also have a polarity switch; if you’re running an instrument through a DI, and also have a mic on that instrument’s amp, it can be worthwhile to flip that polarity switch and listen to determine which setting sounds better.

Passive VS Active

Broadly speaking, there are two categories of direct box that achieve the described results in two different ways: passive direct boxes, and active direct boxes. Passive DI’s employ a transformer for impedance matching and balancing, while active DI’s use a preamplifier circuit. Active DI’s require a source of power – almost always 48V phantom power from the mixer. So, which should you use for any given source?

As a general rule of thumb, active direct boxes should not be used with devices that have “active” outputs – line level sources, like the keyboard described above. There’s no need to boost the strong line level input, so using an active DI would amount to introducing an unnecessary gain stage, and raising the noise floor in our signal chain.

Conversely, active DI’s can be hugely beneficial when dealing with particularly low signal levels from “passive” sources, like the electric bass we talked about earlier. While it will probably sound fine through any modern passive DI, the active DI’s preamplifier circuit can give the bass a little bit of a lift.

Conclusion

There are countless direct boxes on the market today. Maybe you need to plug in a phone or laptop for playback. Perhaps you’re looking for a DI to color (or even “colour”) your instrument’s sound to evoke vintage gear. Or, maybe you need a streamlined way to plug in multiple keyboards with stereo outputs. Our extensive rental inventory includes direct box options for all of the above, plus a lot more. Give our Rental Team a call at 847-367-9588, or email them at rentals@tcfurlong.com to make sure you have the right selection of DI’s on your next gig.

We’re also authorized dealers for all major professional audio manufacturers. For a purchase quote on a DI, or any other gear you may need, reach out to our Sales Team at sales@tcfurlong.com or call 847-367-9588.


For more technical tips, sign-up for our email newsletter!

by Scott Helmke

Disclaimer: Extreme care should be taken with electricity. A/C voltages have the potential to cause serious harm, or even kill. The advice and guidance provided in this article cannot fully anticipate or predict the situations you may experience on a show site. 

Something that we all depend on in the sound industry, but don’t always think about, is the need for a reliable source of electricity at a show site.  On the one hand it’s almost always available, but on the other hand unreliable power can ruin a show with “mysterious” hums, buzzes, and equipment failures, or even injure and kill people.  This article is about basic tools and tests to protect yourself, other people, and your gear from miswired or otherwise dangerous electrical outlets.

Here’s what the standard USA power receptacle looks like:

The “hot” connection should have an AC voltage in the range of roughly 115-125 volts.  The other two connections should both have zero AC volts present.  All the current that goes through the receptacle should only pass between the neutral and hot connections.  The ground, better known as “safety ground”, is there to safely drain away any stray current that might result from defective or damaged equipment. 

If any of these connections are wired incorrectly or not connected, bad things can happen. Even if the venue insists that “nobody else has had a problem with it”, it will still be a safety hazard.

Voltmeter

A voltmeter or digital multimeter (also known as DMM or VOM) is an essential tool for troubleshooting electrical systems. The first thing I do before plugging in any equipment at a venue is use a voltmeter to check that the wiring is correct.  I do this for every outlet I’m planning on using, if it’s my first show in a venue or if I haven’t been there recently.  It’s always possible that somebody came along and “fixed” an outlet the wrong way. Note that most voltmeters or digital multimeters are rated to handle 120 volts AC, but you should always verify that the model being used is properly rated (here’s an article that discusses voltmeter ratings).

I measure between hot and neutral for around 120 volts AC, and I measure between ground and neutral to make sure the voltage is less than 0.5 volts.  I also measure between hot and ground for around 120 volts, to make sure that the ground is actually connected.  The final test is to measure between hot and anything I can find nearby that will be grounded – maybe even just poking the test lead against a concrete floor.  I want to make sure that the hot connection is actually “hot”, because sometimes a miswired outlet can have that backwards – a very dangerous situation (here’s a great article that explains the deadly ReverseBootleg Ground miswiring).

Three-Light Outlet Tester

You can also use a three-light outlet tester to do this basic wiring check, although it’s not as thorough as using a voltmeter as described above.  These testers are good for quickly checking many outlets for basic wiring problems, but they will not catch certain types of wiring mistakes (again see Reverse Bootleg Ground article above).

Non-Contact Voltage Tester

One type of electrical tester that everybody should own is a Non-Contact Voltage Tester, aka NCVT.  This is a clever little device that can identify the presence of high voltage (typically anything over 40V) without having to be connected.  Some have the tip shaped to fit into outlet slots, but they can also be used to quickly check if any object or surface is carrying a voltage. Old “vintage” guitar amps are notorious for having dangerous voltages present, for instance. This is also the best way to test for the dangerous Reverse Bootleg miswiring, by inserting into the ground pin of an outlet.

Non-Contact Voltage Testers are now available for $10-25 at most hardware stores and big-box home improvement stores, and I consider them a necessary piece of safety gear to bring to every show I work.  At TC Furlong we include one in every adapter kit we send to shows, along with a voltmeter.

Kill A Watt Meter

A final piece of test equipment that I’ve found very useful is a “Kill a Watt” meter.  This is a little device that lets you easily measure the power used by a piece of electrical equipment.  Very handy for figuring out what your gear really draws, which is often much less than the sticker on the back would indicate.  Very handy for figuring out how many separate power outlets (on different circuits) you really need for a show.

Always exercise caution when you are operating any of these tools, and make sure that you are being as safe as possible while searching for miswirings or bad outlets. Not only can these preventative measures avoid possible injury, but you may also find problems that could cause equipment issues or just bad sound. You can never be entirely sure what you’ll find at any given venue, but proper use of the tools described in this article should uncover underlying issues before they have a chance to ruin your show.

The TC Furlong Inc. team has the equipment and expertise to safely support your next live event. Get in touch with one of our Project Managers by calling 847-367-9588.

For more technical tips, sign-up for our email newsletter!

By Scott Helmke

I am very happy to be able to report on the latest version of Meyer’s MAPP (Multi Acoustic Prediction Program), MAPP 3D.  Meyer’s extremely accurate and reliable speaker system design and prediction software originally developed more than 20 years ago, now in a 3-dimensional version.  Currently in pre-release, general release of this software is scheduled for August 19, 2020.

I’ve been using the previous 2D versions of this software to simulate various concert setups and determine the best choice of loudspeakers and how to deploy them.  Many high-end loudspeaker companies have prediction software, but Meyer’s MAPP has stood out for years because of the extremely high accuracy and resolution of their speaker data and prediction software.  Needless to say, being able to produce a trustworthy loudspeaker deployment is extremely useful.  And now, the ability to predict loudspeaker coverage and SPL in a 3-dimensional space makes it even better.

Going 3D

The earlier versions of MAPP allowed you to place virtual Meyer loudspeakers, individuals or in arrays, into two-dimensional projects in either a side or overhead view of a venue.  For a theatre with angled seating areas you would use a side view, putting in lines to represent seating areas and using the software to predict relative volume and frequency response over those areas. Another design might use an overhead view to make sure the proposed loudspeaker system covered as well across the seating areas as well as up and down. MAPP 3D allows you to work in a CAD-like 3-dimensional space, placing objects within the 3D planes to represent seating/architecture, loudspeaker systems, and surfaces designed as prediction areas. The software will then show the spectrum of SPL levels as a color gradient across the prediction areas.

System Example

The simulated venue and loudspeaker system shown here is from an annual theatrical fundraising gala, usually produced in a hotel ballroom consisting of three spaces linked by airwalls.  Speaker hanging locations are limited to airwall tracks in the ceiling, including one extra track that runs down the center of the middle section.  The goal is even coverage over the seating area (many large round tables), with minimal spill onto the thrust stage.  I’ve actually set the prediction plane to be a surface four feet above the floor, to approximate how it will sound to the average person sitting down.  I was even able to move my virtual measurement microphone around to set delay times between speakers, saving time during setup.

Galileo and SIM3 Emulation

Since you wouldn’t deploy a large speaker system in the real world without a speaker processor, MAPP 3D allows you to do just that in the virtual system as well.  Speakers can be assigned to outputs of a virtual Galaxy processor, and all of the signal processing can be applied to the simulated response – ultimately you could send those settings to a real processor before even loading the truck, and have a great starting point for tuning the speaker system in the actual venue. It’s also possible to put one or more measurement “microphones” into the 3D area and see a simulated Meyer SIM3 frequency and phase response display. 

Additional Features

While the MAPP 3D software provides basic 3D CAD functionality for putting in simple shapes and prediction areas, it also allows 3D CAD files in DXF and Sketchup formats to be imported.  It is still necessary to define prediction surfaces, but having the actual architecture to use as a reference will save a lot of time and also allow a better-looking output.  There are also advanced tools such as a line array auto-splay tool to help quickly set angles between line array elements.

Like previous versions of MAPP, rigging weights and information is included to make sure that designs are safe to hang.  A new addition is predicted power consumption, which is a very handy feature.

Local Machine

Finally, one really big change in MAPP 3D is that an active network connection is no longer needed for predictions.  Modern computers are now fast enough to do this processing, and you can choose which loudspeaker models to download data for.  Each loudspeaker model file is about 127Mb (seriously high resolution!), so being able to choose which models to keep helps preserve disk space. 

Conclusion

MAPP 3D is a wonderful upgrade to Meyer’s MAPP software, adding even more functionality as well as being able to work in three dimensions.  As I write this article, the software is still in pre-release and they are still ironing out a few bugs, but otherwise it’s quite nice to use.  Having some basic background in 3D modeling software would be helpful to have, but aside from that it’s still familiar to anybody who has used MAPP software in the past.


MAPP 3D is scheduled for public release on August 19, 2020.  TC Furlong is a longstanding Meyer Sound dealer.  For any questions about Meyer’s MAPP 3D prediction software or any other Meyer products, reach out to our sales team at 847-367-9588 or sales@tcfurlong.com

If you are interested in adding Meyer Sound equipment to your next show or rental, get in touch with our Rental Team at 847-367-9588 or rentals@tcfurlong.com.


This is a continuation of our intercom systems blog series. To learn more about analog party-line intercom systems, click here Demystify Audio: Party-Line Intercom Systems.

Wireless intercoms have long been a staple of production intercom systems. In the simplest form, wireless communications can be handled by basic two-way radios, but in the modern era of digital communications, more complex systems are available on the market. In this article, we’ll go through the basics of wireless intercom systems and dive into analog and digital systems.

The Anatomy of Wireless Intercom Systems

The modern standard for production intercom systems is the ability to talk and listen simultaneously with many users. This gets technically complex when we move into the wireless domain because compared to a wireless microphone system that only operates in one direction, wireless intercoms have more specific frequency spectrum requirements. These requirements are handled differently in analog and digital systems.

All modern wireless intercom systems can be broken down into two main components: a base station and user stations (in this case, wireless beltpacks). The base station is the brains of the system and contains transmit and receive radios to communicate to the wireless beltpacks. The base station also provides interfacing to external systems such as other wireless base stations, stage announce outputs, and two-wire ClearCom or RTS party-line systems. Besides the wireless connection, the base station’s primary purpose is to provide the routing of signals between wireless users and these external systems. Lastly, the base station itself acts as a user station, facilitating communication to both wired and wireless users.

Wireless beltpacks (sometimes referred to as “drops”) allow users to connect headsets to talk and listen on the system through built-in transmit and receive radios. After being correctly configured, beltpacks transmit and receive audio wirelessly from the base station which routes the audio streams to other wireless beltpacks in the system and/or to other interfaced systems. Similar to analog beltpack stations, wireless drops allow users to talk on designated intercom channels via buttons that can be programmed to be latching or momentary functions.

Analog Wireless Intercom (UHF & VHF Systems)

Analog wireless intercom systems typically operate in UHF and VHF frequency spectrum used by TV station broadcast. As with wireless microphone systems, the norm is to coordinate these frequencies around FCC licensed TV stations in the individual markets.

For these systems, there are several frequencies that must be accounted for. In order for an analog wireless beltpack to be full duplex, that is to receive audio (listen) and transmit audio (talk) at the same time, separate dedicated frequencies must be used. A typical configuration for analog wireless systems is one system transmitter frequency that broadcasts to all beltpacks and one receiver frequency for each individual beltpack in the system.


A figure from the Handbook of Intercom Engineering.

Typically, analog wireless intercom systems use different frequency spectrums for the uplink (transmissions from beltpack to basestation) and downlink (transmissions from basestation to beltpack) portions. For instance, Radio Active Designs uses VHF frequenices (174-216 MHz) for uplink, and UHF frequencies (470-608 MHz) for downlink.


Learn more about the RAD UV1G System in our rental stock

Analog systems have been an industry standard for many years. One of their advantages is the simple, contained setup and deployment for a single area. Expanding systems to cover multiple areas can require significant additional hardware. Additionally, coordinating frequencies in the limited remaining TV spectrum can be difficult after the sale of the 600 MHz spectrum and ensuing repack.

Digital Wireless Intercom

Digital wireless intercom systems feature “Spread Spectrum” technology, which allows the transmitters and receivers to frequency hop within a certain frequency band. These systems work in dedicated “white spaces” in the wireless spectrum like 900 MHz, 1.9 GHz, and 2.4 GHz.

As opposed to the dedicated receive and transmit antennas of analog systems, most systems deploy cellular communication with many transceiver antennas networked together to the basestation. Most systems use standard CAT5 cable for antenna distribution, allowing for easier deployment of complex antenna systems through different spaces or zones.

With cellular-style digital wireless systems, like Clear-Com Freespeak II or Pliant Technologies CrewCom, coverage and capacity are important for antenna distribution designs. For instance, a single Clear-Com Freespeak II 1.9 GHz transceiver antenna can connect to 5 beltpacks at a time, but a Freespeak II basestation can connect up to 10 antennas and 25 simultaneous users. An example design would be to deploy 5 transceiver antennas for 15 users, and the beltpacks would seamlessly bounce from antenna to antenna based on the open slots and best connection available with no interruption to the audio feed.


Learn more about the Clear-Com Freespeak II System in our Rental Stock

Digital wireless systems can typically support more beltpack users on a single basestation and provide more flexibility and complexity than traditional analog wireless systems. On the flip side, they also involve a fair amount of programming and configuration to be properly deployed. The main draw to using digital wireless intercom systems in frequencies outside of the TV spectrum, allowing more usable RF spectrum for productions operating a large number of wireless microphone, in-ear monitoring, and IFB systems.

Conclusion

While there is no one-size-fits all solution for Wireless Intercom systems, and much depends on your application, it is an invaluable tool of the live production tool kit.

For questions about designing a wireless intercom systems or a quote on two-wire system components, contact the Sales Team at sales@tcfurlong.com. For questions regarding intercom items in our rental stock, contact the Rental Team at rentals@tcfurlong.com.

For more technical tips, sign-up for our email newsletter!