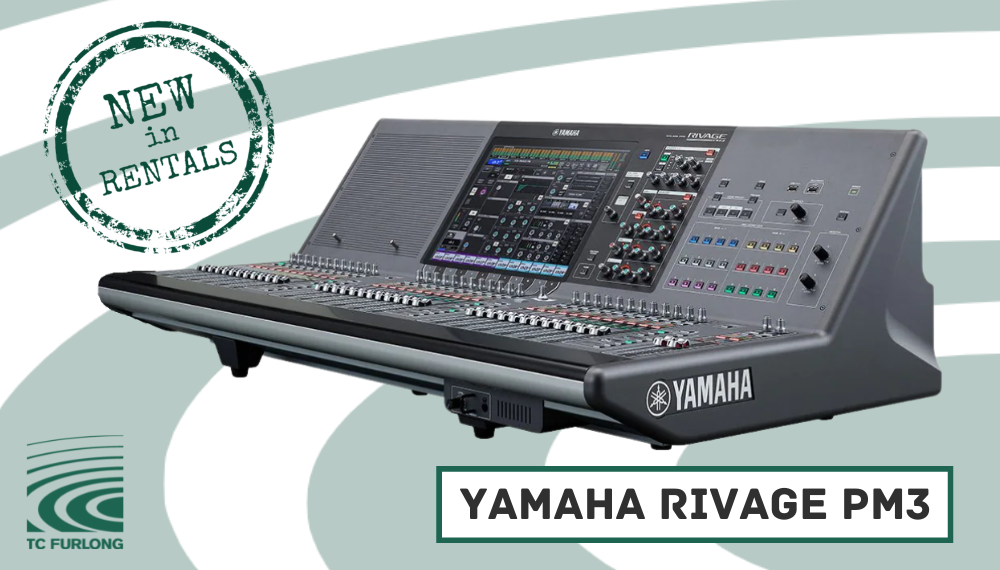
The latest addition to TC Furlong Inc.’s extensive inventory of digital consoles is the Yamaha RIVAGE PM3. As the most compact control surface in the RIVAGE family, the PM3 allows our rental customers to harness all the capabilities of Yamaha’s flagship console series, with a footprint only slightly larger than the CL5.

The super-compact PM3 surface retains the 38 faders – three bays of 12, with two masters – found on the PM10, PM7, and PM5. It boasts a single, multi-gesture touch-panel display, along with a streamlined Selected Channel section for simple, intuitive operation. Coupled with the Yamaha DSP-R10 engine, the PM3 is capable of handling up to 144 input channels, with 72 mix buses, and 36 matrices.

Yamaha’s first professional live sound console, the PM200, was released more than 40 years ago. The PM series has provided fertile ground from which numerous sound reinforcement milestones have grown ever since. Many of those innovations have become benchmarks that professionals depend on to this day. In 2016, The RIVAGE PM10 launched a new generation of PM consoles that have already become standards in large-scale live sound applications because of their unequaled sound, operation, functionality, reliability, expandability, and more. Now the RIVAGE PM3 digital mixing system expands the digital mixing options available for an even broader range of applications.

For more information about adding the RIVAGE PM3 system, other Yamaha consoles and peripherals, or anything else from our vast inventory to your next rental, please contact our Rental Team at 847-367-9588 or rentals@tcfurlong.com.

TC Furlong also sells Yamaha along with other major audio brands.  For questions about purchasing a PM3 system or anything from our list of over 100 professional audio manufacturers, contact our Sales Team at 847-367-9588 or sales@tcfurlong.com.

Originally posted on the Meyer Sound website: https://meyersound.com/news/krannert-center/

Situated on the campus of the University of Illinois at Urbana-Champaign, the Krannert Center for the Performing Arts serves not only as a world-class venue for visiting artists and student ensembles but also as a hands-on learning facility for the school’s sound design programs. Last summer, the Center took a major leap ahead in furthering both missions with installation of a multi-faceted Meyer Sound solution that encompasses Constellation active acoustics, surround sound systems with Spacemap control, and a main reinforcement system based on LINA line array loudspeakers.

The new systems, supplied by Chicago-area integrator TC Furlong, Inc., were installed in the 674-seat Colwell Playhouse, one of four venues in the expansive Krannert Center.

The 2021 project is the first in a series of upgrades planned by Rick Scholwin, who doubles as both the Center’s director of audio services and Chair of the university’s sound design program.

“When I accepted this position, my goal was to support artists with technology that is the best available in the world,” says Scholwin, “while also giving students hands-on experience with systems that are on the cutting edge and will be current long into the future.”

At the foundation of the complete audio makeover is a Constellation acoustic system comprising 99 distributed loudspeakers, 27 microphones for sensing ambient acoustics, and 21 D‑Mitri digital audio modules. Three processors are devoted to hosting the patented VRAS algorithm for generating natural acoustical environments across the hall’s three discrete zones.

The self-powered loudspeaker complement for Constellation and immersive systems includes Meyer Sound Ashby‑8C, UPM‑1XP, UPJunior-XP, and UPJ‑1XP full-range models along with UMS-1XP subwoofers.

“Everybody on campus is excited about the new acoustical flexibility and rightfully so,” comments Scholwin. “The Colwell was designed principally for theater and spoken word events, with a reverberation time of a little over one second. But now we can, for example, emulate the acoustics of Krannert’s Great Hall, with a 2.8 second RT for orchestral music, we can extend that even further for choral works. Now we are blowing the doors off the programming possibilities. We can do opera in here, or host a bluegrass band with one microphone and let the active acoustics fill the room as if it were the Ryman Auditorium.”

For advanced theatrical sound design, the self-powered loudspeaker systems can be instantly configured to work with the Spacemap sound design software, enabling both immersive effects and dynamic panning of discrete sounds across any and all locations. “If we want to fly a bumblebee around the room, we can do that easily,” says Scholwin.

The Colwell Playhouse’s new direct reinforcement system, which functions separately from Constellation, is anchored by twin arrays of eight each LINA line array loudspeakers, with each array flown under two 750‑LFC low-frequency control elements. Two ULTRA‑X40 compact loudspeakers serve as the center cluster, and three additional 750-LFC elements on the floor augment the low-frequency thrust.

The new systems made their debut at the post-pandemic return of the Krannert Center’s highly regarded Ellnora Guitar Festival. Artists supported by the new systems included The Punch Brothers (neo-bluegrass), Katie Pruitt (Americana), Adam del Monte with Sonia Olla and Ismael Fernández (flamenco), Isaiah Sharkey (multi-genre), and Cedric Burnside (blues). Other performances hosted by the venue include drama (The Neverland), dance (Tango Argentina), and Afro-Cuban Jazz (Jane Bunnett and Maqueque).

In addition to supporting a diversity of performance genres, the new systems afford extraordinary learning opportunities for the school’s BFA and MFA sound design students, says Scholwin. “This is a merging of professional arts technologies and education at the highest level. They will leave here with an in-depth, theoretical, and practical knowledge of large-scale immersive systems. They can master all they need to know to step into high-level positions.”

Krannert Center Director Mike Ross played a pivotal role in securing funding for the new systems, and he is elated with the outcome. “What I’ve experienced in the Colwell Playhouse has been utterly inspiring. In addition to greatly enhancing live performances in support of our public engagement mission, the new systems will be a tremendous asset in support of our educational mission, vis-à-vis training students pursuing sound-related career paths in the performing arts.”

Other key contributors to the project on behalf of the Krannert Center were Assistant Audio Director/Video Director Alec LaBau (also on the university’s sound design faculty) and Theatre Audio and Media Specialist Keith Norton. Handling logistics and technical coordination for TC Furlong, Inc., were General Manager Jeff Cech and President TC Furlong.

First opened in 1969, the Krannert Center for the Performing Arts was made possible by a large donation from University of Illinois alumnus Herman Krannert and his wife, Ellnora. The facility was designed by architect Max Abramovitz, also an alumnus of the university.

Interested in Meyer Sound solutions? Reach out to our Sales Team at 847-367-9588 or sales@tcfurlong.com for more information, pricing, & design support.

We also provide Meyer Sound products in our rental inventory, and our experienced Project Managers can help design an optimized system for your next show. Reach out to them today at 847-367-9588 or rentals@tcfurlong.com to get started.

by Andrew Dewar

It’s commonplace for the TC Furlong team to have a position for larger events known as a Wireless Mic Wrangler, whose role ends up being more complicated than it sounds. The Mic Wrangler is ultimately in charge of getting the right packs and microphones to the right people, at the right time and then when the act is done, returning the microphones and packs to their proper home. Below, we lay out some simple ways to effectively “wrangle” high channel count wireless to avoid a catastrophic “wrong mic on stage” type failure at a live event.

Being Prepared is Expected, Not Encouraged

Preparation for live events is 90% of achieving a great show with minimal production errors. Being a Mic Wrangler follows the same approach. The critical document for any seasoned Mic Wrangler is a show flow with the mics going out and the mics coming back for every scene or act depending on the type of event. This allows for two really important things: 1. Front of House, Monitors, and Broadcast all will know exactly which mics will be on stage as well as which mics will not be on stage and 2. It allows the Mic Wrangler to do quick checks such as “how many mics are going out” or “which belt packs should I have in bread pans (more to come on this) during this act”. Finally, a column for names of talent and any capsule or headset information on your show flow is critical and will allow the show to gain another level of sonic quality and consistency.

Microphone location, especially on lavaliers and head worn microphones, makes up a huge component of the sound you get off the capsule and because of this another show document that goes a long way in creating consistent sounding performances is a “Show Bible”. Most of the time we see these in long runs of musical theater performances as they travel across the globe performing in different venues, but we can extrapolate important information from them for one off shows. As the Mic Wrangler you would be most interested in creating pages for the document that give a good visual and written explanation of where mics are located on each person. Some might be very simple and say, “handheld mic” while others might be complex with information like, “black wig clip 2 inches above hair line”. In situations where the mic placement gets complex a picture truly is worth a thousand words and can be good for spot checking mic placement as the talent prepares to enter in the wings.

Organization Allows Preparedness to Thrive

If you’ve got a well written and easy to follow show flow with wireless mic cues, one way to have the hard work not pay off is by allowing yourself to be disorganized during shows and rehearsals. One common industry trend is the use of bread pans or tin bins to not only have a clearly marked place for each transmitter but to also cut down the amount and intensity of intermodulation products created by dozens of transmitters in close proximity to one another. To learn more about intermod and how to avoid it, be sure to check out our recent Wireless Blog Series.

When we bring high channel count wireless onto a show site, we bring along enough tin bins with a few spares and make sure we have more than enough table space to allow each one to sit flat on the table. Once laid out make sure to clearly and consistently label each transmitter, tin bin, and even the table where the bin sits so you can do a cross check at any point in time to make sure everything is cohesive and agrees. Keeping mics and packs for each performer physically separated also decreases the risk of germs and pathogens spreading due to unintentional mixups and sharing of microphones.

Another important level of organization has nothing to do with the physical space we operate in but rather the nomenclature we use to describe each wireless channel. Whether it is “RF 1” or “Wireless 1” or “Allie’s Mic” doesn’t really matter but what does matter is that Front of House, Monitors, Broadcast, and the Mic Wrangler all have the same terms for each channel so communication on coms is quick and efficient. We’ve found that starting with an agreed naming system before rehearsals begin keeps everyone on the same literal page (because you’ve got a well prepped show flow!) and allows us to all “rehearse” using the right names for wireless channels.

Checks and Balances Before and During the Show

A catastrophic mistake that seems to be made far too often is that the first time a microphone goes onto the stage is by the talent as they make their initial entrance during the show. Even if Front of House and Monitors say they see signal coming in pre-show from the mics, an audio crew needs to set aside a few minutes to cycle through the mics and test them before the show on stage. By taking the time to get them on stage and test them we remove 2 possible critical failures from our performance.

First is the possibility that there are some stray wireless frequencies that are causing interference somewhere specifically on stage. Second, it allows us to confirm that the signal passing from the mic to the consoles is clean and won’t feed-back on stage. This is a critical step and can be expedited by having multiple people put on mics and test them on the stage one at a time.

Despite all the planning, testing and organization we still need to have a few ways to navigate the show on the fly. First and foremost, make sure there’s an easy way to quickly see the status of all your transmitters. With networkable Shure systems we tend to put a laptop or a large display near the Mic Wrangler’s position so that during the show they can keep the monitor tab open on Wireless Workbench and see all the transmitters on the display. This can save an act by allowing the Mic Wrangler to spot low batteries, bad RF, and powered off transmitters while deploying the channels to the talent.

Most importantly for a Mic Wrangler, call the show live. The Mic Wrangler can be most effective when they get on coms right before an act and say, “We have RF 1, RF 2, RF 4, RF 6, and RF 9 going on stage for act 7”. The clear communication allows all the engineers to look at their consoles and make sure those channels are unmuted and seeing signal and gives everyone one last check before an incorrect mic is put live in the mix. Even if you’re doing scene to scene pre-programmed shows this technique allows everyone to be on the same page and also builds in the flexibility to make a last minute change if the wireless coordination isn’t holding up or a pack fails during show.

Our extensive rental inventory includes hundreds of channels of wireless mics, IEM, and intercom, along with all the accessories you’ll need to make your next event a success. Reach out to our Rental Team today at rentals@tcfurlong.com or call 847-367-9588.

We are also authorized sales dealers for all major manufacturers of live sound equipment. Reach out to our Sales Team for a quote at sales@tcfurlong.com or 847-367-9588.

by Scott Helmke

This blog post is the eighth and final entry in our blog series all about wireless systems – background info, best practices, and useful tips & tricks. Click here to get caught up on the previous articles.

This is the eighth blog article in our wireless series.  In the previous article I wrote about choosing better antennas, and in this article I’ll wrap up the series with some handy tips for deploying large wireless systems.

System Deployment Tips

Frequency coordination is something that you should always be doing.  At TC Furlong we don’t prep a rental, work a show, or even sell wireless gear without doing some kind of coordination. Whenever possible, the coordination includes any nearby gear we can find out about as well.

Receiver location should ideally be as close to the microphones as possible.  They should also be located where somebody can keep an eye on them during an event, which might mean out at the front of house console.  As long as appropriate antennas are used with good antenna distribution FOH is usually fine.

Large wireless systems need a dedicated person, usually referred to as an A2 (“audio second”), to handle the microphones. This person’s job is to issue mics to the talent, change batteries, and in general keep track of maintenance and repair.  Most importantly, the A2 can be on stage fixing a problem with a microphone instead of making the FOH mixer leave their console.  Even smaller productions can benefit from designating a person to be responsible for the microphones, while the largest productions will have a team.

Microphone storage is also important – simply keeping track of which microphone goes to which person requires some kind of organization, even if it is just having a table marked out with spots for each microphone. Some productions use a hanging shoe organizer, which has many pockets that can be used to store microphones and associated parts.  However, intermod problems can happen whenever microphones are physically close together.  A table or other organizer holding a whole bunch of microphones can cause RF problems, and the usual solution is to use metal baking pans to store each microphone separately.  The metal in the pan reduces the intermod enough to prevent any problems.  Another potential issue is having a large group of microphones right next to the receiving antennas, which could overwhelm the receivers with strong signals.  The baking pans help with that situation as well.

Batteries are critical to having a successful show. Having a microphone battery run out during an important scene is every tech’s nightmare.  At the very least, fresh batteries should be used for every show.  Half-used batteries can be saved and used for rehearsals.  Rechargeable batteries are a good option, as battery and charger technology is very solid these days.  However, any type of battery still requires that somebody be assigned to make sure batteries are always changed and/or recharged as needed.

Maintaining Transmitters & Microphones

Rock shows and musical theatre often has performers working hard enough to sweat, which can cause damage to wireless microphones.  A beltpack transmitter worn under a costume can get regularly soaked in sweat, which can cause a great deal of damage to the electronics. The usual tradition in musical theatre is to use unlubricated condoms as a waterproof cover that can be replaced for each show.  For school teachers who may have trouble explaining why their students need condoms, the same basic product is available from companies selling them as “sheaths”.  Thin rubber gloves can also be used.  And of course after each show the microphones should be left in a place where they can dry out before the next show.

Wireless microphone headsets and clip-on lavalier mics can also suffer from exposure to sweat, makeup, hairspray, and their thin wires can be easily damaged.  Almost all such microphones have tiny protective screen caps that fit over the microphone element itself, and it is important to make sure that those caps are used.  Not only do the caps help protect the microphone itself, they are often used to control the sound of the microphone.  Replacement caps are available from the microphone manufacturer, and spares should be kept in stock.  It’s a lot cheaper to replace a little cap if somebody accidentally hoses the mic down with hairspray.

Headset and lavalier microphones should really be considered something that will need to be replaced periodically. Big professional productions usually consider headset or lav mics to be “consumable”, and have a budget for regular replacement.  While a damaged connector can be replaced or wires spliced, I’ve had customers bring in lav mics where the wire itself was falling apart from corrosion caused by sweat.

Conclusion

This has been a long series of articles with many suggestions for the best way to deploy and use wireless microphones.  While you may not be able to implement all of these best practices, doing as many as you can will help you have successes instead of failures.  At TC Furlong we’ve worked with customers from big Broadway style theatres all the way down to worship leaders using a single microphone, and we’ve often been able to get good results without them having to spend a lot of money on new equipment. Whether you are an RF novice, or an expert in your own right, our technicians are available to provide advice and recommendations, based on our collective decades of experience with production wireless systems.

If you’d like to learn more about the deployment of wireless systems for large, complex, high-pressure shows, check out the webinar we hosted with special guest presenter James Stoffo, Strategies for Large Scale Wireless System Deployment:

Interested in purchasing a wireless system? Reach out to our Sales Team at 847-367-9588 or sales@tcfurlong.com for comprehensive help selecting the right wireless system for your needs, complete with antennas and all the other accessories you’ll need.

We also carry hundreds of channels of production wireless equipment in our rental inventory, and our experienced Project Managers can help design and implement a wireless system for your next show. Reach out to them today at 847-367-9588 or rentals@tcfurlong.com to get started.

by Scott Helmke

This blog post is the sixth entry in an ongoing series all about wireless systems – background info, best practices, and useful tips & tricks. Click here to get caught up on the previous articles.

This is the seventh blog article in our wireless series.  In the previous article I wrote about using antenna distribution to clean up both your RF performance and also your wireless rack.  In this article I’ll be writing about some better choices in antennas.

Omnidirectional Antennas

The antennas that most people use are, no surprise, the ones that came bundled with the system.  Often referred to as “whips”, these antennas might be rather primitive bits of wire and plastic, but the nicer ones might actually be pretty good.  The antennas Shure bundles with their better quality systems such as QLXD and beyond fit the generic “whip” name but are technically “center fed ½ wave dipole” antennas.  If you were to cut one open you’d find more than just a length of wire.  The “half wave” part of that name is important, as antennas work best when they are the same length as one of the RF waves coming from the microphone.  That ends up being a little on the large side, so often a good compromise is to go with a half or a quarter of the wavelength.  The cheapest antennas are usually just a quarter wave long.  But the important thing to take from this is that the antenna needs to be designed for the frequency band that your microphone uses.  While an antenna of the wrong length will still work in many cases, having the right length works best.  More advanced antennas will be designed to work well over wider frequency ranges, but it is always something you should keep in mind especially when considering antennas to feed several different frequency bands through antenna distribution systems.

The most important specification about antennas, after the frequency range, is the directional pickup pattern. The whip-style antennas that come bundled with wireless systems are usually referred to as “omnidirectional”, meaning that they pick up equally well from all directions.  This isn’t entirely true, as the directional pattern is more like a torus or donut shape.  These antennas pick up best from the side rather than the end of the antenna.  Don’t point the tips of your antennas at the stage, in other words.

Directional Antennas

The antenna you will see being used in most professional systems is the log-periodic directional antenna, most often referred to as a “paddle” or “shark fin” antenna.  These antennas pick up best from one direction, and less from the other directions.  By concentrating the pick up pattern in one direction these antennas can usually pick up microphone signals from longer distances than omnidirectional antennas.  This also means that the antennas need to be in a location where they can be aimed at where the microphones are being used, such as from the side of a stage or from the front of house location.

The most advanced antennas found in regular use are the “helical” antennas, or more properly “helically polarized” or “circularly polarized” antennas. Like the log-periodic paddle antennas these have a directional pickup pattern, but they also feature a different antenna polarization.  Most antennas, including whip and paddle antennas, have “linear” polarization.  Put very briefly, RF waves have a particular polarization direction, and the system works best if the transmitting antenna (on the microphone) is oriented in the same direction as the receiving antenna.  A microphone held vertically will work best with a receiver antenna mounted vertically, but a microphone held horizontally will not be picked up very well by a vertical receiving antenna.  If you are using a receiver with two “diversity” antennas, you can put the antennas at different angles to cover any possible angle that the transmitter might be held at.  A helically polarized antenna does not have a polarization angle at all, meaning that it will pick up equally well no matter what angle the microphone is held at.  These antennas are most often used with in-ear monitoring (IEM) systems because the receiving beltpacks rarely have diversity antennas – with only one receiving antenna you want the best transmitting antenna possible.

Antenna Amplifiers

Some antennas have built-in amplifiers to boost the signal strength.  This feature is not meant for picking up distant or weak microphone signals, though.  It’s really only meant to compensate for long antenna cable runs back to the receiver.  An antenna amplifier can overload on strong signals, as well as adding its own noise to the signal.  My usual rule of thumb is to avoid antenna amplifiers unless I’m running at least 50 or 100 feet of antenna cable.

Choosing The Right Antennas

Which antenna should you use?  It really depends on your situation.  Directional antennas are great if you have all the action happening in a place where you can point the antennas at it.  On the other hand if the receiver is located in the middle of all the action (such as on a guitar pedalboard) then an omnidirectional antenna would be best.  Ideally your antennas are mounted high up, so that they can “see” over the heads of the crowd or other obstacles and get a clear “view” of the stage.  Even the best antenna will give disappointing results if it is blocked by people (who absorb RF) or metal (which blocks and reflects RF).  High quality coaxial antenna cables should be used if the antennas are mounted away from the receivers, and with as short a cable length as possible.  

In some situations a long (but high quality, low loss) cable can be used to put antennas close to the microphones, giving better results than an antenna far away from the microphones.  For a hip-hop act on a large festival stage, I will attach a Shure half-wave whip antenna to a short microphone stand and place it right in among all the monitors and lights along the front edge of the stage.  I might have to run 100 feet of cable, but the whip antenna will be much closer to the performers than a directional antenna mounted at the side of the stage.  My other antenna could be a Shure paddle antenna pointing across the stage.  

Conclusion

Finally, because this question comes up a lot, it’s almost always fine to use antennas from one manufacturer for wireless systems from another.  As long as the antennas and antenna distribution cover the frequency range of the wireless systems it will work fine.  Some antennas need 12 volt DC power on the antenna line to power internal electronics, but every major manufacturer provides that power in the same way.

Stay tuned for the final entry in this series. Next week, we’ll wrap things up with some final thoughts and a number of handy tips. In the meantime, if you’d like to take an even deeper dive into antennas, check out the recording of our Antenna Theory webinar with RF expert James Stoffo:

Interested in purchasing a wireless system? Reach out to our Sales Team at 847-367-9588 or sales@tcfurlong.com for comprehensive help selecting the right wireless system for your needs, complete with antennas and all the other accessories you’ll need.

We also carry hundreds of channels of production wireless equipment in our rental inventory, and our experienced Project Managers can help design and implement a wireless system for your next show. Reach out to them today at 847-367-9588 or rentals@tcfurlong.com to get started.