Education

TINY COMM TESTER: For Clear-Com compatible intercom systems.

by Scott Helmke

Similar to the Tiny Phantom Power Tester, this is another very simple idea that’s an important part of my toolbox. This allows very quick testing of an analog, Clear-Com style intercom line to make sure it’s receiving power, signal, and can help find stations and belt packs that are causing problems for the whole intercom circuit.  I was actually hoping to design a slightly more complicated tester that would do a few different things, but ran into serious feature creep compared to the utility of this little wonder.

How to build

The theory is pretty simple.  Clear-Com analog party-line intercom puts the 30 volts DC power for all the belt packs and remote stations between pins 1 and 2 of an XLR connector, and the audio signal between pins 1 and 3. The “Call” function works by adding 12 volts DC to the audio signal. 

So this tester simple uses a green LED to show the presence of the power, and a red LED to show the presence of the call light voltage.  Resistors have been added to each LED to limit the amount of current and keep the LED from burning out. 

Construction is fairly easy – you just need an XLR connector, usually the sockets (“female”) end, one green and one red LED, and two resistors.  I built mine with a 2.2k ohm resistor for the green LED (power), and 1k ohm resistor for the red LED (audio and call light).  The resistor values don’t have to be exactly what I used, either.

Make sure that you connect the red LED between Pin 3 and Pin 1, and the green LED between Pin 2 and Pin 1.  To finish, I added heat shrink over all the components.

How to use

Using the tester is fairly simple, just plug it into an intercom circuit to see if power is present – that’s the green LED lighting up.  If you press the Call button on a belt pack the red LED should light up.  If both of those tests work then the intercom should be working. 

Sometimes a belt pack or remote station will go bad, causing all the call lights on the line to light up and kill the audio signal.  I’ve used these testers to quickly find the bad unit, by disconnecting belt packs and stations until the red LED goes dark.  Very useful if you’re by yourself checking remote intercom drops in spot booths.

For more technical tips, sign-up for our email newsletter!

This is a continuation of our intercom systems blog series. To learn more about analog party-line intercom systems, click here Demystify Audio: Party-Line Intercom Systems.

Wireless intercoms have long been a staple of production intercom systems. In the simplest form, wireless communications can be handled by basic two-way radios, but in the modern era of digital communications, more complex systems are available on the market. In this article, we’ll go through the basics of wireless intercom systems and dive into analog and digital systems.

The Anatomy of Wireless Intercom Systems

The modern standard for production intercom systems is the ability to talk and listen simultaneously with many users. This gets technically complex when we move into the wireless domain because compared to a wireless microphone system that only operates in one direction, wireless intercoms have more specific frequency spectrum requirements. These requirements are handled differently in analog and digital systems.

All modern wireless intercom systems can be broken down into two main components: a base station and user stations (in this case, wireless beltpacks). The base station is the brains of the system and contains transmit and receive radios to communicate to the wireless beltpacks. The base station also provides interfacing to external systems such as other wireless base stations, stage announce outputs, and two-wire ClearCom or RTS party-line systems. Besides the wireless connection, the base station’s primary purpose is to provide the routing of signals between wireless users and these external systems. Lastly, the base station itself acts as a user station, facilitating communication to both wired and wireless users.

Wireless beltpacks (sometimes referred to as “drops”) allow users to connect headsets to talk and listen on the system through built-in transmit and receive radios. After being correctly configured, beltpacks transmit and receive audio wirelessly from the base station which routes the audio streams to other wireless beltpacks in the system and/or to other interfaced systems. Similar to analog beltpack stations, wireless drops allow users to talk on designated intercom channels via buttons that can be programmed to be latching or momentary functions.

Analog Wireless Intercom (UHF & VHF Systems)

Analog wireless intercom systems typically operate in UHF and VHF frequency spectrum used by TV station broadcast. As with wireless microphone systems, the norm is to coordinate these frequencies around FCC licensed TV stations in the individual markets.

For these systems, there are several frequencies that must be accounted for. In order for an analog wireless beltpack to be full duplex, that is to receive audio (listen) and transmit audio (talk) at the same time, separate dedicated frequencies must be used. A typical configuration for analog wireless systems is one system transmitter frequency that broadcasts to all beltpacks and one receiver frequency for each individual beltpack in the system.


A figure from the Handbook of Intercom Engineering.

Typically, analog wireless intercom systems use different frequency spectrums for the uplink (transmissions from beltpack to basestation) and downlink (transmissions from basestation to beltpack) portions. For instance, Radio Active Designs uses VHF frequenices (174-216 MHz) for uplink, and UHF frequencies (470-608 MHz) for downlink.


Learn more about the RAD UV1G System in our rental stock

Analog systems have been an industry standard for many years. One of their advantages is the simple, contained setup and deployment for a single area. Expanding systems to cover multiple areas can require significant additional hardware. Additionally, coordinating frequencies in the limited remaining TV spectrum can be difficult after the sale of the 600 MHz spectrum and ensuing repack.

Digital Wireless Intercom

Digital wireless intercom systems feature “Spread Spectrum” technology, which allows the transmitters and receivers to frequency hop within a certain frequency band. These systems work in dedicated “white spaces” in the wireless spectrum like 900 MHz, 1.9 GHz, and 2.4 GHz.

As opposed to the dedicated receive and transmit antennas of analog systems, most systems deploy cellular communication with many transceiver antennas networked together to the basestation. Most systems use standard CAT5 cable for antenna distribution, allowing for easier deployment of complex antenna systems through different spaces or zones.

With cellular-style digital wireless systems, like Clear-Com Freespeak II or Pliant Technologies CrewCom, coverage and capacity are important for antenna distribution designs. For instance, a single Clear-Com Freespeak II 1.9 GHz transceiver antenna can connect to 5 beltpacks at a time, but a Freespeak II basestation can connect up to 10 antennas and 25 simultaneous users. An example design would be to deploy 5 transceiver antennas for 15 users, and the beltpacks would seamlessly bounce from antenna to antenna based on the open slots and best connection available with no interruption to the audio feed.


Learn more about the Clear-Com Freespeak II System in our Rental Stock

Digital wireless systems can typically support more beltpack users on a single basestation and provide more flexibility and complexity than traditional analog wireless systems. On the flip side, they also involve a fair amount of programming and configuration to be properly deployed. The main draw to using digital wireless intercom systems in frequencies outside of the TV spectrum, allowing more usable RF spectrum for productions operating a large number of wireless microphone, in-ear monitoring, and IFB systems.

Conclusion

While there is no one-size-fits all solution for Wireless Intercom systems, and much depends on your application, it is an invaluable tool of the live production tool kit.

For questions about designing a wireless intercom systems or a quote on two-wire system components, contact the Sales Team at sales@tcfurlong.com. For questions regarding intercom items in our rental stock, contact the Rental Team at rentals@tcfurlong.com.

For more technical tips, sign-up for our email newsletter!

Yamaha Launches RIVAGE PM5 and RIVAGE PM3 Digital Mixing Systems 

Yamaha recently announced the significant expansion of the RIVAGE PM Series digital mixing console family with the addition of the PM5 and PM3 control surfaces, and the DSP-RX and DSP-RX-EX DSP engines.

RIVAGE PM5
The PM5 is the latest in the evolution of the RIVAGE PM Series control surfaces.  In a similar layout to the RIVAGE predecessors, the PM5 features 3 Centralogic style bays, but now with a total of 3 large, capacitive touchscreens to allow for multi-finger gestures.  Yamaha has reduced the number of knobs in the third bay to reduce the overall footprint and make room for the integrated third screen. Additionally, meters that were previously above each channel’s ON button have been moved to be along the length of the fader for higher visibility and granularity.  Channel scribble strips have been removed – replaced with naming along the lower sections of the screen – bringing the touchscreens closer to the user for a more efficient reach across the entire console.

RIVAGE PM3
The PM3 scales things down with a 45-inch-wide surface (only slightly wider than a CL5 digital mixer) but retains the 38 faders – three bays of 12, with two masters – found on the PM10, PM7, and PM5.  Featuring a single, multi-gesture touch-panel display and condensed selected channel section, the PM3 is ideal for users needing a compact surface that packs the full punch of the RIVAGE series. Although slimmer in size, the console is compatible with both new DSP engines and does not compromise in I/O capabilities, including up to 288 input channels when paired with the DSP-RX-EX.

DSP-RX and DSP-RX-EX
The new brains of the RIVAGE series are an evolution of the modular DSP engine design and are available in two options.  The DSP-RX unit provides 120 inputs, 48 mix buses, and 24 matrices.  The DSP-RX-EX provides 288 inputs, 72 mix buses, and 36 matrices.  Both DSP engines are built on the same platform, so if you purchase a DSP-RX and need additional horsepower down the line, a DEK-DSP-RX expansion kit can be added to upgrade the DSP-RX to full DSP-RX-EX specifications.

Expansion of the Yamaha Ecosystem
All RIVAGE PM systems use the same I/O racks, the same firmware, and the same DSP engines (with the exception of the PM7 that has an internal DSP unit).  All surfaces feature the same basic fader configuration, and any console file would be compatible across the full line.  Like their predecessors, the PM5 and PM3 are directly compatible with TWINLANe and Dante networks using the necessary HY I/O cards.   A choice of two DSP engines with different mixing capacities, plus a total of five control surfaces including the two new models, gives engineers ample flexibility to create systems ideally tailored to a wide range of applications.

  PM5/PM3

DSP-RX-EX

PM5/PM3

DSP-RX

CL5 CL3 CL1
Input Mixing Channels 288 120 72 mono + 8 stereo 64 mono + 8 stereo 48 mono + 8 stereo
Mix Buses
 
72 48 24
Matrices
 
36 24 8
Stereo Bus
 
2 2 1
Mono
 
1 1 1
Cue
 
2 2 1


In the most basic configuration, the newly released PM5 or PM3 has 120 inputs, 48 mix buses, and 24 matrices, and capable of running at 96 kHz.  In comparison, a CL5 has a maximum of 72 mono and 8 stereo inputs, 24 mix buses, and 8 matrices.  The CL and QL series console do have limited DSP capabilities (as well as the limit of running at 48 kHz), but the entire mix engine is built into the console, while the PM5 and PM3 surfaces need the external DSP engine in order to function.  It is also worth noting that an HY144-D card is needed to connect a PM series console to a Dante network, rather than having an integrated Dante port like the CL and QL series.

The PM5 and PM3 surfaces are a highly anticipated bridge between the functionality of the RIVAGE series and the price point of the CL series. For questions about designing a RIVAGE PM system, contact our sales team at 847-367-9588 or sales@tcfurlong.com.

Comparing Lav vs Headworn and Omni vs Directional Mics

At TC Furlong Inc., we handle a significant number of wireless microphone system quotes for rental and purchase. Along with each of these, we typically walk customers through the myriad of choices including price points, sensitivity, attachment options, brands, antennas, etc.

Two of the biggest questions for customers when assembling a bodypack worn wireless system is “Lavalier or Headset” followed by “Omnidirectional or Directional.” Most of the time, the decision is not cut and dry, and each has their special application. Below is an explanation of how we typically work through the process, but first, here are some definitions:

Definitions

Lavalier Mics

Also known as “Lavs.” These are small (miniature) mics that often clip to a lapel, tie, or other piece of clothing. The goal with these is to be small and discreet. They commonly come in two colors, black and beige. The Black is often used for clipping to clothing and the beige is often used in theatrical settings. Because they are small, they can also be attached to an actor’s wigs or within scenery for certain theatrical applications.

Headworn Mics

These mics, also known as headset or earset mics, have similar capsules to lavaliers but are attached to a boom and are designed to be worn around the head. This form factor allows the capsules to be positioned as close to the users mouth as possible. The typically come with single-ear or dual-ear attachments and are available in a palette of colors to approximate skin tones.

Omnidirectional

This mic will pick up audio sources (ie. the presenter) from all directions. They have little to no “handling noise” (the incidental sounds of a mic cable brushing up against the presenter). They also have the most “natural” sound. That is, they reproduce the sound the most accurately, are not susceptible to wind noise, and are not as sensitive to positioning. On the downside, they are more prone to feedback and can easily pick up unwanted or environmental noise.

Directional

This mic will pick up audio sources only in one direction. These come in several forms, but most often they have the pickup pattern of “cardioid” or “hyper-cardioid”. While these mics are great for rejecting unwanted environmental sound (ie. crowd noise), they are more vulnerable to handling noise and wind (including the popping sounds of P’s or even breath sounds). They must be positioned carefully and are sensitive to changes in position of the mic relative to the source.

Which mic is best for you?

Lav vs. Headworn

Our typical recommendation for live sound applications is a headworn microphone. It has the ability to be placed close to the mouth in a static position and allows users to achieve the most consistent sound of a presenter. The headworn does require more adjustments to position correctly, but once it is placed, the consistency you achieve will be worth it. This is not only great for seasoned veterans in the industry but also for church volunteers.

Often the amount of physical activity of the presenter will direct your decision for a dual-ear or single-ear attachment. A dual-ear, headset model tends to stay in place better while the presenter walks (or dances) around a stage. With the single-ear, earset version, you will find most people will use a small piece of medical tape to help secure it.

If the presenter isn’t comfortable with a headset or prefers that the mic be more discreet, the lav might be the better option. Placement with these can be just as challenging to get right and often it boils down to the particular clothing the presenter is wearing. For instance, some low-cut dresses can be challenging to find a functional placement.

One of the plus sides to the lav is the ease and quickness that you can place it. If you have multiple presenters but only one lav, the changeover can be much quicker than a headset. The downside of a lavalier placed on a presenter’s chest is that audio levels will vary as the user moves their head.

In the end, it does come down to a compromise between aesthetics and engineering, so when making the decision, it is worth weighing the preferences of the presenter with the technical requirements of the production.

Omni vs. Directional

After you have made the decision on a lav or headworn style mic, you will need to decide whether to use an Omni or Directional capsule. Sometimes people make the mistake of thinking directional is always better, but this is not always true.

A good place to start when deciding is to know if there will be any sound reinforcement. If the application is a webcast, video recording, or broadcast, an omni would likely be a great choice. In these cases, there is no fear of feedback or rejection of other sources near the presenter, and the omni capsule will provide an open and natural sound.

Directional mics are best used when you have a ‘less than ideal’ situation and work well in on-stage applications. For instance, directional mics work better for a church or venue with a thrust stage that puts the presenter in front of the PA, or in a very reverberant space with a lot of ambient noise. It is important to keep in mind that placement of a cardioid element is vital and to pay careful attention to which direction the microphone is picking up the audio.

Conclusion

Choosing the right microphone is important to the success of your event. There are hundreds of variations and brands on the market and in our inventory, and these are just some of the factors to consider when making a decision. Our team is happy to discuss in more detail on a case by case basis to help guide you through your rental or purchase decisions.

For questions about the many lavalier and headworn microphone options in our rental stock, contact the rental team at 847-367-9588 or email at rentals@tcfurlong.com.

For questions about purchasing a microphone or wireless system, contact the sales team at 847-367-9588 or email at sales@tcfurlong.com.


For more technical tips, sign-up for our email newsletter!

by Steve Whittenhall

Live multitrack recording used to be a complicated task, relying on 2- or 3-way splitters and racks of mic preamps and A/D converters.  With the advent of digital mixing consoles and digital audio networking protocols (like Dante), much of this process has been simplified. 

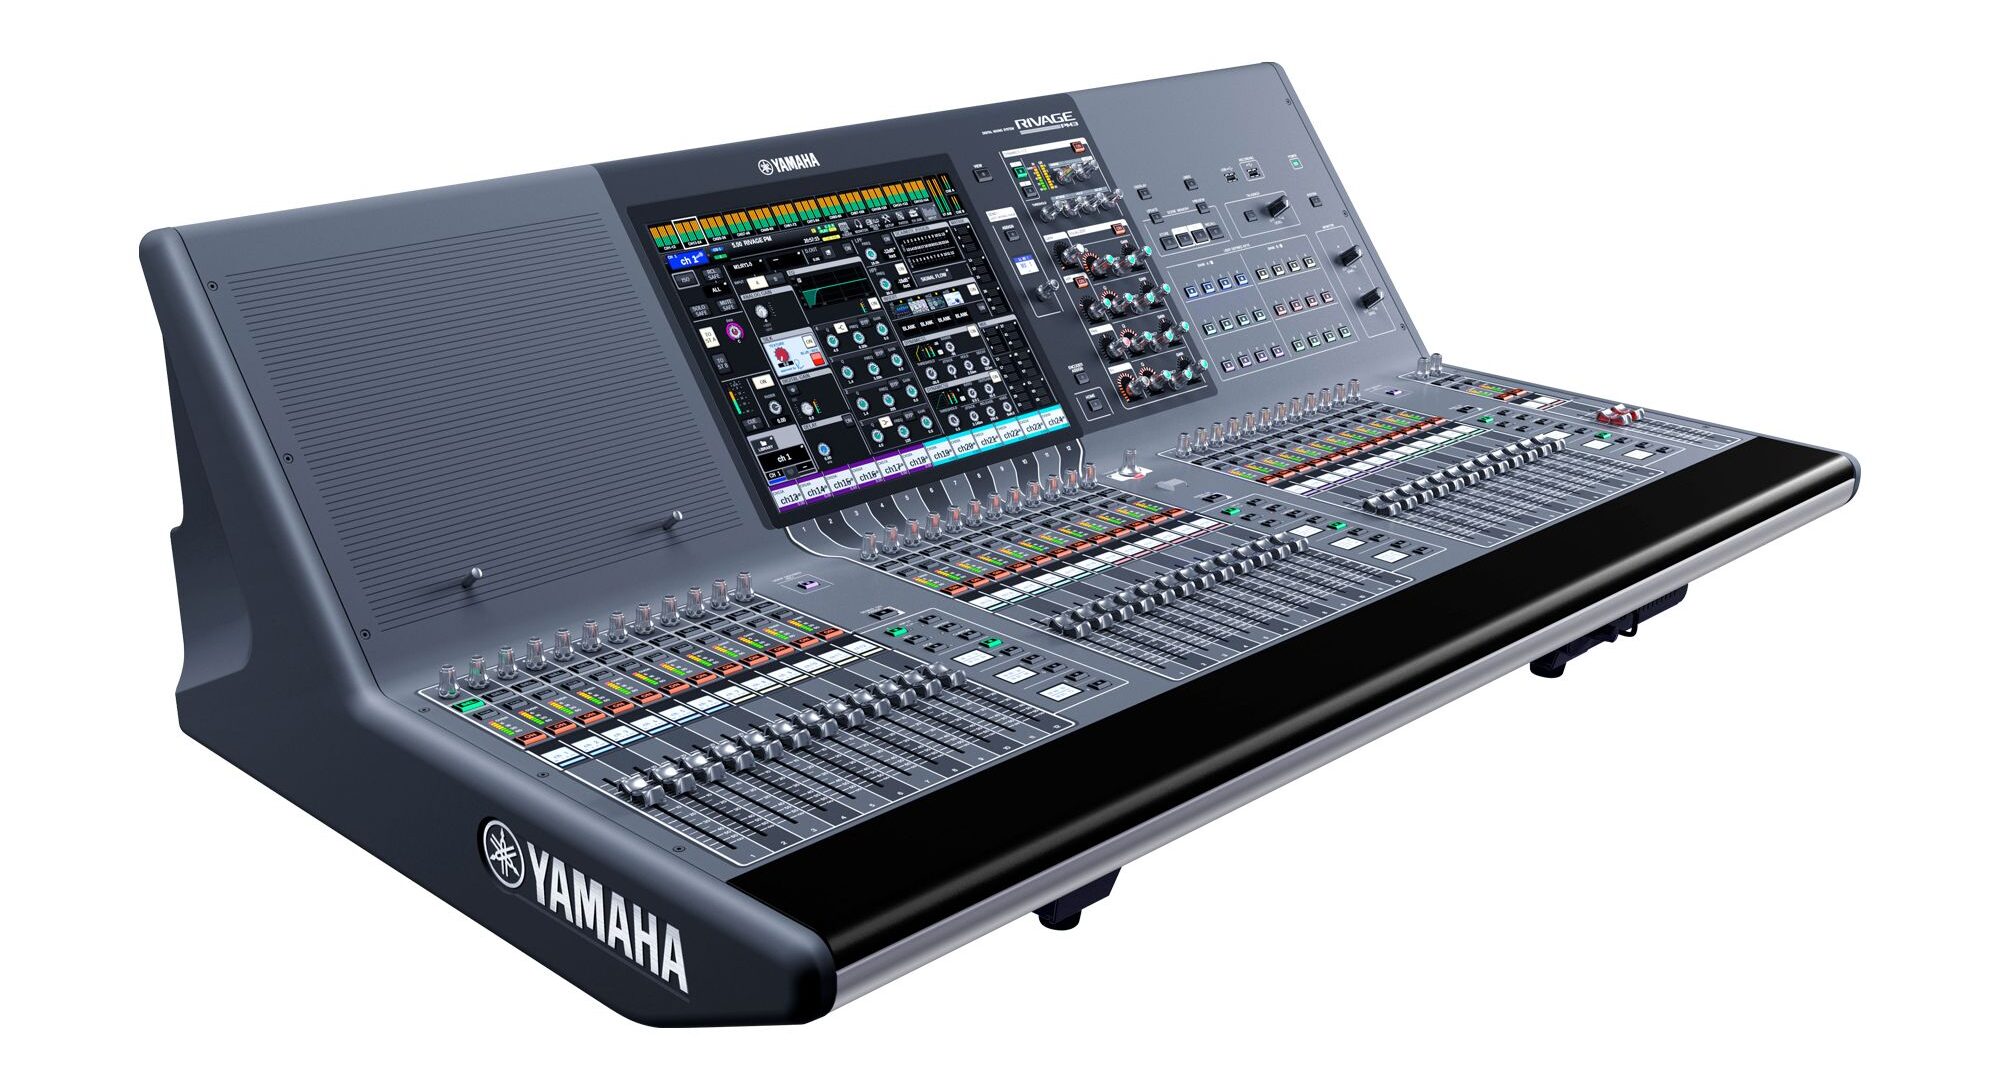
Yamaha CL and QL series consoles have the capability of integrating with the Steinburg Nuendo Live software.  Although the software connects directly to your existing Dante network, the setup is not intuitive.  Here, we will lead you through the basic steps for connecting a Yamaha CL/QL console, RIO inputs, and Nuendo software for a live, multitrack recording setup.

While instructions vary slightly depending on which operating system you are using (Windows or Mac), both will require the same four pieces of software:

  • Dante Virtual Sound Card
  • Dante Controller *
  • Yamaha Console Extension
  • Nuendo Live V1.0 (with security dongle)

* NOTE: This is not a lesson on Dante set-up and Dante Controller.  This tutorial assumes you are familiar with that.

Dante Virtual Soundcard

We will start by getting the Dante Virtual Sound Card (DVS) initiated. When you start up DVS you will get this screen:

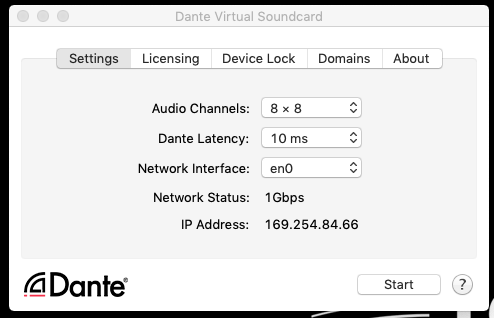
For the most part, you don’t need to change anything except for the Audio Channels. We recommend just doing the minimum that you need.  In this example, we are using 32×32.

Once you have selected the channel count, hit “Start”. You can now close or minimize this window.  DVS will continue to run in the background.

Dante Controller

In Dante Controller, be sure to subscribe (check mark) so that the inputs from the RIO (transmitters) are going to the Dante channels of your DVS Computer (Receivers).  You can also record the direct outs of the console.  Just be sure to turn those on!  But usually you will want to record directly off of the pre-amps of the RIO.

CL/QL Integration

In order to allow the channel names and colors to transfer over to Nuendo, you will need to connect the computer to the Nuendo Live recording module on the CL/QL.  This is why you need the Yamaha Console Extension installed on the computer.

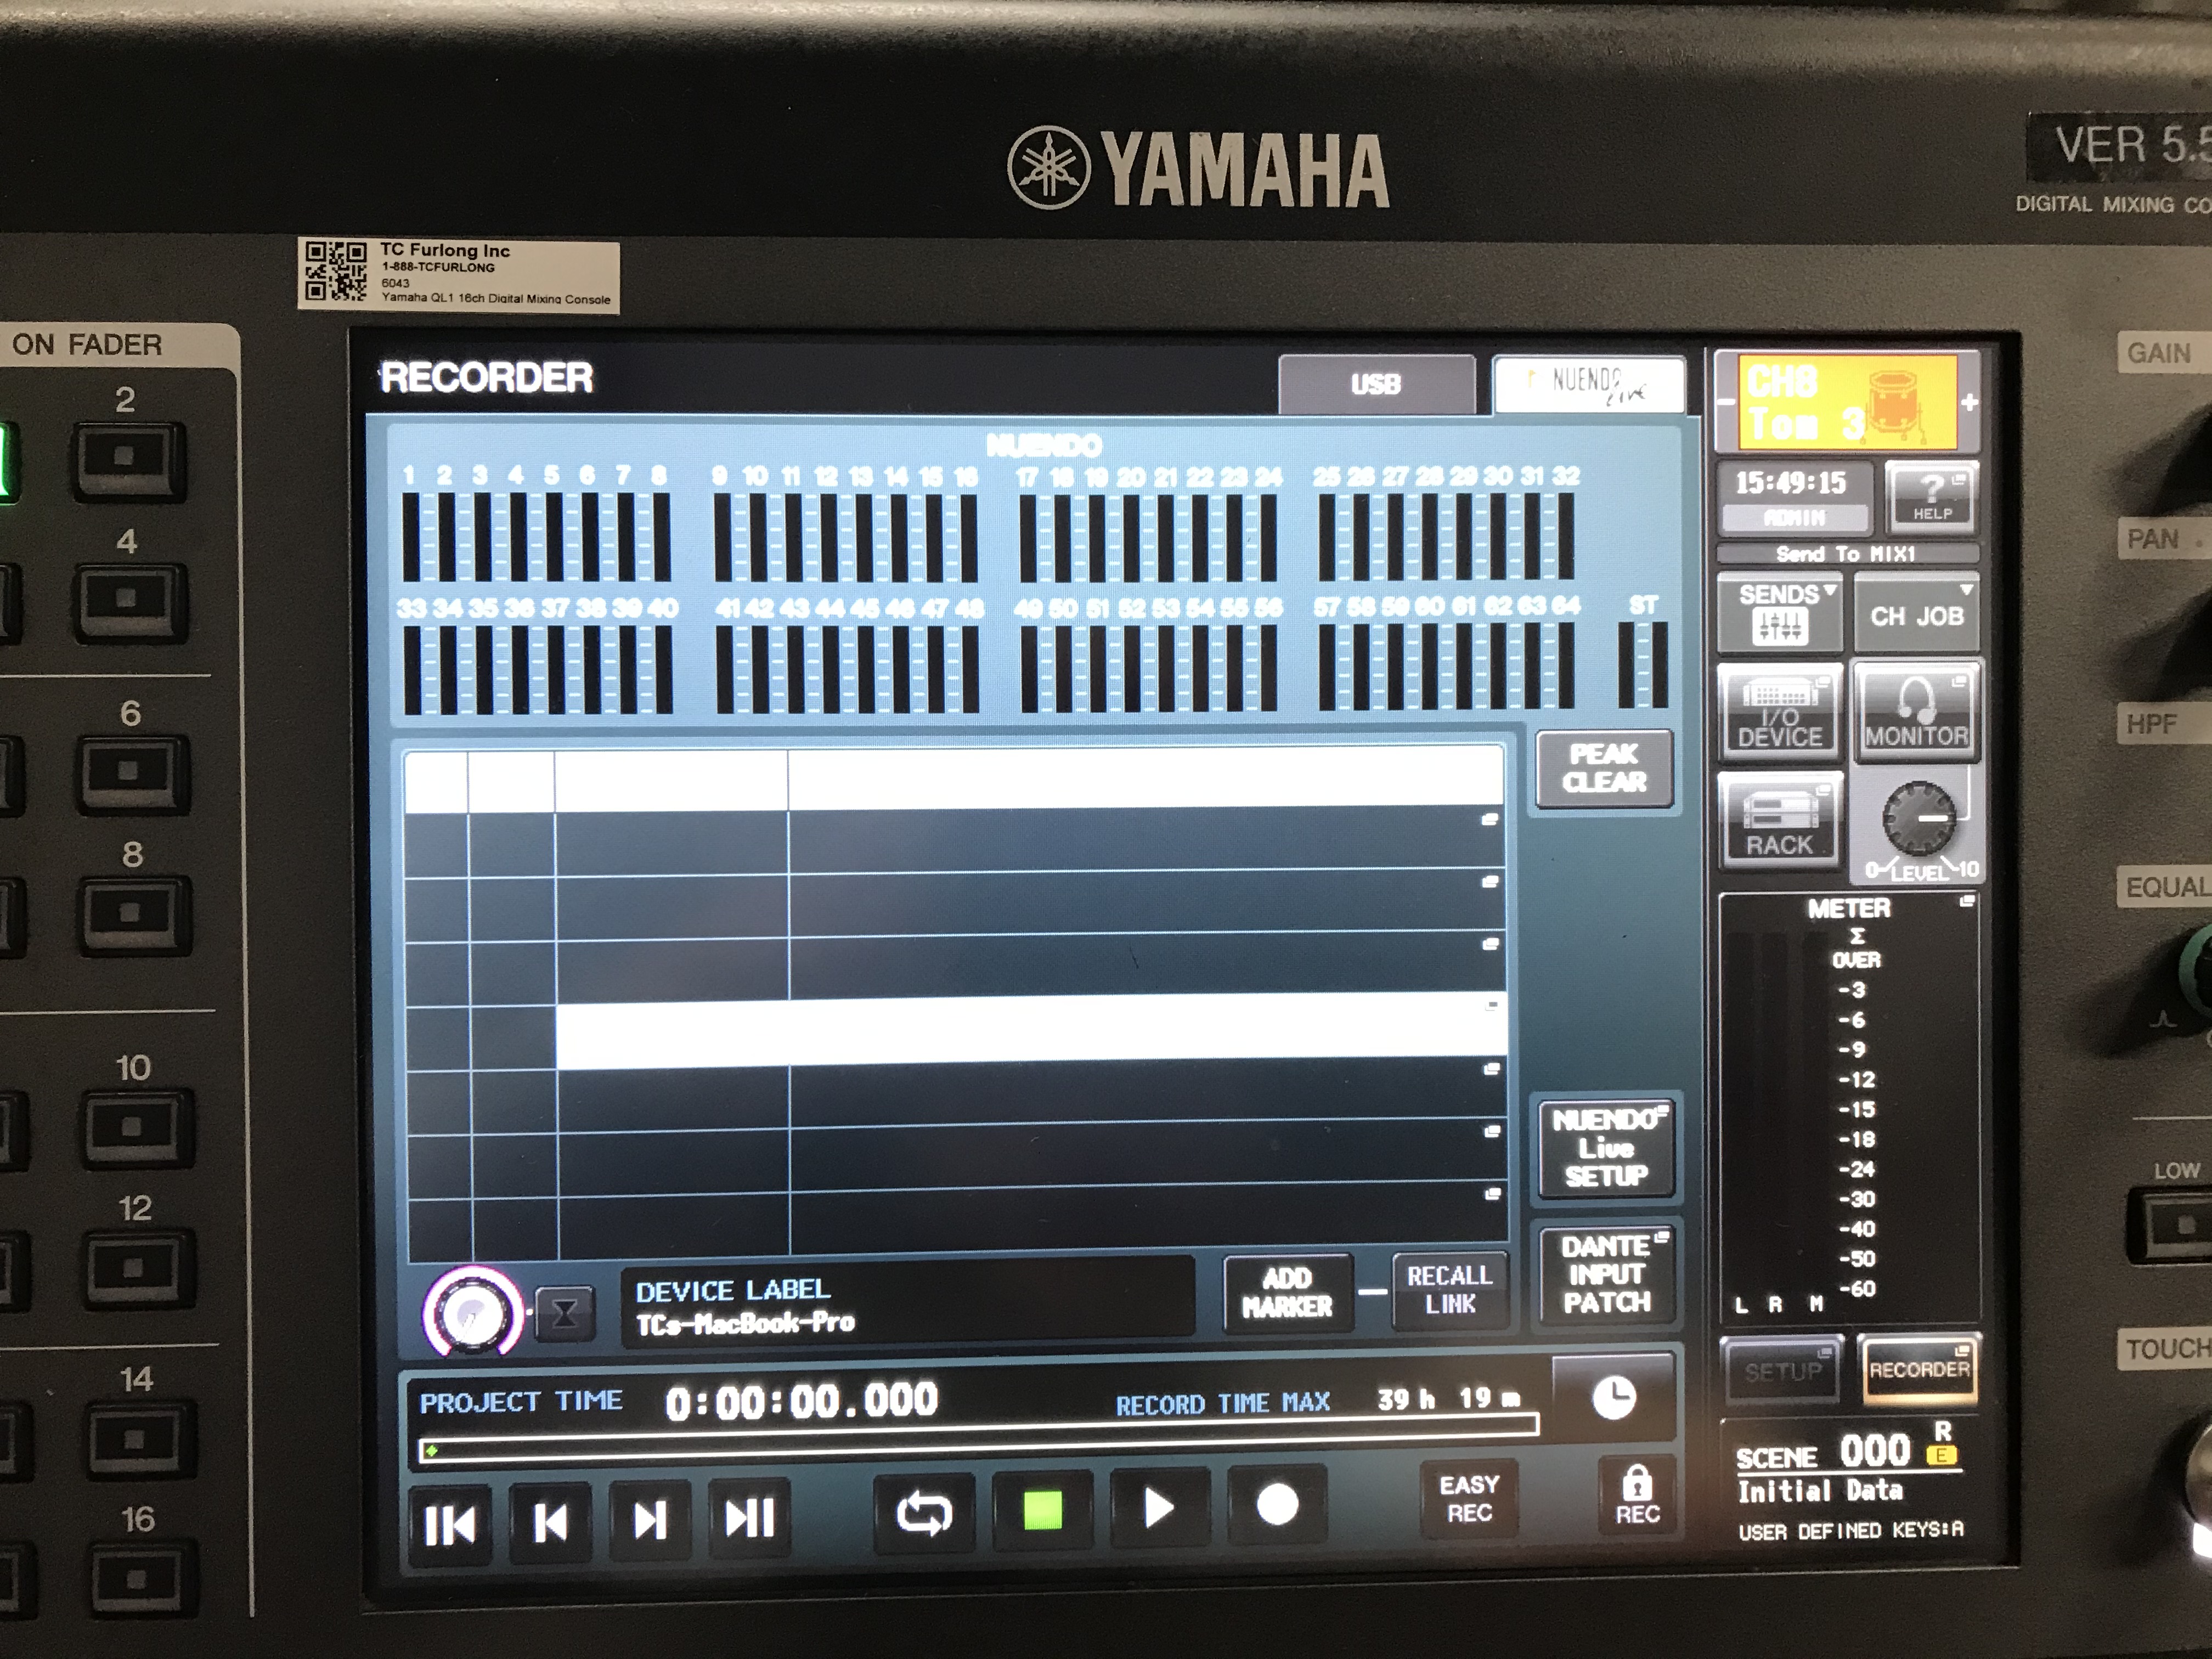
On the console, below the metering section on the right-hand side of the screen, click “RECORDER”. On the top right of the screen you will see 2 tabs.  Select the “NUENDO LIVE”   The screen should like this:

Next, select the “NUENDO LIVE SETUP” This will bring up this screen:

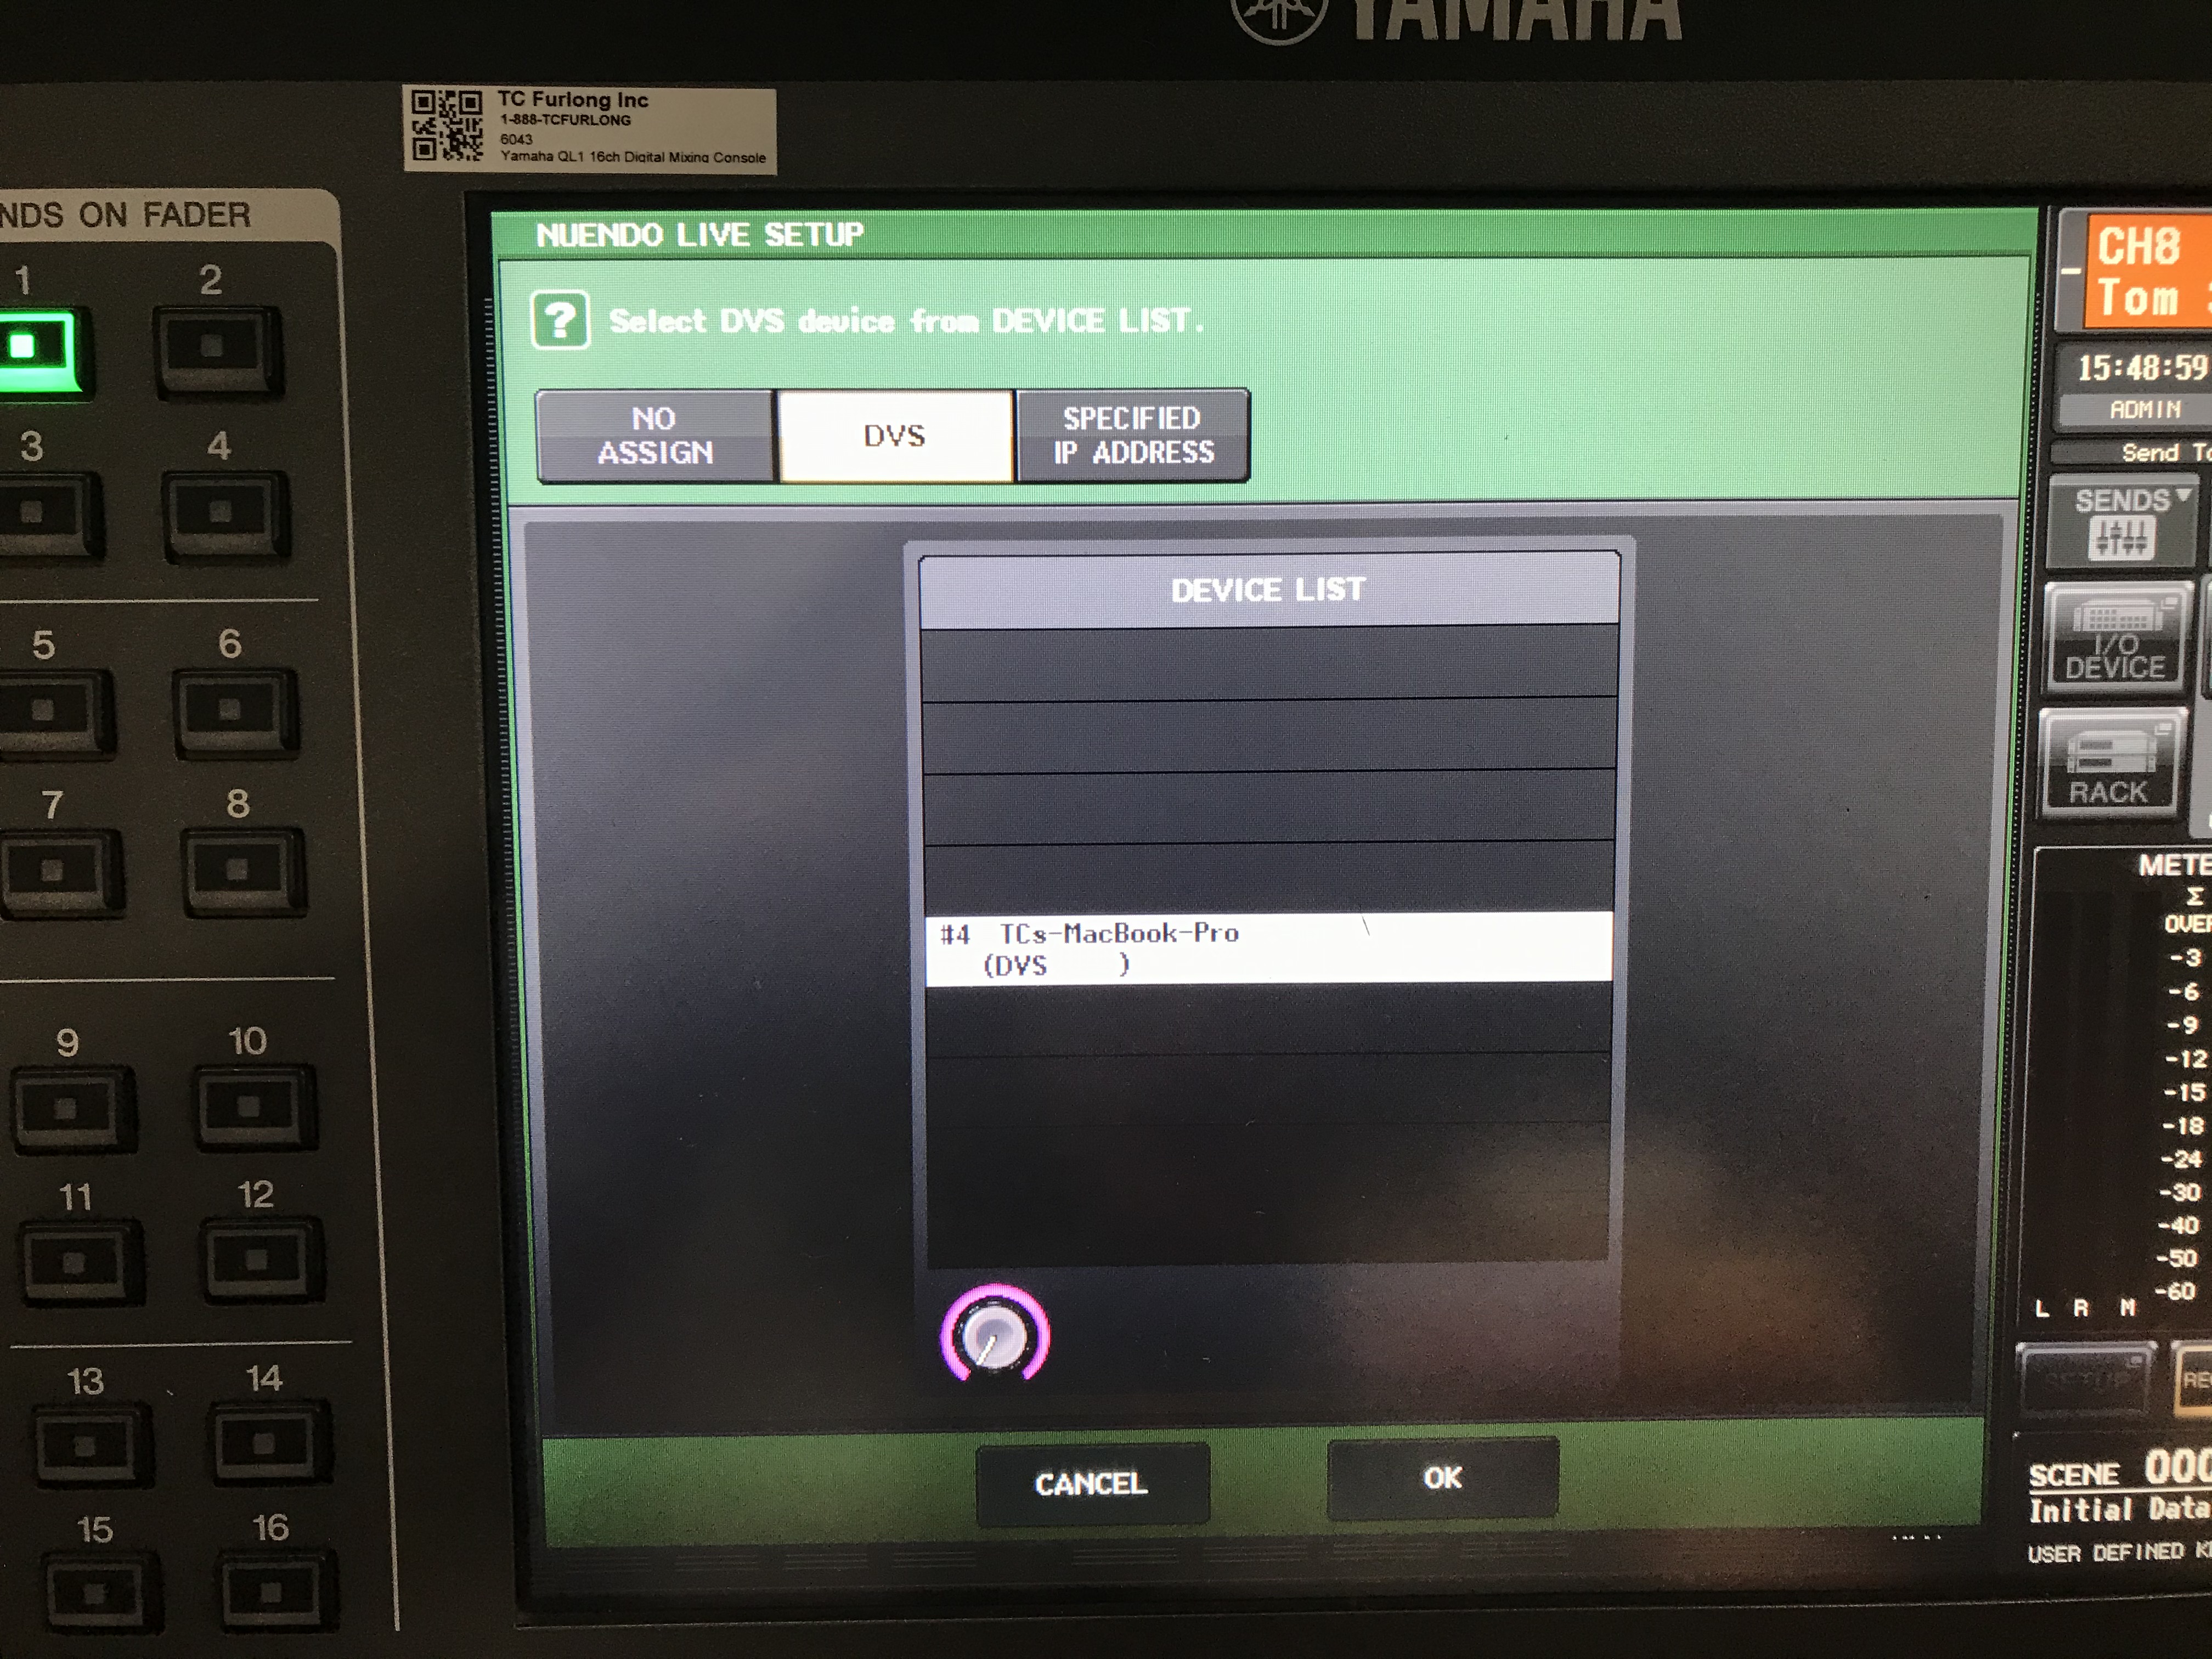
On the top, select “DVS”. If your computer is configured correctly for Dante and mounted as a device on your Dante network, you should see it displayed here.  Select your computer and click “OK”.

Nuendo Live

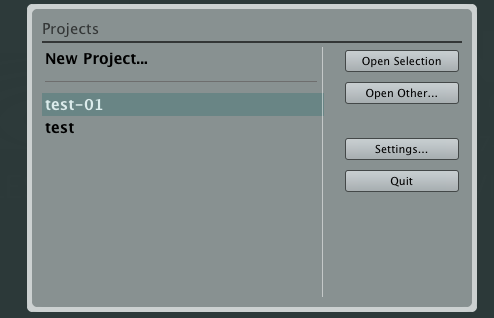
When you launch Nuendo, it will ask you to select a new project or open an existing one. For this tutorial, click “New Project…”.

When that opens, you can click on the gear icon in the upper left-hand corner to get to the settings.

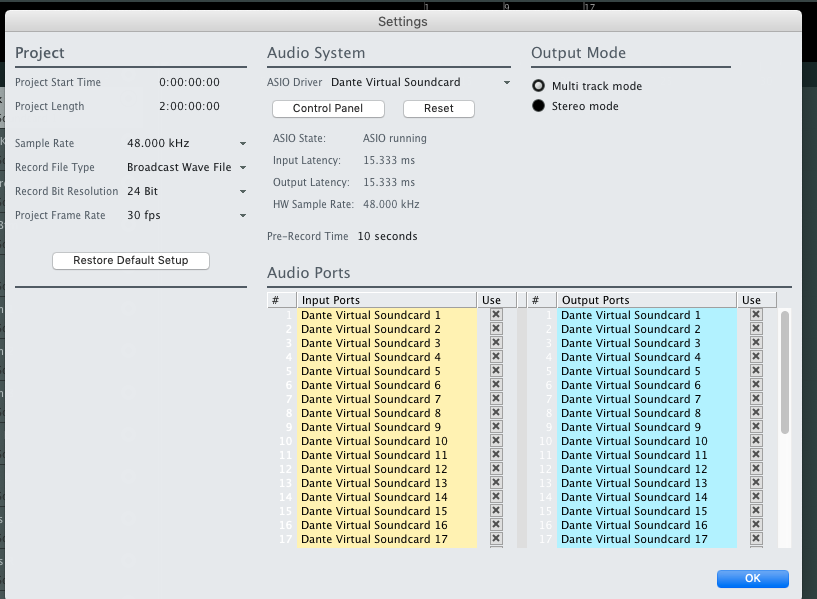
You will want to be sure that the ASIO driver selected under the Audio Systems header is the Dante Virtual Soundcard. We typically leave all the settings as default. (48kHz/24bit).  If everything went as planned, you should see the screen above.  Hit “OK”.

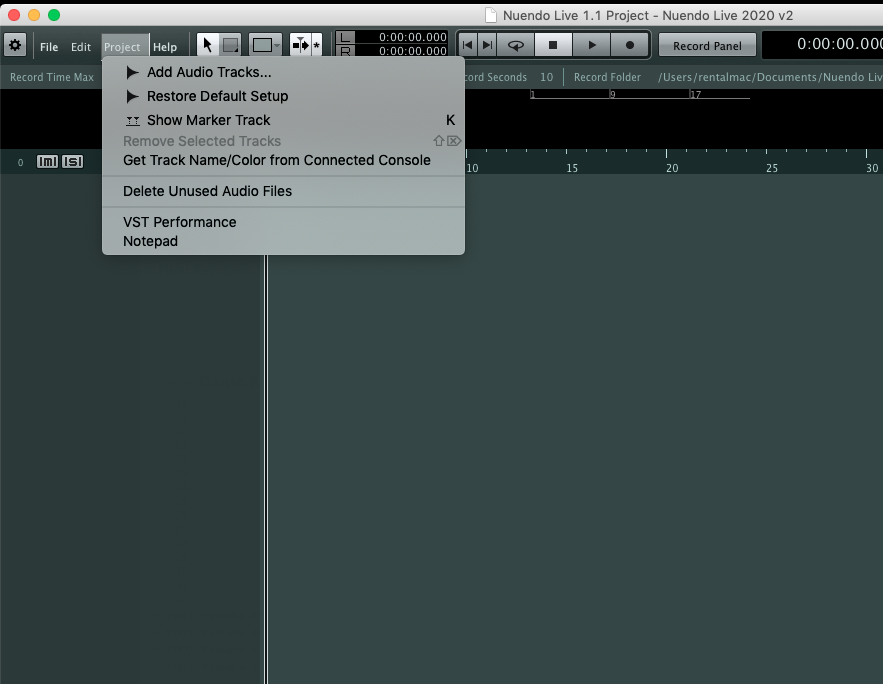
Now from the “Project” menu, select “Add Audio Tracks…”

This is where you can select how many recording tracks you would like.

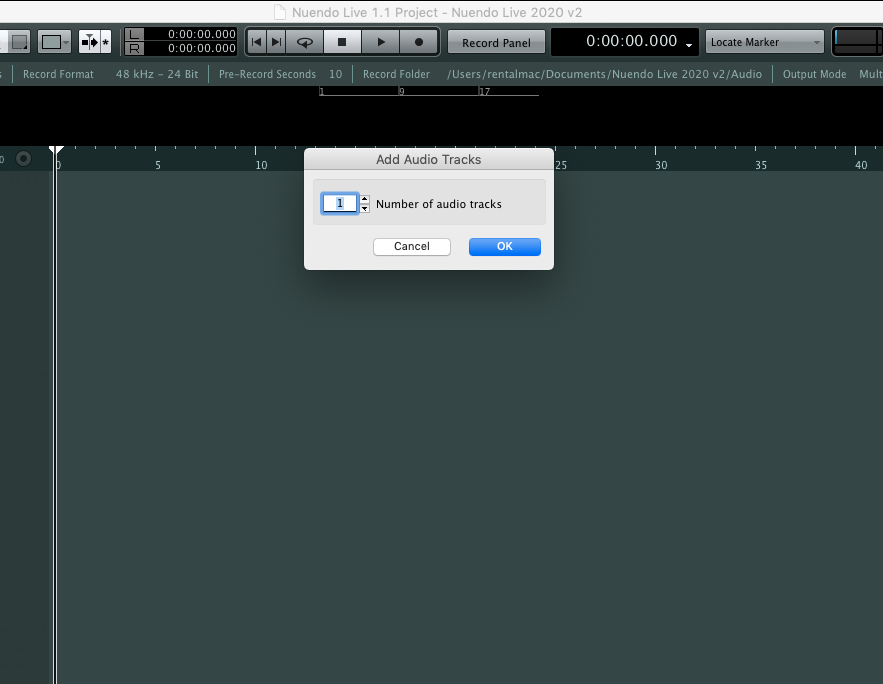
Select the number you need. In this example, I made 22 tracks.  Then click “OK”.

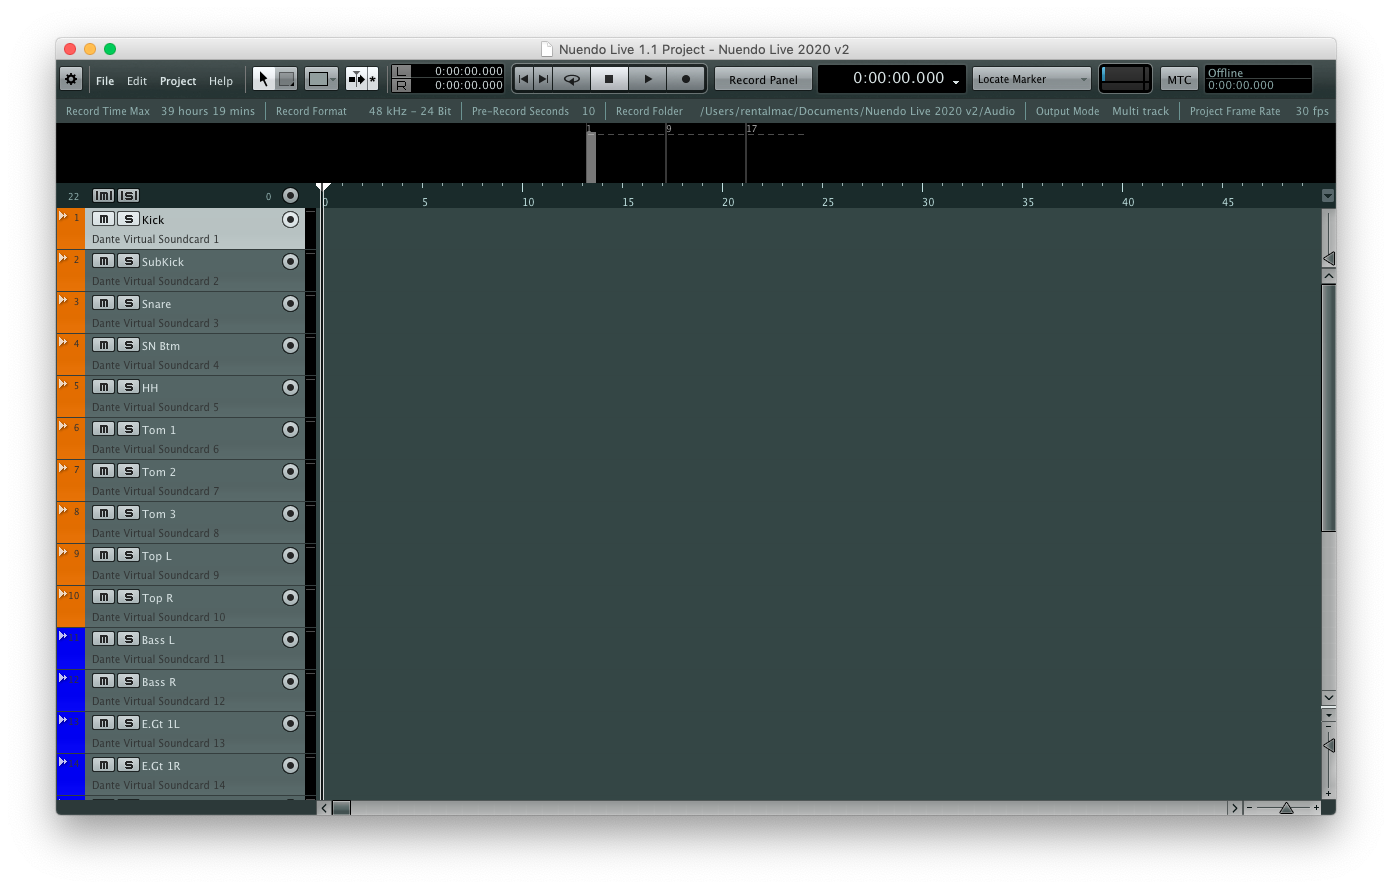
Next, under the “Project” menu again, select the “Get Track Name/Color from Connected Console”.

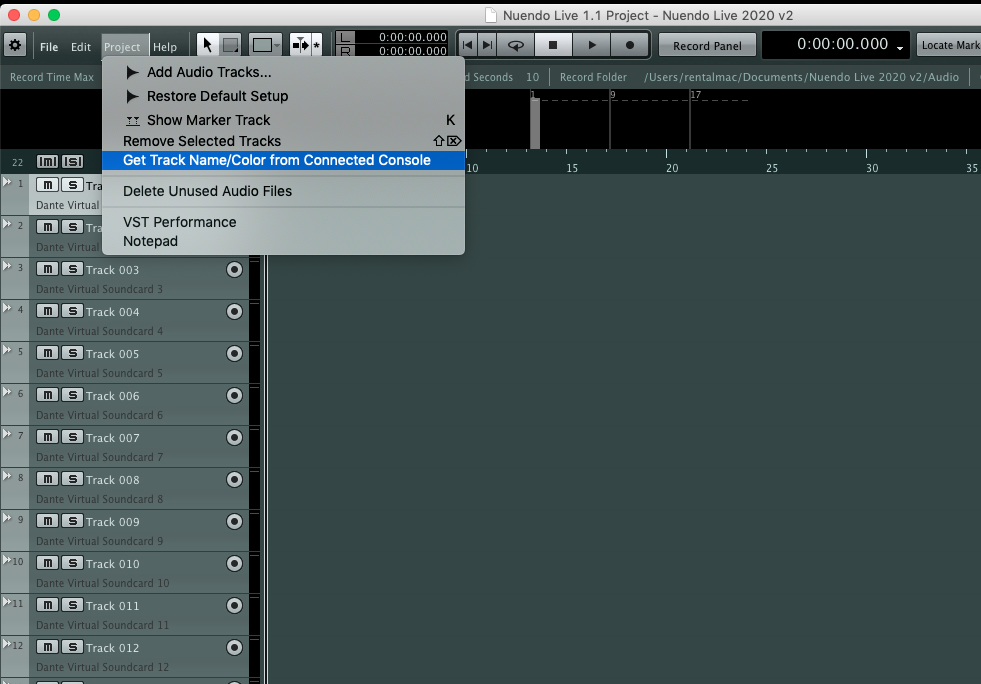
Now, if you have labeled your console with color ID tags and channel names before this step, they should all be populated now into your Nuendo Live project!

Now hit the record button!

Trouble-shooting (Mac)

If you have followed all the instruction and you still don’t have audio being recorded on your computer, try the following steps.

On your Mac: Go to System Preferences.  Go to “Security and Privacy”. From there on the last tab, select “Privacy”.

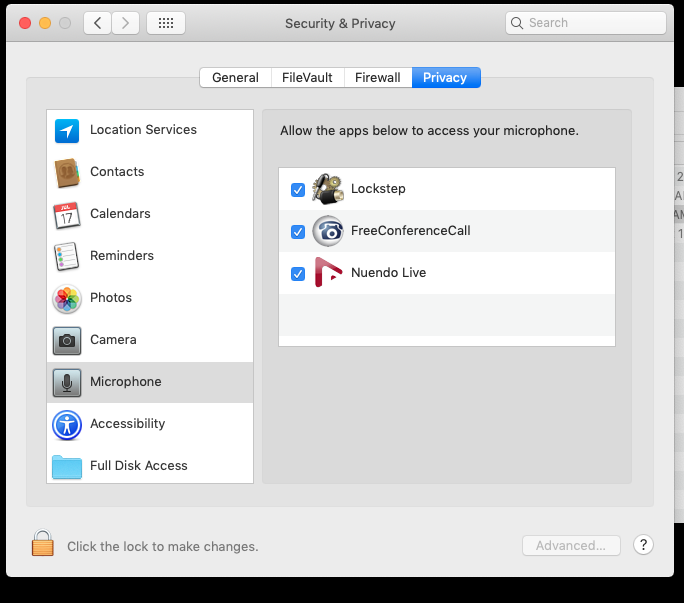
In the menu on the left, select “Microphone”. Make sure that Nuendo Live is checked to allow. 

This is a strange step to remember since you may think it only applies to the built-in microphone of your computer, but it does matter!  Now hopefully you are recording! 

Yamaha’s CL and QL series are powerful consoles, and we hope these instructions help unleash the full multitrack recording capabilities of the desk.  For any questions about this guide, or help troubleshooting your multitrack setup, call us at 847-367-9588.  If you need assistance after business hours, please contact our 24/7 support line at 800-866-3875.

TC Furlong Inc. is an authorized dealer of Yamaha commercial products (including CL/QL consoles and Nuendo) contact our sales team sales@tcfurlong.com. We also maintain a fleet of Yamaha consoles, I/O devices, and interconnect in our well-maintained rental inventory. For a rental quote, contact our rental team at rentals@tcfurlong.com.